Nvidia Control Panel – What can it fix?
If you are having issues with your Gaming Pc such as Low Frame rates
Game lag or Game Stuttering, then this video should help. By following this video and optimizing the Nvidia control panel you can do the following.
- Increase your Frames rates.
- Fix Game Stuttering
- Increase power
- Optimise Nvidia GPU
- Best colour settings and brightness for games
- Smooth out your gameplay
As mentioned this video is for Nvidia GPU, If you have an AMD GPU I plan to do video for AMD as well so make sure you hit the subscribe button.
Nvidia Control Panel – Config
Alright first step is to open your Nvidia control panel. You can do this by right clicking the Desktop and selecting Nvidia control panel.
If you cant find it there try looking in the bottom right hand corner of your screen near the time. If you still cant find it, check what GPU you have installed by right clicking the start button and selecting Device Manager.
Under Display adapters you can check what Nvidia GPU you have and download the driver for it.
Download your GPU drivers – Nvidia.com
Head over to nvidia.com and download your driver or you can download the GeForce Experience software and I will leave links to those pages in the description below.
In the Nvidia control panel go to Adjust image settings with preview. Click on use 3D image settings and click Apply.
Next up click on Manage 3D settings and make sure you are on the Global Settings Tab. These settings will apply globally you can change these at any time or click restore if you want to set settings back to defaults.
- Set Ambient Occlusion to Off
- Anisotropic filtering to Off
- Antialiasing to Off
- Leave Gamma correction On
- Antialiasing – Mode Off
Antialiasing on or off?
Don’t worry you can still turn Antialiasing on in Game. Also if the options aren’t the same as this video just change the options that are the same.
- CUDA -GPUS Should be set to all.
- DSR Factors should be off.
- With Maximum pre rendered frames set this to 1, if you have an older pc you can try setting this to 2 or 3. But if you have a newer PC set this to 1.Multi-Frame Sampled AA set to Off. Open GL set to Auto.
- Power Management Mode set this to Prefer Maximum Performance.
- Preferred Refresh rate set it to Highest Available.
- Shader Cache set to On.
- Turn on – Texture Filtering – Anisotropic
- Texture Filtering – Negative LOD Bias set to Allow
- Texture Filtering – Quality set to High Performance
- Threaded Optimisation you can set to Auto, however if you play games like PUBG, FORTNIGHT and Battlefield which are quite demanding. You can set this to On.
- Triple buffering set to Off
- Vertical sync to Off
- Last setting Virtual Reality pre-rendered frames set this to the same value as Maximum pre rendered frames.
Once you are done make sure you click Apply. Once you have set this go ahead and click Apply.
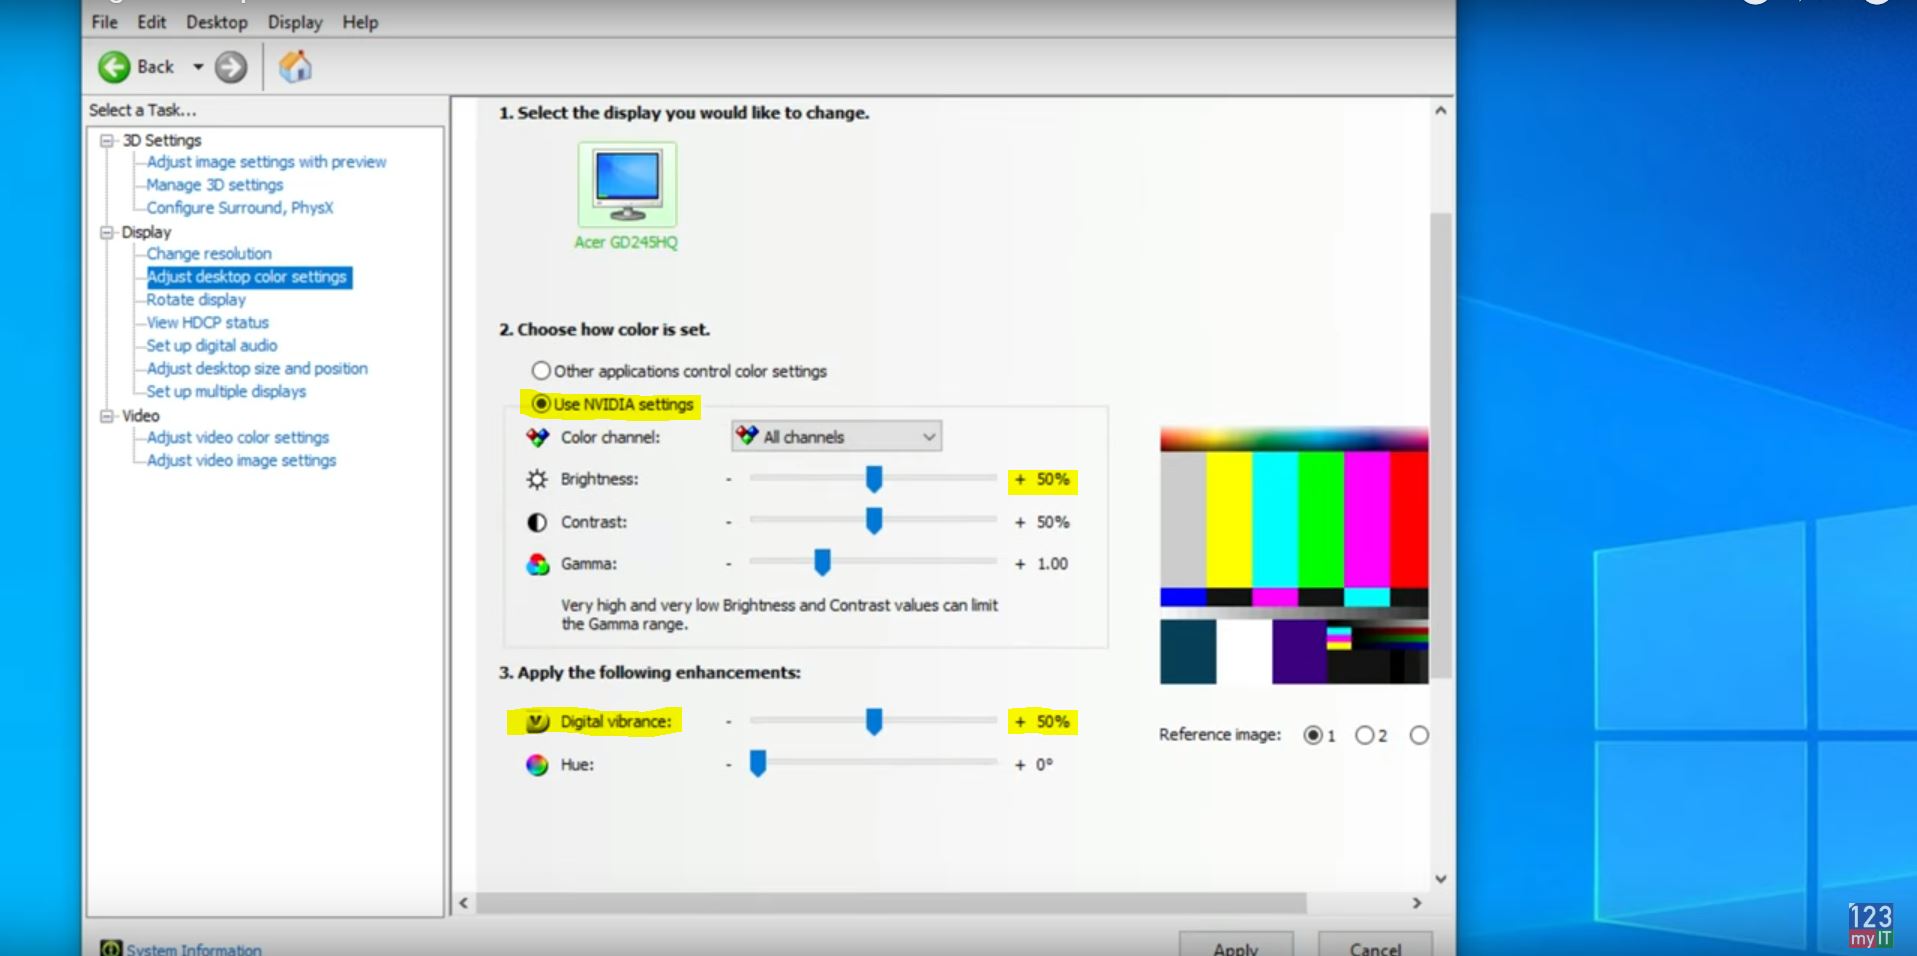
Next up go back to the left hand side and click on Adjust desktop colour settings.
Select the Use Nvidia Settings on the right.
Click Apply then click Yes.
PRO TIP!
Heres a little secret. If you play first person shooters you have just made the colours much better than the default ones by selecting Use Nvidia settings. Also if you scroll down to the Digital vibrance slider its default settings is 50%. If you slide this upto 80% suddenly the dark areas of your game will become much brighter. This will allow you to see your emimenes in game before they see you. This really helped me allot in PUBG.
Best image and colour settings
Click Apply and then go to the Adjust video colour settings.
Next up select the with the Nvidia settings. Click onthe Advanced tab.
In the Dynamic range drop down menu select Full. Next click Apply this should allow you to see better colours when watching videos.
Next go to the Adjust video image settings.
In here you can also use the Nvidia settings and change these however you like. These last two settings only change video and image settings outside of Games and they wont effect Gaming performance.
Another point to mention is, if you update your Nvidia driver, make sure you come back to this video and check that the driver update hasnt reset your Nvidia control panel settings back to defaults. And lastly I get asked allot of questions about customising Windows 10 and AMD settings I will do a few more videos on this topic so do me a favor. Hit the subscribe button and smash the bell icon.