Transfer Data Android to Android 2020

Hi Guys and welcome to 123myit. In this video, we will show you how to Transfer data from Android to Android in 2020. Ok Guys If you are transferring data from any Android device to Samsung then you will be able to transfer Calls, Contacts, Messages, Calendar, Apps, Photos, Videos, Music and Documents. IF you transferred from Samsung to other devices, you will be able to transfer Contacts, Calendar, Photos and Videos.

Getting Started – Transfer Data Android

First up we are going to transfer data from my Oppo Phone to my Samsung phone and we are going to use an app called Smart Switch. Most Samsung phones will have the smart switch app already installed under Settings > Accounts and backup. But if you cant find it on your device you can download it from the Google play store.

I already have it installed so I am going to tap open and do the same on your other Android device. Tap agree and then allow. This will give the phone access to your files so it can transfer the data. Tap lets go and then tap Wireless. Make sure both devices are on the same WIFI network. Tap receive data, Tap from Android and then tap Wireless.

android to android
Get Connected Moving your data on Android

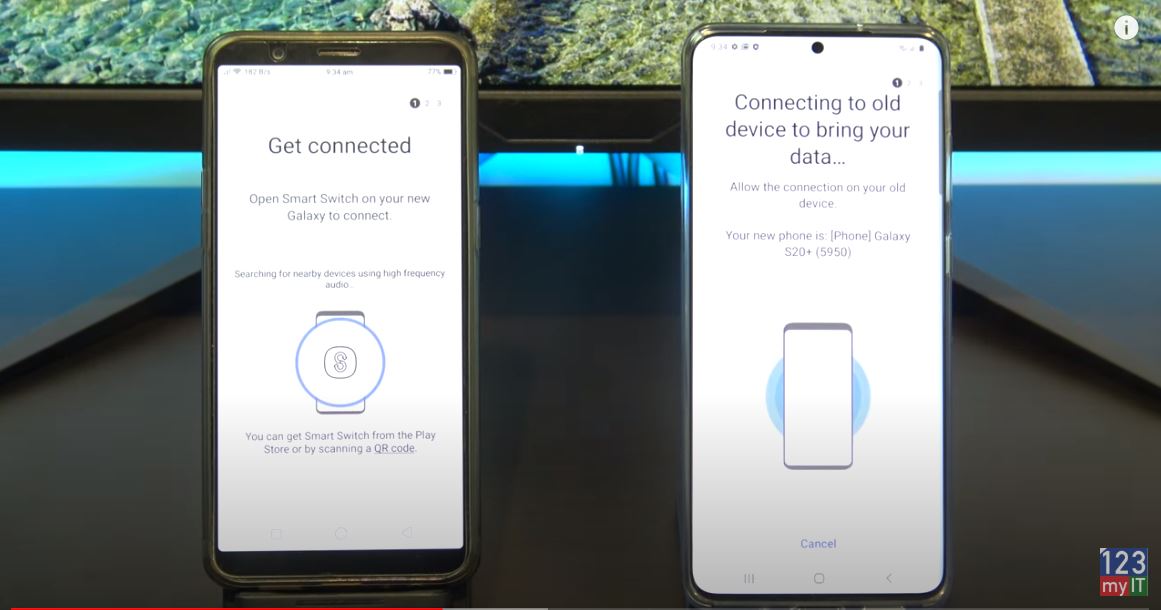
If all is going well you should see a pop up to allow access on your other phone. Just tap accept or allow. Your devices should then work out what data it can copy across. Alright choose what to bring, just deselect anything you don’t want to copy across. If you scroll down you should also get an SD card option.

Select what you want to Transfer

I am going to deselect everything and only copy across my Calls and Contacts. Once you are done tap transfer. Awesome all your stuff is copied across now. Alright lets go back the other way now. We are going to use an app called Copy my Data. You can download it from the Google play Store. I have already downloaded it so I will just start the app. Download and start the app on your other device. Tap next on both devices. Tap to or from another device over WIFI. Select your device then select copy data to selected devices. Add in the pin number. Then tap next. Deselect any of your data you don’t want to copy across. I just want my calendar and then tap next. Just tap allow on your other device. Congratulation you have just copied your data between two Android devices.

Also guys don’t forget to check out my other videos such Change Bixby side button on Samsung. And do me a favour if you know anyone who might need this video please share it will them, hit the subscribe button and smash the bell icon.

Make your Phone Number Private on Android in 2020

Copy Data iPhone to Android with iCloud 2020

Change Bixby Side Button on Samsung

Hi guys and welcome to 123myIT. In this video, we will show you to change the function of the side button on your Samsung Galaxy S20. Helpful if you want to change Bixby side button.

If you are annoyed, with the side being set to Bixby then this video will help you change it. By default the side button on your Samsung S20 and other models is set to Bixby. So lets change it.

How to change it? – change Bixby side button

To change Bixby side button go into Settings and scroll down to advanced features. And tap side key up the top. These are your side key settings. If you want to be able to double press the side key you can turn it off by toggling the button at the top. Otherwise if its turns on you have the option of Quick launch, camera, Open Bixby and Open app. Open app can be pretty handy if you want to choose an app to quick launch. For example Google Chrome to start web browsing. If you look below that you have the Press and hold menu. This is where you can change that annoying Bixby button, as you can see I have changed mine already from Bixby to Power off Menu.

change bixby side button
The Bixby side button options.

Side button defaults

However by default yours will be set to Wake Bixby so tap Power off Menu instead and let go ahead and test it. There you go it works now. The side button has now been set back to a Power Off button.

Let try setting Google Chrome on the double press option. Awesome that works as well! Ok if you want to set it back to Bixby here’s how.

Also guys don’t forget to check out my other videos such as Make your phone number private on Android. And do me a favour if you know anyone who might need this video please share it will them, hit the subscribe button and smash the bell icon.

Copy Data iPhone to Android with iCloud 2020

Everything iPhone SE in 3 Minutes

Make your Phone Number Private on Android in 2020

Hi Guys and welcome to 123myit. In this video we will show you how to make your phone number private on Android in 2020. Ok Guys if you want to call someone’s phone but you don’t want your number to display on their phone then this video will help. There is a few ways you can hide your number so let’s get started.

If you just want to hide your number on a single call. The you can dial a prefix before your dial then number. So for example my prefix in Australia is #31# and then the phone number I am calling. Remember this is for a single call so you would have to type your prefix every time. As always test this to another phone before you make that important call.

Private number on Android
Prefix to hide your numbers.

Make your number Private on Android

If you want to make your phone private on all calls then tap on phone and then tap the three dots. If you don’t have the three dots. Just go into the Settings Then Call Settings on your Phone. On my Samsung I tap on Supplementary services and then show caller id and then hide number. Other Android phones might be different. You might have Operator’s Call Settings, Additional Settings, and Owner number. If you can’t find it there then try one of these other locations for different Android phones. Ok before we call that crazy person lets test it to another phone to make sure its hidden.

Please always test the number before calling. Don’ take my word for it. Type *67. This code will work with virtually any North American provider.

Numbers to use – Test them first ! 🙂

*67 – United States (except AT&T), Canada (landline), New Zealand (Vodafone phones) #31# – United States (AT&T phones), Australia (mobile)[3], Albania, Argentina (mobile), Bulgaria (mobile), Denmark, Canada (mobile), France, Germany (some mobile providers), Greece (mobile), India (only after network unlock), Israel (mobile), Italy (mobile), Netherlands (KPN phones), South Africa (mobile), Spain (mobile), Sweden, Switzerland (mobile)

*31# – Argentina (landline), Germany, Switzerland (landline) 1831 – Australia (landline)[4] 3651 – France (landline)

*31* – Greece (landline), Iceland, Netherlands (most carriers), Romania, South Africa (Telkom phones) 133 – Hong Kong

*43 – Israel (landline)

*67# – Italy (landline) 184 – Japan 0197 – New Zealand (Telecom or Spark phones) 1167 – Rotary phones in North America

*9# – Nepal (NTC prepaid/postpaid phones only)

*32# – Pakistan (PTCL phones)

*23 or *23# – South Korea 067 – Spain (landline) 141 – United Kingdom, Republic of Ireland If your phone is on a GSM network (e.g., most Androids), you can always dial #31# to block your caller ID.

Awesome its working your number is coming up as No Caller ID or it will Show as private number.

Also guys don’t forget to check out my other videos such Copy Data iPhone to Android with iCloud 2020. And do me a favour if you know anyone who might need this video please share it will them, hit the subscribe button and smash the bell icon.

Everything iPhone SE in 3 Minutes

Fix Mac by Resetting NVRAM PRAM