Copy Data iPhone to Android with iCloud 2020

Hi guys and welcome to 123myIT. In this video, we will show you how to Copy data from iPhone to Android with iCloud 2020. Ok Guys so we are going to copy the data from your iPhone to iCloud and then download that data to your Android device. This will copy data such as Contacts, Messages, Free apps, Photos, Videos and Documents. We will use WIFI so make sure both devices are on WIFI.

This video & article will help you copy data iPhone to Android via iCloud in 2020.
Choose what you can copy.

Also this should with most Android phones, the process will be simular but you might have to work out which copy software to use. Ok let us start.

On your iPhone go into settings scroll to the top and sing into iCloud with your Apple id.

Sign into iCloud – Copy data iPhone to Android

Once you are signed into iCloud the next step is to do a Backup to iCloud. To do this tap iCloud and then scroll to the bottom and tap on iCloud Backup. This is where you would tap backup now to start the backup. However before you do this lets go back and select what we want to backup remember you will be copying this to your Android device.

Ok I am going to go in and turn off anything that I don’t want to backup. Ok once finished there is a few more options to turn off.

Things to turn off before you get started.

You need to turn off Turn off two-factor authentication if you have that turned on. To do this go out of settings and into Safari and browse to appleid.apple.com. Once there sign in with your Apple ID and password. Log into your account tap on Security, then scroll to the bottom, and turn off two-factor authentication. As you can see, I do not have it turned on.

The next step is to Turn off find my iPhone. This is helpful if you want to sell your iPhone afterwards. Go Back into settings, Tap Apple ID and then tap on Find my. Find my iPhone is turn on tap to turn it off. Enter your apple id and then turn it off.

The last step is to Turn off iMessages. This will stop your phone number from being linked to your Apple ID. Tap on find my, tap on Apple ID, tap on Settings. Scroll down and find messages. And then just toggle off iMessages. Go back into settings and back into iCloud again. Tap iCloud. Again go down to iCloud backup. Tap backup now to start the iCloud backup. Depending on how much data you have this might take a while. Head over to your Android device and start up the restore software. This is a Samsung S20 so the software is called Smart switch.

Smart Switch App

You can find it in the menu or if you are on other Android devices look under Settings and then Accounts and Backup or the Backup area of your Android device. Always Tap update.

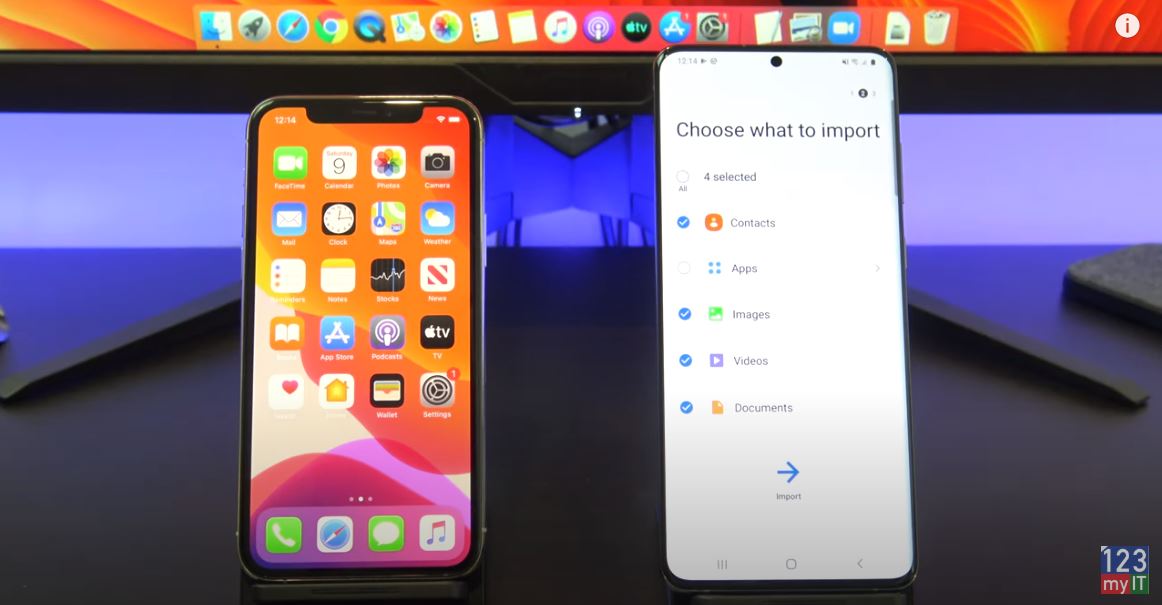
Tap on Receive data and then Tap iPhone since we want receive the Data from the iPhone. You want to connect wirelessly to iCloud. The backup has finished on the iPhone now so you can close out of it. Tap done to log into your iCloud on your Android device.

Awesome it should now show you a list of data that you can copy across to your Android device. Just deselect anything that you don’t want. Great it will give you other options to copy data to your Android device. Tap next down the bottom. Its give you a warning about turning off iMessage which we already did. And then tap go to the Home screen and check if you data copied across by going into your Android device.

Guys, don’t forget to check out my other videos such as Everything iPhone SE in 3 Minutes. Also do me a favour if you know anyone who might like this video please share it will them, hit the subscribe button and smash the bell icon.

Fix Mac by Resetting NVRAM PRAM

How to join a Zoom Meeting PC & Mac

Everything iPhone SE in 3 Minutes

iPhone SE 2 🙂

Hi guys and welcome to 123myIT. In this video, we will show you everything you need to know about the iPhone SE in three minutes. The iPhone SE is basically an iPhone 8 with the A13 Bionic processor from the iPhone 11. Pricing for the iPhone SE 2 starts at $399 USD and it comes in three different colours, Black, White and Product Red.

What you get inside the box iPhone SE 2

First up in the box you will find the documentation, Quick start guide, SIM card eject tool, Warranty information and Apple stickers. Next you have the iPhone SE itself. Other accessories are Earpods with lighting connector. Lighting USB cable a five watt USB charger which will take 2 hours and 45 minutes to charge to full. Not to forget that the SE supports wireless charging and is IP67 water and dust resistant.

The SE has a 4.7-inch widescreen LCD multi touch retina HD display with IPS technology. It has a 1334 by 750-pixel resolution at 326 ppi. If you compare it with the iPhone 11 Pro on the left, you can see the Pro has allot more screen real-estate on its 5.8-inch OLED display. In reality though they are almost the same body size with the Pro being 6 mm taller and 4 mm wider and only a mm thicker.

iphone se 2
iPhone 11 Pro and iPhone SE 2 side by side.

No Face Unlock, but you get Touch ID.

There is no face unlock just the all too familiar home button which has the Touch ID fingerprint scanner built in. On the front top of the SE we have a 7 megapixel FaceTime HD camera compared with 12 megapixel on the Pro. Both have a F2.2 aperture. On the back of the SE you have a single 12megapixel Wide camera, however the Pro also has a Triple Camera setup which features a Ultra Wide, Wide and Telephoto cameras.

Don’t worry out of the box the SE will still take amazing photos. Here are some comparisons between the iPhone 11 Pro and iPhone SE. Can you spot the difference?

On the right side you have Sleep Wake power button and SIM card slot. Looking at the left you have the Ring Silent and Volume up and down buttons. On the bottom you have the lighting connector, microphone and stereo speakers.

A13 Processor

The SE has the same A13 processor as the iPhone 11 Pro and here is the benchmark. Single core and Multi core score are almost the so not allot of difference in terms of performance. A fast processor is important when playing games and videos or when generally moving around the iPhone.

Battery life is the same as the iPhone 8 and you can expect about 27 hours between charges. This will get you about 8 hours or streamed video playback.

Guys, don’t forget to check out my other videos such as Fix Mac by Resetting NVRAM. Also do me a favour if you know anyone who might like this video please share it will them, hit the subscribe button and smash the bell icon.

How to join a Zoom Meeting PC & Mac

Install Windows 10 on Mac 2020

Fix Mac by Resetting NVRAM PRAM

Hi guys and welcome to 123myIT. In this video, we will show you how to fix your Mac by resetting NVRAM.

Before we get started, what is NVRAM? NVRAM is a small amount of memory that your Mac uses to store certain settings. Therefore, if you are having issues with Sound Volume, Display Resolution, Start-up disk selection, Time zone and Kernel Panic then resetting NVRAM might help. 

Ok to reset the NVRAM you need to hold down Option, Command, P and R buttons on your keyboard as your Mac restarts.

Resetting NVRAM
Hold down the ALT Command and P R keys will help you in resetting NVRAM.

Go up to the Apple menu and restart your Mac now and you see your Mac restarting. Quickly, hold down the Option, Command, P and R buttons. Because you will hear the first Apple chime continue to hold down the Buttons and you should hear a second Apple chime. Great job the NVRAM has been reset now let go of your buttons now.

You can log back into your Mac and hopefully your issues have been resolved! Other helpful reset videos are fix MacBook Air with T2 chip. The T2 chip is that funny looking power button on some of the Mac computers.

Also guys don’t forget to check out my other videos such as How to join a Zoom Meeting. And do me a favour if you know anyone who might need this video please share it will them, hit the subscribe button and smash the bell icon.

Install Windows 10 on Mac 2020

Copy Music from Android to iPhone, iPad & iPod

How to join a Zoom Meeting PC & Mac

Hi guys and welcome to 123myIT. In this video, we will show you how to join a Zoom meeting.

If you have been asked to join an online Zoom meeting but have no idea how to do that, do not freak out. This video will show you how to do it.

Guys this video will show you how to Join a Zoom meeting, but I will also be doing a video after this one which shows you how to create a Zoom meeting. So please hit that subscribe button.

Setup Zoom on PC and a Mac

I will show you how to do it on Windows first then Mac later in the video. Ok Let’s get started. Open up a web browser and type in Zoom.US.

That will take you to the official zoom website and you should see the Join a meeting link on the top of the web page. If you click on that it will take you to a Join a Meeting page, where is asks you for a meeting ID. Below that you also have an option of joining a meeting from H.323/SIP room. Don’t worry if this doesn’t make much sense to you just pointing this out so you know where to go if you need to connect to this type of meeting.

Ok let us check the meeting invite details that were emailed to us. So if you have been invited to a meeting you will normally have some meeting details sent to you via email. Here I have a copy of that invite which says 123myit is inviting you to a scheduled Zoom Meeting. Topic My meeting and a link which you can use to join a meeting. Go ahead and copy that link and paste it in your browser.

Meeting ID details

Press Enter on your keyboard and the meeting will start. You can also copy and paste the meeting ID directly into the web page or if you have the Zoom app installed you can copy the meeting ID into the Zoom app. And below that you can change your display name. When using the Zoom app you might be prompted for a password copy and paste that to join the meeting.

You might be prompted to download the Zoom app or if you already have it installed you will be prompted to Open Zoom meetings.  You should then see a popup, which says Please wait for the host to start this meeting. As you can see the meeting starts at 12pm but the time now is 11:15am. So we are a bit early. While we are waiting click test Computer Audio. In here you can test to see if your speakers and microphone are working. If you have different speakers and microphones you can change which one you want to use in these settings. For example you might have desktop speaker or headphone.

Join a zoom meeting
Zoom settings important to setup before you start.

Video Settings

If you click on Video you can change you video settings around. So here my webcam is just pointing at my Samsung phone playing a video. If you want you can rotate your video. Under camera if you have more than one camera you can select a different one. Below that you can change the ratio from Widescreen to Original. Enable HD just allows you to up the resolution so that your camera looks less pixelated. Mirror my video flips the video around. This is important if you are reading a book or something and you want to turn the text around the right way for your views to see it. Touch up my appearance makes the video look better.

Virtual Background

Ok click on Virtual background. This allows you to virtually add a background behind you. So if I select the 123myIT logo I can add it behind me. If we untick mirror the logo faces the right way. Note that its not picking up the phone very well. We can fix this by using a green screen. I don’t have a green screen cloth but I can change the LEDs in the background to green. Watch this.

There you go you can see the phone now. Its not perfect but work pretty well on my hand!

Ok the meeting has started. Just select join with computer Audio. The first thing that I recommend doing is turning off your Audio and video in the bottom left until you are ready. Otherwise, you might interrupt the Host if he or she has started speaking. Next up select participants and chat in the bottom, this will allow you to see who is in the meeting and display the group chat if you have a question. 

Webcam

If your not camera shy you can show your video by pressing the Start video button in the bottom left hand corner along with the Unmute button to start speaking. If someone else is speaking its good practice to mute yourself until you want to talk again. Along the bottom you also have a thumbs up and clap reaction which displays on your video. You also have buttons to share your screen and record.

In the top you have gallery view and speaker view buttons. It just changes the view so you can see more participants if you need too.

If you want to make sure you leave a meeting, click the leave meeting button in the bottom right of the screen.

Join a Zoom Meeting on a Mac

Joining a meeting on the Mac is pretty much the same. Go to Zoom.us in the web browser. Click Join a meeting. Copy and paste your meeting id. If its your first time joining a meeting click download and run Zoom app. Press continue and enter your password to install. Paste your meeting ID and change your name if you want and click join. Copy and paste your password.

Congratulation you have joined a Zoom meeting. All the options will be the same as the first part of this video.

Also guys don’t forget to check out my other videos such as Install Windows 10 on a Mac 2020. And do me a favour if you know anyone who might need this video please share it will them, hit the subscribe button and smash the bell icon.

Copy Music from Android to iPhone, iPad & iPod

How to Clean & Disinfect your iPhone & Case