How to create a bootable Windows 8.1 USB

Microsoft has released Windows 8 and 8.1 in digital and physical formats. You can install the new Windows operating system by either downloading the ISO file or by a DVD. But what can you do if none of these options are suitable for your situation? You can create a bootable Windows 8.1 USB drive.

The main benefits to using a bootable Windows 8.1 USB drive is that its compatible with every device that runs Windows. You don’t need to have a DVD drive on your hardware to install it, just a USB port. Its easier to store and carry and installs times are much faster than a DVD.

So what do you need to set up the USB?

You will need the following to create a Windows 8.1 USB drive:
* A 4GB USB drive or larger;
* Windows 8.1 ISO file or DVD, you can download an ISO file from the downloads section of 123myIT website here.
* Any device that can run Windows.
* Windows product key. You can find it on the 123myIT Downloads page here.

I already have a Windows 8 Product Key, can I update it?
The answer is yes. If you own Windows 8 or Windows 8.1, you can download and install Windows by using your product key. Click here.

How do I create the Windows 8.1 USB drive from a DVD or ISO file?
After downloading the Windows 8.1 ISO follow the steps below.
1. Insert your 4GB USB drive.
2. Open the Command Prompt by pressing Windows Key + R and type “cmd” of go to Start Run and type “cmd”.
3. In the black command windows type “diskpart” and this will open the partitioning software, so that you can start to format the USB drive.
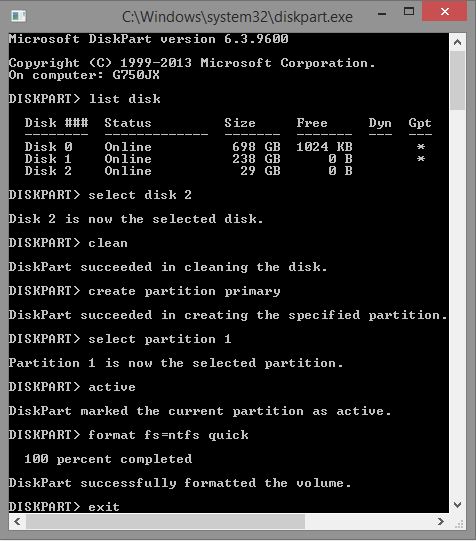
4. Run the following commands.
* DISKPART> list disk
“list disk shows all of the active disks on your computer”
* DISKPART> select disk #
“# represents the number for your USB flash drive”
* DISKPART> clean
“deletes any existing partitions on the USB flash drive”
* DISKPART> create partition primary
“creates a primary partition on the USB flash drive”
* DISKPART> select partition 1
“selects the partition you just created”
DISKPART> active
“makes the partition active”
DISKPART> format FS=NTFS quick
“This command will format the USB with the NTFS file system”
* DISKPART> assign
“assign a volume and drive letter to the USB drive”
DISKPART> exit
“exit Disk Partition”

Once complete your CMD or command window should look something like this.

Diskpart Commands

Copying the Windows 8.1 files from the ISO file or DVD drive to your Windows 8.1 USB drive.

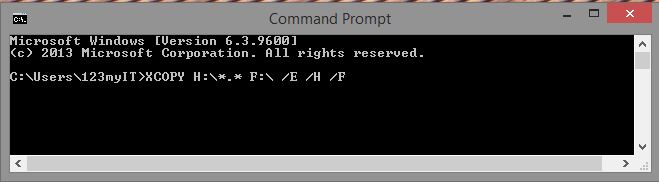
The next step is to use XCOPY to copy all the files on your ISO file or DVD to the Windows 8.1 USB drive. Use the command below to get started. Change the “H and F” drive to suit the letters of your ISO file or DVD drive and USB drive. For more info watch the video above.

XCOPY H:\*.* F:\ /E /H /F

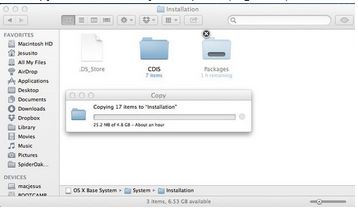
Once you finished typing the command it should look like the screen shot below.

Xcopy Commands

And the hard part is now done. Simply plug in your bootable Windows 8.1 USB drive into any Windows PC and you will be able to boot and install Windows 8.1.

Good Luck.

How to open an ePub file in Windows

First of all you might be asking, what is an ePub file?
Well an ePub file extension is an Open Publication Structure eBook file, which is a popular eBook standard. And as eBooks are becoming more popular I thought I would share with you how you can open ePub files in Windows as there is no support built into Windows to open these files.

So If a friend send you an ePub file you may not have an application on your PC to view or edit ePubs files.

To test if you have a application to open an ePub file you can try downloading and opening the ePub file below.

Beowulf ePub

Beowulf by J. Lesslie Hall click here to download.

Ok so you have downloaded the Beowulf eBook above and you were unable to open it the next step is to find a application that will help you open the ePub files.
Below is a list of programs that will help you open an ePub file.
Adobe Digital Editions
Calibre
Stanza Desktop
Mobipocket Reader Desktop
Okular

Converting ePub files:
There are a number of ways to convert an ePub file.
* You can open the ePub file in its default program, in this case Adobe Digital Editions and save the file as another format.
* Download Calibre it is one the free applications mentioned above that allows you to convert ePub files to and from eBook formats. This is really helpful if you want to convert files to be compatible with the an Amazon Kindle.
* You can use an online file conversion service.

You will find that most PCs don’t have a “default” program to open or convert ePub files. The application Calibre motioned above is a great solution for opening and converting.

TIP: ePub files are structured exactly the same as Zip files, so if you change the .epub extension to .zip then you will be able to open the file as if it was a zip file.

How to create a bootable OS X Mavericks usb drive

This guide will show you how to create a USB installer of Apples OS X 10.9 Mavericks.

Have you ever wanted to do a clean install of OS X from but your new MacBook Air doesn’t come with a DVD drive?
Well this guide will step you through how to create a bootable OS X Mavericks 10.9 USB drive.

To complete the process you will need the following items:
* 8GB USB drive or SD Card
* OS X Mavericks.app (this can be downloaded from the App Store)
* An Apple computer with the Mac App Store
* A user account with administrator rights

OS X Mavericks USB drive

Step 1. Download Mavericks from the App store.
Apple direct link here.
Step 2. Insert your USB into the Mac and run the Disk Utility.
Step 3. Select the USB drive that appears in the left-hand menu and select the Partition tab across the top.
Step 4. Select the drop down menu and click on 1 partition.
Step 5. In the format type menu make sure you have Mac OS Extended (Journaled) selected.
Disc Utility

Step 6. Select the Options button and make sure the GUID Partition Table radio button is selected.
Disc Utility - GUID Partition Table

Step 7. Open up the Terminal.app you can find it under the Applications Utilities folder or search for it in Finder.
In the terminal window type the following command.

defaults write com.apple.Finder AppleShowAllFiles TRUE;\killall Finder;\say Files Revealed

Terminal Window

Step 8. When the USB completes the formatting, go into the Launchpad and copy the Install Mac OS X Mavericks.app to your desktop then Right-click and click on Show Package Contents.

Mavericks App
Step 9. Go into the Contents > Shared Support folder and double click the InstallESD.dmg file.

Install ESD

Step 10. Click on the mounted.dmg file and find the hidden BaseSystem.dmg file.

null

Step 11. Go into Disk Utility and open the newly formatted USB and click on the Restore tab.
Step 12.Drag and drop the BaseSystem.dmg into the Source field. And drag and drop the partition that you recently created on the USB drive, into the Destination field.

OS X Restore

Step 13. Click the restore button and click Erase. You might get prompted for the Administrator password.

Untitled Message

Step 14. It may take some time to copy all the data to the USB drive.

Copy Time OS X Mavericks

Step 15. When the files have finished copying, the USB drive should mount automatically. Go into the System > Installation folder and delete the Packages directory.

OS X Packages Directory

Step 16. Go back into the mounted Install ESD.dmg file and find the directory called Packages. Copy this to the Installation folder.

Installation Folder

And now you are done. You have just created a bootable copy of OS X Mavericks on a USB drive.

Good Luck.

Jailbreak iOS 7 with Evasi0n on a Windows PC

This video will show you how to Jailbreak iOS 7 with Evasi0n on a Windows PC.

Hi All
The Evasi0n iOS 7 jailbreak software has been released and you can watch the guide on the video above.
If you fast forward to 8:35 on the video you will see a bug where the icons have changed around and something has clearly gone wrong. A restore was the only way around this. Once I restore the device I was able to repeat the Jailbreak process again for a successful Jailbreak.
So I can confirm it does work fine.
Good luck.

How to Fix iTunes Error 3194 on a Mac – This device isn’t eligible for the requested build

This video will show you how to Fix iTunes Error 3194 on a Mac – This device isn’t eligible for the requested build.

Hi All
Earlier I created a video on how to Fix iTunes Error 3194 while using Windows. This video will show you how to fix the same error on a Mac.
You will need to open up Terminal in Finder and type the following command.
sudo nano /private/etc/hosts

Press Return and Enter your password.
Once you have typed your admin password you will see all the entry’s in the hosts file.

Mac Terminal Hosts file

Now Apple says, look for an entry containing “gs.apple.com”.
The next step I delete any entry back to the local file which essentially sets the hosts file back to defaults.
However Apple says, Add the # symbol and a space (“# “) to the beginning of the gs.apple.com entry.

You can save the file by pressing Control-O. Hit Enter when prompted for the filename and Control-X which will allow you to exit the editor.
Restart your Mac and you should be good to go.

Good luck guys.