Fix The PC must Support TPM 2.0 Error ASUS

Hi Guys Matt from 123myit. In this video, we will show you how to fix the TPM 2.0 Error ASUS on your Asus motherboard. Guys if you are trying to install Windows 11 and you are getting the error The PC must support TPM 2.0 then this video will help. TPM stands for Trusted Platform Module and it can prevent malicious attacks on your hardware. And is required to be turned on to run Windows 11.

Heres where you can find the setting on Asus motherboard – tpm 2.0 error gigabyte

TPM 2.0 Error ASUS

Go ahead and restart your computer and you need to log into your computer bios. To do this when your computer starts up you need tap the delete button on your keyboard. For my Asus motherboard the button is Delete, however if can be different on different motherboard. If its HP it could be F10. Other models it could be Esc, F1 or F2 keys.

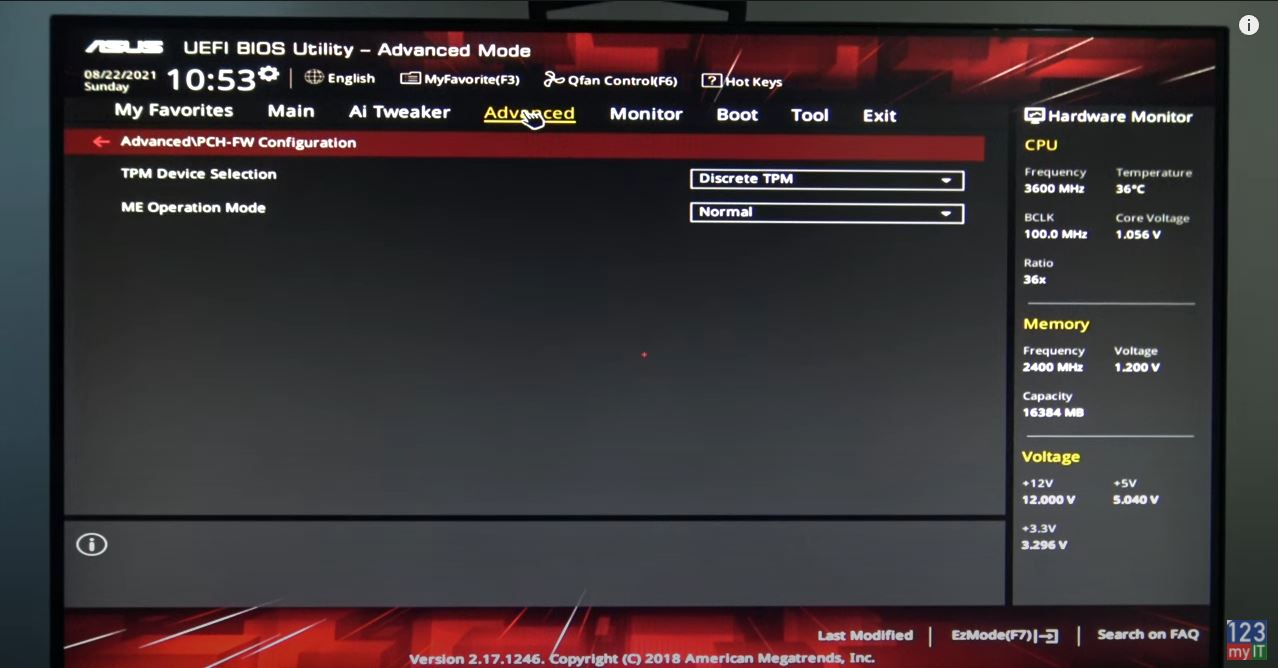
Once you are logged into your Bios go to the advanced mode down the bottom, you can also press F7. Then click on the Advances Tab up the top and click to highlight the TPM Device Selection menu. Change the discreet TPM to Firmware TPM, click ok. Then go to the Exit Tab and click Save Changed & Reset. That is that all you need to do.

Awesome, this time when you go to install Windows 11, you should get past that error and get the ready to install screen.

Guys don’t forget to check out my other videos such as how to fix The PC must support TPM 2.0 error on Gigabyte. And do me a favour if you know anyone who might need this video please share it will them, hit the subscribe button and smash the bell icon.

Download Windows 11 ISO File

Record Your Screen on iPhone or iPad

Fix The PC must Support TPM 2.0 Error Gigabyte

Hi Guys Matt from 123myit. In this video, we will show you how to enable TPM PTT on your Gigabyte motherboard. Guys if you are trying to install Windows 11 and you are getting the error The PC must support TPM 2.0 then this video will help. TPM stands for Trusted Platform Module and it can prevent malicious attacks on your hardware. And is required to be turned on to run Windows 11.

Heres the error to look out for – tpm 2.0 error gigabyte

tpm 2.0 error gigabyte

Go ahead and restart your computer and you need to log into your computer bios. To do this when your computer starts up you need tap the delete button on your keyboard. For my Gigabyte motherboard the button is Delete, however if can be different on different motherboard. If its HP it could be F10. Other models it could be Esc, F1 or F2 keys.

Once you are logged into your Bios go to the Peripherals tab up the top. Then to Intel Platform Trust Technology PTT. And then set it to Enabled. That is that all you need to just make sure you save it by going to Save & Exit. tpm 2.0 error gigabyte.

Awesome, this time when you go to install Windows 11, you should get past that error and get the ready to install screen.

Guys don’t forget to check out my other videos such as how to download Windows 11. And do me a favour if you know anyone who might need this video please share it will them, hit the subscribe button and smash the bell icon.

Record Your Screen on iPhone or iPad

Turn on Speak Screen on your iPhone or iPad

Download Windows 11 ISO File

Hi Guys Matt from 123myit. In this video, we will show you how to download Windows 11 ISO file. You can use this Windows 11 ISO file to install Windows 11 directly or create a USB drive to do clean installs of Windows 11. I will do a video on how to setup a Windows 11 USB after this video. So hit subscribe if you are interested in seeing that one.

UUPdump.net website – Download Windows 11

We are going to download Windows 11 from the uupdump.net. website to find the link, head over to 123myit.com and click on downloads. I will put all the links in the description below. Once you are on the downloads page. Scroll down to where is says create Windows 11 ISO file here and click that.

IT will then take you to the uupdump.net website. Click on the x64 button for 64 bit computers and you can use the arm64 for non x86 computer and Raspberry Pi.

download windows 11

Next click on the Cumulative Update link.

Click Next. And then select the version of Windows you want to download. I already downloaded the Pro version so I will try the Home version next. Click next.

Cool, Make sure you have “Download and convert to ISO” and the “Include updates” selected and click on Create download Package.

Go down to the Zip file and click on open when done. It will download and when it opens you will need to click on extract all files. I am just going to extract them to my desktop.

Awesome, just minimise your other windows. And Double click the file that says uup_download_windows.cmd.

Run the batch file

Ok that will run a batch file that downloads all the files from Microsoft and creates the Windows 11 ISO file for you. Depending on your internet, this might take a while so go get a cup of tea or coffee and maybe hit that subscribe button.

Because this takes a while, I will cut the video until the end. Ok so you should see your Windows 11 ISO file appear on your desktop. When the script finishes press 0 to exit.

Cool so you are complete, your Windows 11 ios file has downloaded and you can rename it if you want. You can also delete the other files on your Desktop you do not need them anymore. I want to show you one more thing before you go.

Install Windows 11

To install Windows 11 just double click and open the file and double click the setup.exe file. If you run the install and click, next and you come up with this error. The PC must support TPM 2.0. Do not worry I will show you how to fix this error in a video after I publish this one. I will put a link to that video and in the top of this video and the description below.

Guys don’t forget to check out my other videos such as Record your screen on iPhone or iPad. And do me a favour if you know anyone who might need this video please share it will them, hit the subscribe button and smash the bell icon.

Turn on Speak Screen on your iPhone or iPad

Scan a QR code on iPhone iPad or iPod Touch