Create macOS Big Sur USB Installer Drive

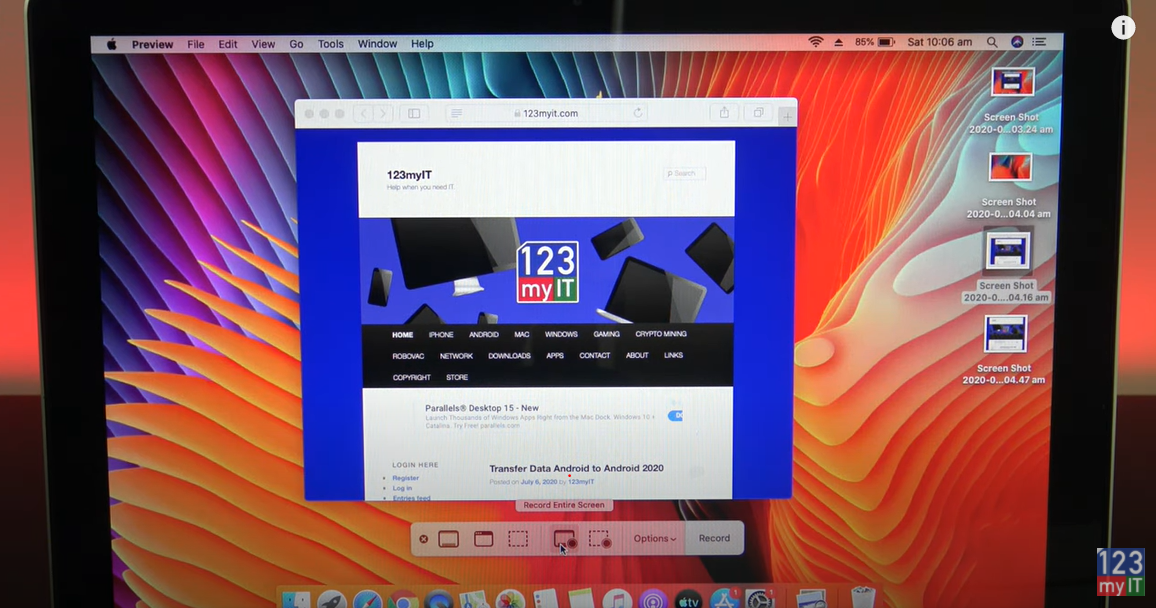
Hi guys and welcome to 123myIT. In this video, we will show you how to create a macOS Big Sur Installer Drive.

Creating a Mac Big Sur USB Installer drive is super easy and all you need is a Mac and a 16GB or larger USB drive.

Which USB drive to use?

I like to make a USB copy so I can do a clean install of MacOS on any Mac. Over this video I do a follow up video to show you how you can use this USB to do a clean install of MacOS on any Mac. The USB drive that I will use has both USB C and USB 3 ports so it should work on any of the new Macs in the future.

If you want to buy one of these here is the Amazon link. 👉 https://amzn.to/3gM67UN

Step 1 – Download MacOS Big Sur – Big Sur USB Installer

Ok, open up a Safari Browser and head over to beta.apple.com. Sign in with your Apple ID. Go ahead an enrol your Mac. After you have done that scroll down to where it says Download the macOS public access beta.

Big Sur USB Installer
Downloading macOS Big Sur

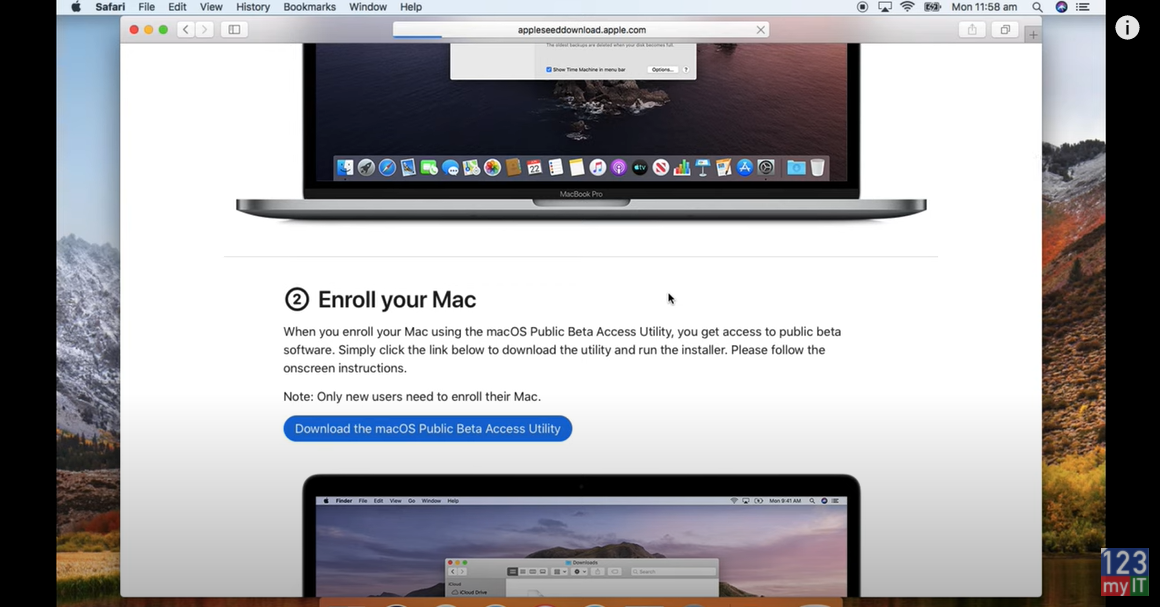
Go into the Downloads folder and open up the public beta file you just downloaded. Double click on the file to open its up. Then click ok And install. Once installed close the feedback assistant. When the App store opens up. When it does click download on the Big Sur page.

So once its downloaded go into the Apple menu and just quit any of the Applications you have open.

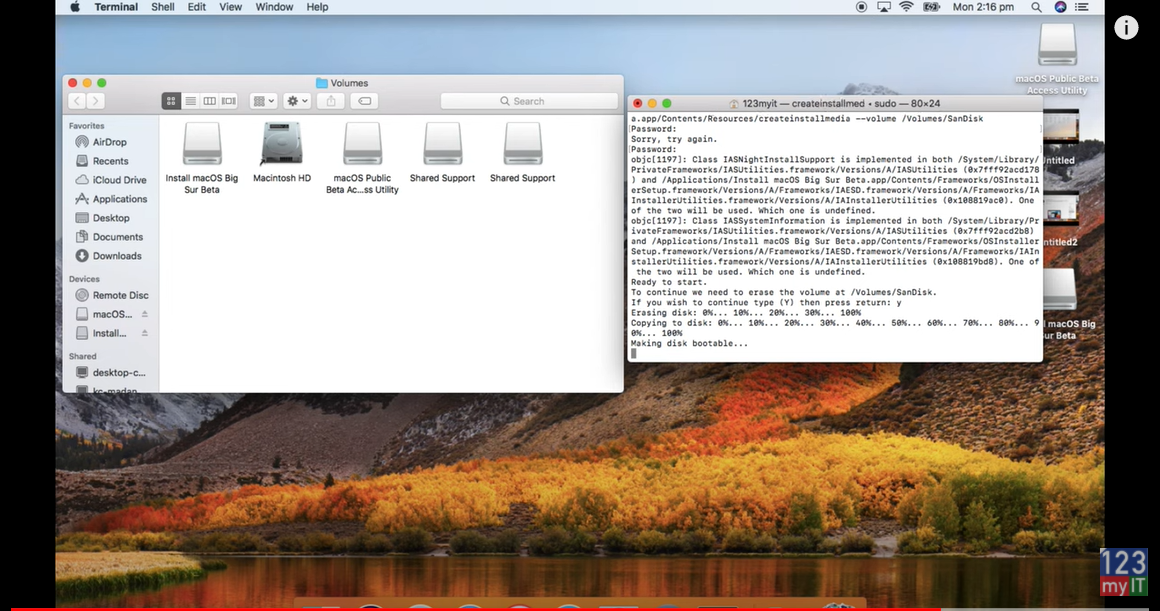
Step 2 – Create MacOS Big Sur Drive

Click go in finder then open Applications and right click the Big Sur application and click show package contents. Open contents and Resources folders and find the createinstallmedia file. Move your window to the left. Go to finder and type in terminal. Drag you terminal window to the right. In the terminal window type sudo then space. And then drag and drop the createingstallmedia file into the terminal window. Next Type –volume and then space again. And then go back to the finder menu. Click go then click go to folder.

Create Install Media File

In the box there type /volumes then click go. The step is to plug in your USB drive. Your USB should show up in the Volumes now. And you can see the SanDisk just appeared. So the next step is to drag the usb into your terminal window. Just a reminded that the next step will wipe the USB drive. So back it up if you need too. Go ahead and type in your password. Hit Y and hit return on your Keyboard.

Maing the USB disk bootable
Making the USB bootable

Once that has finished you should be good to go. To use the USB hold down your ALT option key on the when you start you Mac and select the bootable MacOS USB drive.

Guys don’t forget to check out my other videos such as Transfer Data iPhone to Huawei. And do me a favour if you know anyone who might need this video please share it will them, hit the subscribe button and smash the bell icon.

Everything Huawei P40 Pro in 3 Minutes

How to Record your Screen on a Mac

Transfer Data iPhone to Huawei

Hi guys and welcome to 123myIT. In this video, we will show you how to transfer data from iPhone to Huawei.

What can you copy across? iPhone to Huawei

Ok guys by following this video you will be able to transfer Contacts, Photos, Videos, Calendar items and more from iPhone to Huawei. Let get started. If it’s a new phone we will need to do a reset first to start to copy the data. If you don’t want to reset you phone skip to the 3 min mark on this video. And open the Clone phone app.

. To reset the phone go to Settings, Then System and then reset. Resetting your phone will wipe the data on it so make sure you back it up first if you need too. While that’s doing a reset go into the App store on your iPhone and download Clone Phone.

iphone to huawei reset
A reset will wpie your data.

Move data from another device

Now that your Huawei phone has reset itself follow the prompts to setup your phone. Once you get to the data import screen, tap move data from another device. Tap on iOS iPad. Press next and then start up Clone phone on your iPhone.

Tap agree and then tap Allow to give Clone phone access to your data so it can move across to the Huawei phone.

Next tap on this is the old phone. And then tap continue. On your Huawei phone do the same thing tap allow. Grab your iPhone and scan the QR code. Tap join on your iPhone and then select the data you want to copy across. I only want to copy the contacts across. Tap transfer and then tap yes.

Awesome you have now transferred all your data from your iPhone to your Huawei phone. If you don’t want to reset you phone just open the clone phone app on both phones. Allow on both phones and tap this is the old phone on your iPhone. Tap continue and tap This is the new phone on your Huawei phone. Tap iOS iphone and tap next. Again go ahead and scan the QR code with your iPhone. Just go ahead and select what you want to transfer. Tap yes

Guys, don’t forget to check out my other videos such as Everything Huawei P40 Pro. Also do me a favour if you know anyone who might like this video please share it will them, hit the subscribe button and smash the bell icon.

How to Record your Screen on a Mac

Setup & Reset Screen Time Passcode on iPhone iPad & iPod Touch

Everything Huawei P40 Pro in 3 Minutes

Hi guys and welcome to 123myIT. In this video, we will show you everything you need to know about the Huawei P40 Pro in three minutes. Huawei released three different versions of the P40, there the P40, P40 Pro and P40 Pro Plus. Pricing for the base P40 model starts around $700 USD and it comes in five different colours, Silver, Gold, Blue, Black and White.

The Box

On the outside of the box you will see that the phone is co engineered with Leica and down the bottom you will see explore it with App Gallery. So Huawei is advertising their own app store in the absence of the Google stores.

Deeps Blue Sea Colour – Huawei P40 Pro

Huawei P40 Pro
Huawei P40 Pro

First up in the box you will find the P40 Pro,the colour that we have is called Deep Blue Sea. Next you get the documentation, Quick start guide, SIM card eject tool and Warranty information. Along with a clear protective case. Other accessories are Earpods with USB C connector. USB C cable and a forty watt USB C Super charger adapter. Forty watts should charge the battery from empty to 80% in thirty minutes. Not to forget that the P40 Pro supports 27 watt fast wireless charging and the P40 Pro Plus supports 40 watt fast wireless charging. To put that in perspective the wireless charger on my desk only supports 10 watts max. So 40 watts wireless charging is incredible. Both models are IP68 dust and water resistant.

OLED Screen

The P40 Pro has a 6.5-inch OLED Capacitive touchscreen. It has a 1200 by 2640-pixel resolution at 441 pixels per inch. If you compare it with the iPhone 11 Pro on the left, you can see the P40 Pro has allot more screen real-estate on its 6.5-inch OLED display. Comparing the Samsung Pro Plus model has a slightly larger 6.7-inch display.

FingerPrint ID & Face Recognition

The P40 Pro comes with fingerprint ID and Face Recognition. And you can set these up at the start. There are two options side unlock by default or direct unlock which is my favourite. Slide unlock means you will need to slide the screen to get to the Home screen. Direct unlock will take you to home screen without the need to slide.

Camera

On the front top of the P40 Pro we have a 32 megapixel camera which has a F2.2 aperture. On the back of the P40 Pro you have the colour Deep Sea Blue and four cameras, all of the P40 models have a 50 megapixel Zoom lens standard. Which offers better low light performance. However the P40 Pro also features a 40 megapixel Ultra Wide lens and a 12 megapixel 5 times optical zoom. It also has a time of flight sensor, which give depth information for better portrait photos.

Here’s a side by side comparison of the back of the iPhone 11 Pro and Huawei P40 Pro.

Out of the box the P40 Pro will take amazing photos. Here are some comparisons between the iPhone 11 Pro and The Huawei P40 Pro. Can you spot the difference?

Around the Phone – Huawei P40 Pro

The right side you have Sleep Wake power button and Volume up and down button. On the left you have the Ring Silent and Volume up and down buttons. On the top you have microphone pin holes. Around the bottom you have the sim card slot, microphone, USB C slot and stereo speakers.

The P40 Pro has a Kirin 990 processor which seemed to work well for the games and movies that I tested. And a fast processor is important when playing games and videos or when generally moving around the iPhone.

Battery on the P40 Pro  is a 4200 mAh and you can expect about 13 hours between charges.

Guys, don’t forget to check out my other videos such as how to record your screen on a Mac. Also do me a favour if you know anyone who might like this video please share it will them, hit the subscribe button and smash the bell icon.

How to Record your Screen on a Mac

Hi Guys and welcome to 123myit. In this video, we will show you how to record your screen on a Mac. Guys if you are new to the channel we do tech related videos that can help you with any questions you might have. So please don’t forget the hit the subscribe button and smash the bell icon.

Let’s Get Started!

To record your screen on a Mac you will need to bring up the Screen Recording menu by pressing Command + Shift + 5.

record your screen on a mac
The different options when record your screen on a Mac.

So that’s buttons command shift and 5 all at the same time. You will see the Screen Recording menu pop up. I am going to go through each part and show you what they all do. The first option is capture screen shot. This will basically take a screen shot of you screen as it is. Once its selected click on Capture and you will see a preview pop up. It will also save this image to your desktop.

Command + Shift + 5 keys

Double click on it and you be able to preview it. Press Command + Shift + 5 again and click Capture selected window. This will allow you to select a part of your window to screen shot. This allows you to screen shot a window that is currently open. If I select the background it will screen shot that only. See the preview in the bottom right. If I do it a again and select the 123myIT website it will screen shot that only.

Capture Selected Portion

And again I can double click it to preview it. Next up is capture selected portion. This allows you to capture a exact part of the screen. Just move the guidelines to where you want them and click on capture.

Alright the next part of the menu is called Record Entire screen. This will allow you to record a video of your entire screen. So click that and then click record and move something on your screen. Once your are done click the stop button in the menu bar. If you want to look what you have recorded click the preview and play the video.

Record Selected Portion

Next up is record selected portion. This allows you to record a video of only the part of the screen that you move the grid lines too. Click record and move your video and then click stop when you are finished. Now there is some other cool options you can choose. If you click on the options menu you can choose where you want the files to be saved. The default is to the desktop but if you want you can change this.

Other Helpful Tips

Next it’s a timer count down which gives you 5 or 10 seconds before its starts to record. Handy if you need to clear your throat or something before you start.

Under Microphone, if you want to record your voice or sound to the video you can select Microphone. Lets test it.  Cool so the sound came through.

The last option I want to show you is mouse clicks. This is handy if you want to highlight where your mouse is clicking in your video. So turn it on in options record you video and I am going to click on the link on the 123myIT website. No if I stop the recording and play the video you should see a circle highlighting a click around the mouse cursor. And there it is.

One last thing, if you want to quickly trim a video simply click on the preview and then click the Trim button. Move the yellow sliders to select the part you want to keep. And then click done to save your recording. Let say I want to move that click to the beginning of the video. Double click your video and it will play you the video you Trimmed.  

Also guys don’t forget to check out my other videos such as Setup & Reset Screen Time Passcode on iPhone, iPad & iPod touch. And do me a favour if you know anyone who might need this video please share it will them, hit the subscribe button and smash the bell icon.

How to use Apple Reality Composer on your iPhone or iPad

Schedule Do Not Disturb on your iPhone iPad or iPod Touch