Take Control of Your Notifications iPhone iPad iOS

Hi Guys and Matt from 123myit here. I had a funny story recently where a family member said. I was getting to many notifications on a chat group, so I had to leave the group. And, my reply was, why didn’t you turn off the notifications iphone or adjust them? So, I wanted to do a video which will hopefully help you guys take control of your notifications and stop them from being annoying and distracting.

Lets get started.

Notification Centre – Notifications iPhone

You can find Notification Centre by swiping down from the top left. In addition, to edit a notification directly you can just swipe across on it and you will get more options depending on the type of notification.

Notifications iPhone

So if you get a SMS notification on the messenger app swipe across on it and you will have an Options button.  You can Mute for one hour or mute it for the whole day. You can turn off all notifications for messages or you can tap view settings.

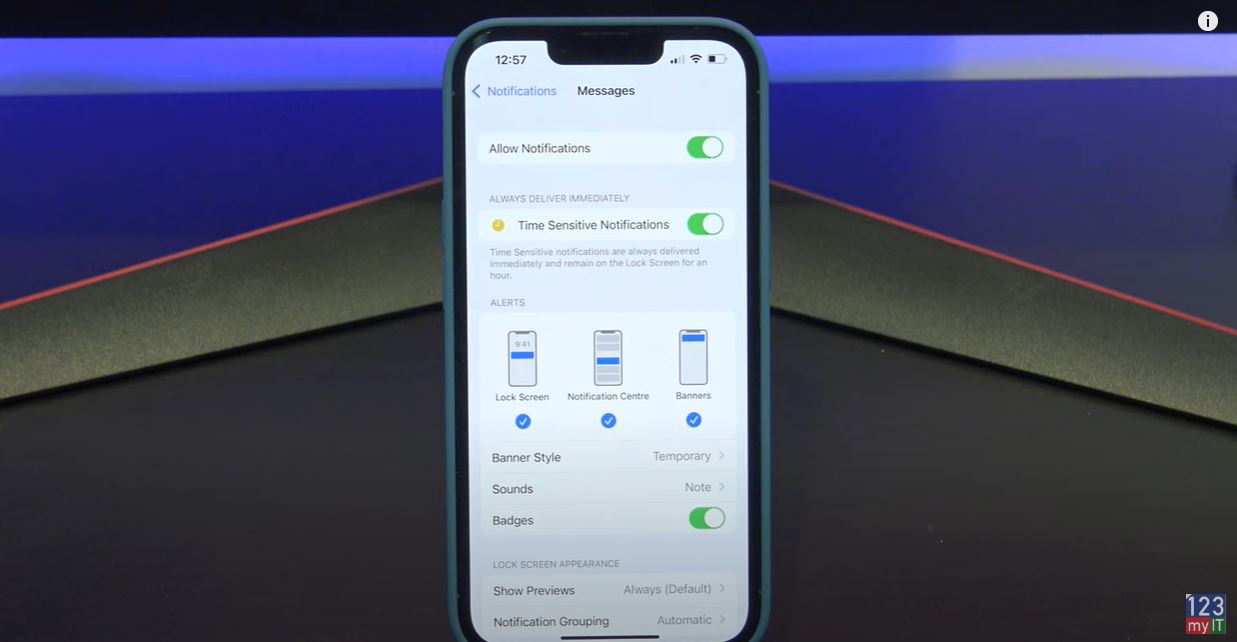
This will take you into the Notification settings for the App that you were in. In this case, it’s the notification settings for Messages. IF you want to find the notification settings for all apps. You can find it under Settings and then Notifications.

Toggle Notifications – Notifications iPhone

At the top, you have a blanket toggle button which turns the notifications on or off for the app that you select. Therefore, if I turned this off I would not get any notifications for Messages.

Always deliver immediately, will deliver messages even in you have Focus setup with Do Not Disturb. So if you leave this turned on it will Deliver the message straight away and leave it on the locked screen for 1 hour.

I will do a video on Focus at some stage so hit that Subscribe button. Alright lets learn about what the different alerts are. You have Lock Screen, Notification Centre and Banners. Lock screen is the first screen you see on your phone when you unlock it. Notification Centre you can find when you swipe from the top left and I will show you banners when I send a text to my phone. Ok cool there it is at the top that is the banner. If you do not want any of these notifications to show up you can turn them off here. So if you wanted the messages to not show up on Lock Screen you would turn that off.

Choose your banner style

If you tap on banner style. This will allow you to set the banner as persistent. This means it will stay up as a banner until you read it. So it will sit at the top of your screen until you do something with it.

If you go into sounds, you can change the vibration of an alert as well as the sound it make when it comes in.

Badges, Badges are the little round red circles that appear on your app when you have an unread message. These are good on messages but when I had these on my emails it showed 12000 unread emails which was rather annoying. So I have this turned off on my emails.

Next is locked screen appearance. Show previews you can set to Always When unlocked or never.

Show notification on the locked screen

Always means it will show up on the locked screen. This can be a privacy issue. If you do not want others to read your message I would set these to When unlocked or never.

Notification Grouping allows you to group your notifications iphone. You can group by App or turn groups off. The last option and possibly the most annoying is Customise notifications and then repeat alerts.

Repeat sounds on messages

In here you can control how many times your messages will make a sound when a message comes in. If you do not pick your phone up and check the message when it comes in the first time it will send another alert two mins later. This could be why people get overwhelmed and think that they are getting so many messages. For me I would set this to never. Its probably the main reason people are addicted to their phones.

Guys if you want to see other iPhone iPad tips such a how to arrange your iPhone icons the easy way click on the video. And do me a favour if you know anyone who might like this video please share it will them, hit the subscribe button and smash the bell icon.

HP ProBook 640 G8

Transfer WhatsApp iPhone to Samsung

HP ProBook 640 G8

Hi guys Matt from 123myIT here. In this video, we will show you everything you need to know about the HP ProBook 640 G8.

The ProBook range is the entry level for HP’s Business laptops. Above the ProBook you will have the EliteBook and ZBook range.

This is 14-inch business laptop comes with an Intel Core i5 11th Gen Processor which has an integrated Iris Xe Graphics. Along with 16GB of Ram and 512 GB of NVMe storage.

Pricing

Pricing for the G8 starts around $1339 USD for the Intel i5 CPU and goes up to $1709 USD for the i7 CPU. On the HP website, you can customise and buy. If you are going to do this, then I recommend upgrading to an i7 CPU and changing the screen to a screen with better brightness. The default screen comes only with 250 nits of brightness. I would recommend the screen with 400 nits of brightness and the default one feels a bit dull to me.

In the box, you will get Warranty and setup documentation. Along with a 45-watt USB C power adapter. The laptop uses around 24 to 27 watts of power. In addition, you can expect to get around 12 hours of battery life. Charging the battery will take just under one and a half hours.

Display

The G8 comes with a 14-inch FHD LED Anti-Glare Display. With a resolution of 1920×1080 and 250 nits of brightness. As I mentioned earlier I felt like the display was a bit dim even when I turned the brightness up so I would suggest upgrading to 400 nits of brightness if you can.

Out of the box, though I was able to get FortNite to run ok on giving up about 35 to 50 Frames per second. This would be mostly due to the Intel quad core i5 11th gen CPU and 16gb of ram as the Intel Iris Xe GPU is not the best for gaming.

Windows unlock

The G8 does also have a finger print scanner, which allows you to unlock Windows with a touch of the button, but you need to add it in the customise and buy section I mentioned earlier. Along the top, you will find an integrated HD 720p webcam with dual microphone and indicator light. One of the cool things about the G8 design is you can close the camera off with a sliding button.

HP ProBook 640 G8

On the right side, you have the charging port, one USB C port, two USB-A ports, one HDMI 1.4 port, Audio Jack and a SIM card slot. This SIM card slot is pretty cool but you will two add this as an option when you buy. You also have an indicator light to show when the laptop is being charged. The USB C doubles as a display port so if you have a USB C to HDMI adapter you can plug in an external display.

Connectivity

On the left, you have a security lock, one RJ45 Ethernet, one USB 3 port, and SC card reader. Annoyingly there is no SD card reader.

The 640 G8 comes with standard duel stereo speakers and they are designed to point upwards towards your ears. The speakers sounds pretty good but missing a little bass.

The Trackpad is nice and wide but I do find myself right clicking allot because to left click you need to press on the left side of the Trackpad. For me it feels like the trackpad sits too far to the left. Having said that it does feel like this issue has been improved since last year G7 model.

Keyboard

The keyboard is a delight to type on and does not bend when pressing the keys. However, the base model does not come with backlit keys. So make sure you add that feature when you buy.

The overall build feels like good quality and there is little to no flex on the laptop. Also the silver plastic doesn’t leave finger prints which is great. The display hinge folds all the way back 175 degrees; however, other laptops go all the way to 180 degrees, so 175 feels a bit awkward.

Upgradable

 You can also upgrade the 640 G8 by removing the screws from the bottom cover. The system supports 64 GB of RAM so you can upgrade that along with a 1TB NV Me SSD if you want. The WIFI card is already WIFI 6 so you won’t need to upgrade that for a while.

Here’s the Geekbench CPU score and the GPU score. And when comparing the scores with the EliteBook 840 G7 model from last year the 640 G8 is much faster. However, I am surprised it didn’t give better performance in Fortnight. So maybe there is some fine turning to do there.

If you are looking for a gaming laptop then you are better off looking for a laptop with the GeForce MX or Radeon RX GPU configured. While this laptop is small and easy to carry, the performance in games is what stops it from being an all-round great laptop.

Guys don’t forget to check out my other videos such as How to Transfer WhatsApp from iPhone to Samsung. And do me a favour if you know anyone who might like this video please share it with them, hit the subscribe button and smash the bell icon.

LG 27GL850-B Gaming Monitor Unboxing & Gaming Settings

How to Arrange your iPhone icons the Easy Way!

Transfer WhatsApp iPhone to Samsung

Hi Guys Matt from123myit here, in this video I will show you how to Transfer your WhatsApp messages from iPhone to Samsung.

Guys for as long as I can remember people have been asking me to do a video on how to Transfer WhatsApp messages. Well here is, but there is a few things you need to know first.

This video assumes that you have a new Samsung phone so it needs to be factory reset. Because you will be copying data from iPhone to Samsung. To reset it go into Settings, About Phone, Reset and Factory Data reset. This process will wipe the data currently on your Samsung. So make sure you do a backup first.

Get ready – Fully charge your battery – WhatsApp iPhone to Samsung

Second thing to know is make sure you have both phones battery has fully charged. As it will take a long time to move the data.

The next thing to do is turn off any security on your iPhone. So turn off Passcodes, as they will block the Transfer process.

Last, you will need a USB-C to lighting Apple cable. We will use the to move the data from iPhone to Samsung. Let us get started.

WhatsApp iPhone to Samsung

Plug your two phones in with the cable

Go ahead and plug in your Samsung to your iPhone. Cool and you should see the app called Smart Switch pop up on your Samsung. Just go ahead and tap it and that download. Up to you will see a pop up that says downloading. If you do not see this swipe down from the top of your Samsung and you can check the download process, there. You will need internet access for it to download.

Cool, there it is so tap Agree on the Samsung. We want to tap Receive data because we are receiving from the iPhone. Then tap on iPhone then tap ok. All right, it has come up with the Trust this computer on the iPhone. So go ahead and tap Trust. And then tap next.

Backing up your phone

Awesome, swipe up on your Samsung and it will give you a complete list of data to backup. You can do this if you want. But for this video we want WhatsApp only. Therefore, I will take the tick out of all the data and just tap Apps. Next swipe to the bottom and tap Transfer. Now if you have a Google account go ahead and Sign In. Google will ask you to approve the account on another device or in your email.

Great if you have made it this far well done. Just unselect all the apps and tap Whatsapp Messenger. Ok some phones will start the Transfer automatically. If yours does not then go into WhatsApp on your iPhone. Go into Settings > Chats  and move Chats to Android. Then tap Start.

Turn off iMessage

Cool, tap next and then you will get a prompt to turn iMessage off on your old iPhone. You can follow the prompts on the Samsung, or you can do it on your iPhone under settings, Messages and then turn the iMessage button off. Tap next, next and done.

Awesome go check and see if the WhatsApp icon is there now and tap on the WhatsApp icon. Now if you have a sim card now is the time to move it because WhatsApp needs the phone number to work properly. Once you have moved your Sim tap Agree and continue. WhatsApp will send you a text message to verify your phone number. Tap Allow and then Allow again.

Also guys don’t forget to check out my other video such as Transfer Data iPhone to Android 2021. And do me a favour if you know anyone who might need this video please share it with them hit the subscribe button and smash the bell icon.

LG 27GL850-B Gaming Monitor Unboxing & Gaming Settings

How to Arrange your iPhone icons the Easy Way!

LG 27GL850-B Gaming Monitor Unboxing & Gaming Settings

Hi Guys Matt from123myit here, in this video I will show you how to an unboxing and first look at the LG UltraGear Gaming Monitor.

The Specs -LG 27GL850-B Gaming

The LG 27GL850-B is a 27-inch 1440p QHD Gaming monitor with a 1 ms response time. It has a refresh rate of 144Hz and its also Gsync and Free sync compatible by using Adaptive Sync. The 27GL850-B is a great buy at the moment retails for around $350 usd and $550 Aussie at the time of this video. If you are interested, I will put a link in the description below.

Other features include black stabilizer and HDR10 support. Let’s take a look what you get inside the box.

Inside the box

First up inside the box you have the base of the monitor stand. It has a black plastic cover with red highlights. Inside the LG UltraGear black box, you get a power plug. So, an Australian New Zealand power plug, but if you are in the US, you would get a US power plug. The power supply is not built into the monitor, and it comes as a separate power brick much like you see with laptop designs. I tested the power draw with HDR Effect turned on which is a bright setting, and the monitor uses about 26 watts of power. When I changed it to Reader it used 13 watts.

Power usage

The worst part when the monitor was turned off totally it still was using 1 to 2 watts while not in use.

Next in the box you have a little cable tidy, Display Port, USB 3.0 and HDMI cable. Also, in the box you have a driver CD, quick start guides and warranty information.

Next up is the arm that connects to the monitor to the base. Taking the monitor out of the box it’s an IPS display so blacks should look darker and colours will be brighter than a TN display. On the back you will see two HDMI and USB down ports. Along with one display and USB up ports. And if you have a VESA stand you can also attach your own.

The Stand

While the stand is solid there is some wobble, but it’s not a deal breaker. You can adjust the height and swivel as well as put it in portrait mode. Here it is beside the Aorus KD25F, which is a TN panel. Can you make out the deeper blacks and brighter colours?

Remembering that its a Nano IPS panel with a resolution of 2560 x 1440 and 350 nits of brightness.

FreeSync and G Sync

To start the OSD there is a little joystick under the logo. The thing I really like about this is it tells you the refresh rate straight away. Sweet so its running at 144Hz and you can see Adaptive Sync is on. In Game Mode it has some modes already to go which is nice. For best results in games, I set this to FPS with and went into the Game Adjust menu and turned Adaptive Sync off. The reason for this is when Adaptive Sync is turned on the Frame Rate in PUBG dropped making it terrible to play.

Adaptive Sync

If you can’t get Adaptive Sync to turn off, go into the NVidia control panel and take the tick out of Enable G-Sync. I am assuming it will be the same thing for AMD graphics cards. Once you have that turned off, go down to Response Time and make sure it is set to fast not faster. This is because the Faster setting only works with allot of errors and it looks bloody terrible.

Try it an test a game. Don’t take my word for it try it yourself. Next up to add a cross hair, go down to the Cross Hair menu and select the cross hair you want to use. I always go for the red one works best for me. Alright go in and check your display settings and make sure your 27GL850 is set to 144Hz.

On the Back

On the back the monitor has a USB hub which I really like as it allows you to plug in extra devices for your desktop. I use a desktop mic so when I turn my monitor off it also turns the mic off which is handy.

Testing how well games play

Alright let’s fire up PUBG and do some testing. So, with Adaptive Sync turned on I was getting around 71 to 74 frames per second. And with it turned off the frames improved all the way up to 110 frames per second. So, you can see why some BenQ monitors don’t even include Gsync FreeSync as it might not always be suitable.

Also, guys don’t forget to check out my other video such as How to Arrange your iPhone icons the Easy Way!. And do me a favour hit the subscribe button and smash the bell icon.

Turn On Background Sounds on iPhone to Help you Sleep

Dont Use Nicehash Optimized Settings

How to Arrange your iPhone icons the Easy Way!

Hi Guys and Matt from 123myit here. I am always amazed when how to do something a new way on computers or phones. Sometimes you do not even realise that there is a new way to do something until someone else shows you and you realise you have been doing it the hard way for a while.

What to do first – Arrange your iPhone icons

Take arranging your icons on your iPhone for example. Normally I would tap and drag th icons around but there is an easier way. Let me show you. If you tap your icon and hold it. I would normally drag this around but what you can do is tap the other icons that you want to arrange this icon with.

So if I grab my Calendar, Photos, Camera and Wallet. It will reorganise them in that same order that I selected. OK I will do it again. This time I want to put all my icons on the bottom row so can reach them easy. So I will tap my wallet, photos, camera and facetime. Cool so there is my wallet, photos, camera and facetime all on the easy to reach bottom row.

Arrange your iPhone icons

Here’s another one. To move an icon to a different screen I used to tap and do an awkward icon drag to one of the other screens. But what you can actually do it Tap and hold the icon and then just use your other hand to switch screens……. Oh so much easier haha.

Guys click if you want to see other iPhone iPad tips such a how your iPhone can help you sleep. And do me a favour if you know anyone who might need this video, please share it will them, hit the subscribe button and smash the bell icon.

Turn On Background Sounds on iPhone to Help you Sleep

Dont Use Nicehash Optimized Settings

Turn On Background Sounds on iPhone to Help you Sleep

Learn how to turn on background sounds on iPhone

Guys Matt from 123myit here. People you might be wondering why I am showing you a planes on a iPhone video. Well these are the planes that fly over my house and as you can hear, they are very loud! So if you are trying to sleep, study, concentrate or just get some peace from the outside world. I will show you a new iPhone feature that allows you to block out some of this outside noise.

background sounds on iphone

Let us take a look. Helpful background sounds on iPhone. The features is called background sounds and it’s only available on iOS version 15 or later. To find it swipe down from the top right and go into control center and it’s the little ear icon. If it off you can just tap the ear icon to turn it on. I will show you how to find it in settings and turn it on. All right so this is my older iPhone 12 and it’s not updated. So if you have swiped down from the top into control center and you do not have the ear. I will show you where to find it in settings > accessibility > Audio Visual and background sounds. On my iPhone, 12 Pro its running iOS 14 and I will show you it’s not there so you will need to update to iOS 15.

Cool so to turn it on toggle the button at the top. And then you are done. Easy as.

Guys, don’t forget to check out my other videos such iOS 15 settings to turn off right now. Also do me a favour if you know anyone who might like this video please share it will them, hit the subscribe button and smash the bell icon.

Dont Use Nicehash Optimized Settings

Create Windows 11 USB & Download Windows 11 for Mac