Transfer data Oppo to iPhone 2019

Hi Guys, Welcome to 123. In this video we will show you how to transfer data from your OPPO to iPhone in 2019.
Ok guys to transfer data from your Oppo phone to iPhone we are going to use an app called Move to iOS.

Oppo to iPhone – What will transfer?

The move to iOS app will try to transfer the following data for you.

  • Contacts
  • Mail accounts,
  • Message history,
  • Calendars,
  • Camera photos
  • videos
  • Web bookmarks
  • Free apps.

To start the transfer you will need to reset your iPhone. You can do this by going into Settings > General and Reset menu.
If you don’t want to reset your iPhone you will need to manually copy the data across. I will do a video on this later so hit the subscribe button.

Reset and Connect

Once you are in the Reset menu tap on Erase All content and Settings. And then tap the erase iPhone button twice. Once you have doen this the iPhone will reset itself back to factory defaults. Making it the same as brand new iPhone.
Follow the prompts like you would setting up your iPhone for the first time.
Go ahead and add your iPhone to your wifi. Make sure its the same wifi that you Oppo phone is connected too.

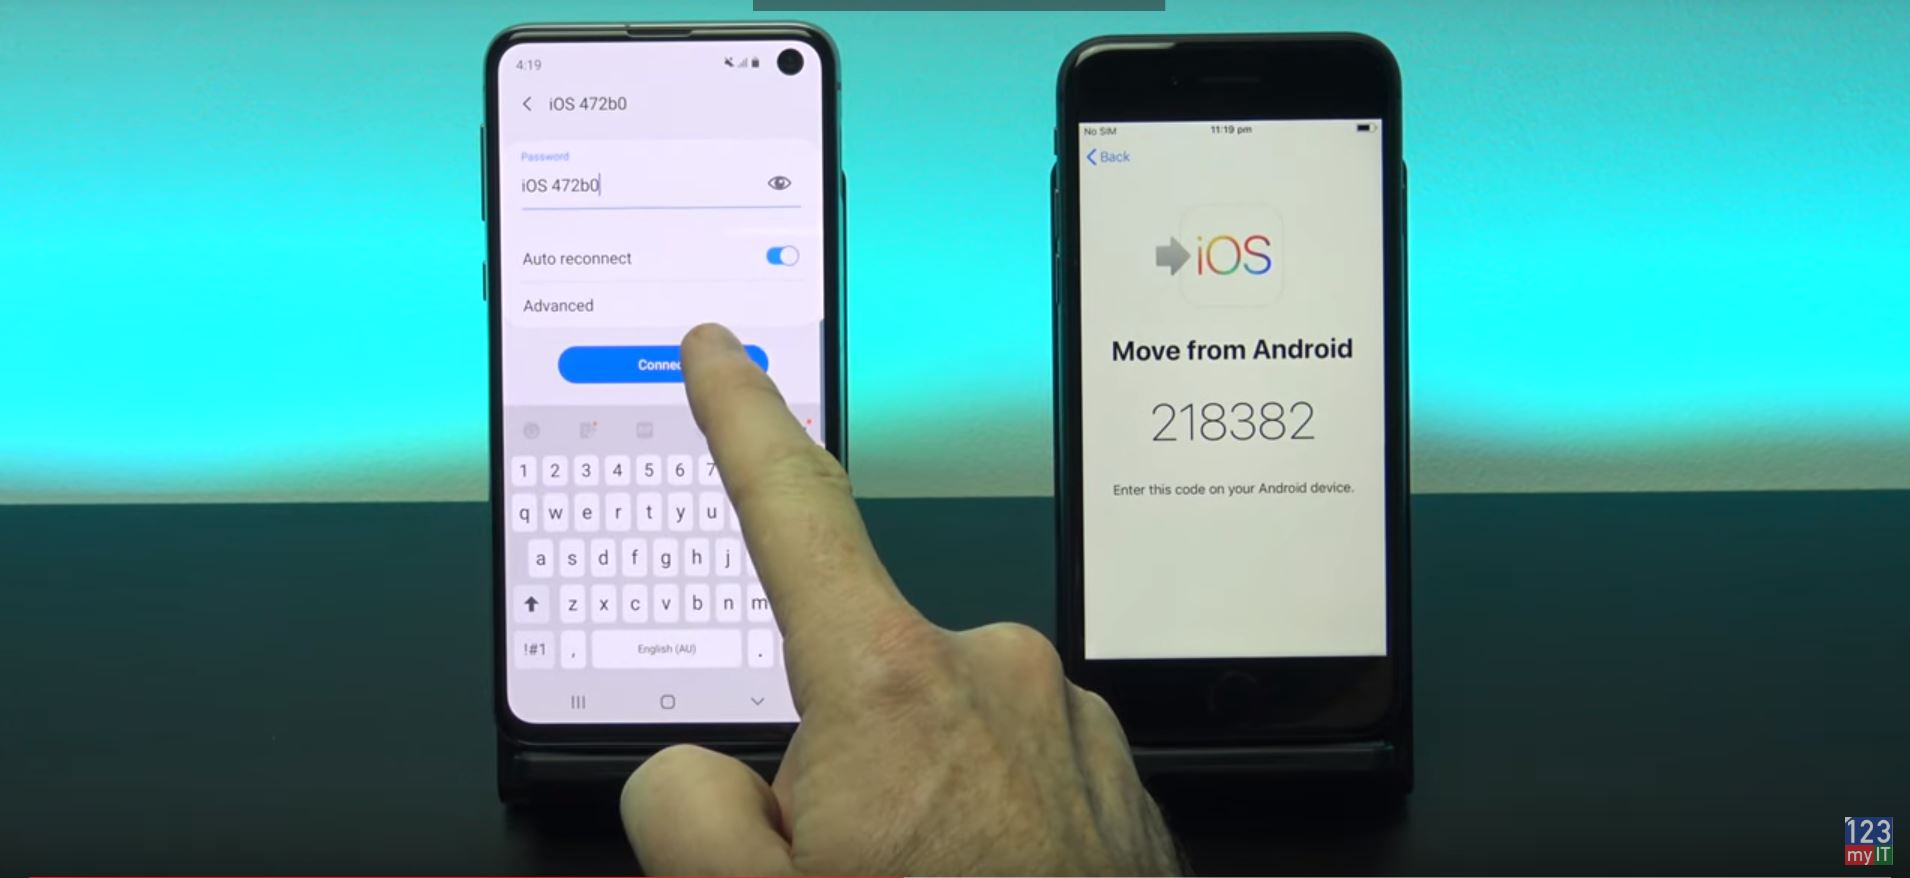
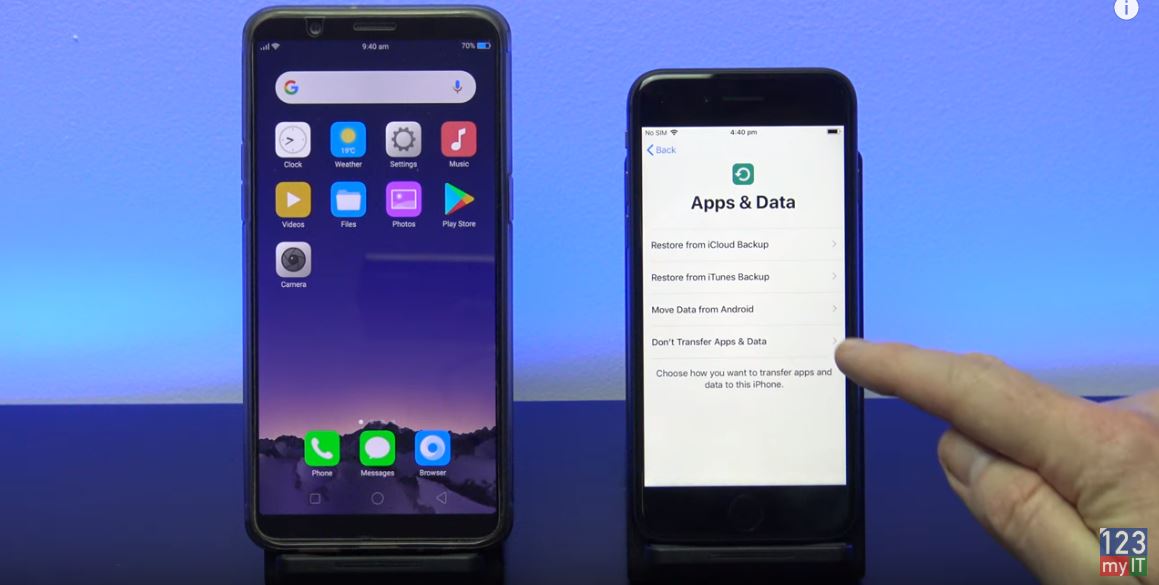
Keep going through the prompts until you get to Apps and Data. Once you get to Apps and Data, tap on Move Data from Android. And tap continue. Next up you will need to download the Move to iOS app from the Google play store.

Oppo to iPhone apps and data
Apps & Data screen

I have already downloaded the Move to iOS app, so I just press open.
On your Oppo phone press continue and then Agree. Hit next up the top and then enter the code that is displayed on your iPhone.

You should then see a Data Transfer screen. Select the data you want to copy from your Oppo phone to your iPhone and tap next.

Fix Could not communicate with the device Move to iOS

If you get the Could not communicate with the device Move to iOS message, click the link to help you get past that error.
Once the transfers complete just tap Done on your Oppo phone.
Go ahead now and continue setting up your iPhone.

This last part of the setup will add the free apps to your iPhone. So go ahead and enter your Apple ID. After entering in your Apple ID, tap Agree and then the Apps will start to install.

Check your iPhone and all your data should have copied across. If you are missing something check the 123myIT future videos for Manually copying your data to iPhone. I will put links in this video description.
Also don’t forget to check out my other videos such as Fix the Could not communicate with the device error and do me a favor hit subscribe and smash the bell icon.

Gaming PC Settings – Nvidia Control Panel

iPhone Battery Drain – Is your iPhone letting you down?

Setup Bedtime on iPhone

Fix Could not communicate with the device Move to iOS

If you are getting the error Could not communicate with the device when using the Move to iOS app. This video can help. If you have a new iPhone like the iPhone 11 and you are transfering your data via the move to iOS app. You might get the Could not communicate the with device. here’s how you can fix it.

Could not communicate – Move to IOS

If you not familiar with the move to iOS app don’t worry I will have two new videos coming out shortly so keep checking this website, or subscribe on our YouTube page for updates. So here I will show you that I am trying to transfer data from Android to iPhone and I am getting the Could not communicate with the device error.

You will need to connect the Android phone to the iPhone manually. To do this go into the WIFI settings and find the iPhone WIFI. The iPhone WIFI will come up as iOS and then a random number, tap on that to connect to it.

Could not communicate
Connecting the Android phone to the iPhone WIFI

Enter the iPhone WIFI password

Next enter the WIFI name as the WIFI password. Make sure you use upper and lower case. When you are done double check you have entered it right and hit connect. On the next screen make sure you are connected to the iPhone WIFI and restart the Move to iOS apps on both phones.

Next up on your Android phone enter the code that is displayed on your iPhone.
There you go now the Could not communicate with the device error is gone and your phones have moved to the next step Data Transfer.

Simply untick and data you dont want to transfer and hit next.
Hit Done on your Android phone. And now just continue along with the Move to iOS prompts to setup your new iPhone. Thats it you have now got past the Could not communicate with the device error.

Also Guys dont to check out my other videos like iPhone battery drain and do me a favor hit the Subscribe button and smash the bell icon.

Gaming PC Settings – Nvidia Control Panel

iPhone Battery Drain – Is your iPhone letting you down?

Setup Bedtime on iPhone

Gaming PC Settings – Nvidia Control Panel

Use the Nvidia control panel to increase performance of your games.

Nvidia Control Panel – What can it fix?

If you are having issues with your Gaming Pc such as Low Frame rates
Game lag or Game Stuttering, then this video should help. By following this video and optimizing the Nvidia control panel you can do the following.

  • Increase your Frames rates.
  • Fix Game Stuttering
  • Increase power
  • Optimise Nvidia GPU
  • Best colour settings and brightness for games
  • Smooth out your gameplay

As mentioned this video is for Nvidia GPU, If you have an AMD GPU I plan to do video for AMD as well so make sure you hit the subscribe button.

Nvidia Control Panel – Config

Alright first step is to open your Nvidia control panel. You can do this by right clicking the Desktop and selecting Nvidia control panel.
If you cant find it there try looking in the bottom right hand corner of your screen near the time. If you still cant find it, check what GPU you have installed by right clicking the start button and selecting Device Manager.
Under Display adapters you can check what Nvidia GPU you have and download the driver for it.

Download your GPU drivers – Nvidia.com

Head over to nvidia.com and download your driver or you can download the GeForce Experience software and I will leave links to those pages in the description below.

In the Nvidia control panel go to Adjust image settings with preview. Click on use 3D image settings and click Apply.
Next up click on Manage 3D settings and make sure you are on the Global Settings Tab. These settings will apply globally you can change these at any time or click restore if you want to set settings back to defaults.

  • Set Ambient Occlusion to Off
  • Anisotropic filtering to Off
  • Antialiasing to Off
  • Leave Gamma correction On
  • Antialiasing – Mode Off

Antialiasing on or off?

Don’t worry you can still turn Antialiasing on in Game. Also if the options aren’t the same as this video just change the options that are the same.

  • CUDA -GPUS Should be set to all.
  • DSR Factors should be off.
  • With Maximum pre rendered frames set this to 1, if you have an older pc you can try setting this to 2 or 3. But if you have a newer PC set this to 1.Multi-Frame Sampled AA set to Off. Open GL set to Auto.
  • Power Management Mode set this to Prefer Maximum Performance.
  • Preferred Refresh rate set it to Highest Available.
  • Shader Cache set to On.
  • Turn on – Texture Filtering – Anisotropic
  • Texture Filtering – Negative LOD Bias set to Allow
  • Texture Filtering – Quality set to High Performance
  • Threaded Optimisation you can set to Auto, however if you play games like PUBG, FORTNIGHT and Battlefield which are quite demanding. You can set this to On.
  • Triple buffering set to Off
  • Vertical sync to Off
  • Last setting Virtual Reality pre-rendered frames set this to the same value as Maximum pre rendered frames.

Once you are done make sure you click Apply. Once you have set this go ahead and click Apply.
Next up go back to the left hand side and click on Adjust desktop colour settings.
Select the Use Nvidia Settings on the right.
Click Apply then click Yes.

PRO TIP!

Heres a little secret. If you play first person shooters you have just made the colours much better than the default ones by selecting Use Nvidia settings. Also if you scroll down to the Digital vibrance slider its default settings is 50%. If you slide this upto 80% suddenly the dark areas of your game will become much brighter. This will allow you to see your emimenes in game before they see you. This really helped me allot in PUBG.

nvidia control panel
PRO TIP: Use Nvidia settings to control brightness and colour – this helps when spotting enemies.

Best image and colour settings

Click Apply and then go to the Adjust video colour settings.
Next up select the with the Nvidia settings. Click onthe Advanced tab.
In the Dynamic range drop down menu select Full. Next click Apply this should allow you to see better colours when watching videos.

Next go to the Adjust video image settings.
In here you can also use the Nvidia settings and change these however you like. These last two settings only change video and image settings outside of Games and they wont effect Gaming performance.

Another point to mention is, if you update your Nvidia driver, make sure you come back to this video and check that the driver update hasnt reset your Nvidia control panel settings back to defaults. And lastly I get asked allot of questions about customising Windows 10 and AMD settings I will do a few more videos on this topic so do me a favor. Hit the subscribe button and smash the bell icon.

iPhone Battery Drain – Is your iPhone letting you down?

Setup Bedtime on iPhone

Apple Shutting Down iTunes

iPhone Battery Drain – Is your iPhone letting you down?

If you having issues with yor iPhone it could caused by problems with your Battery.
iPhone battery drain Issues you might experience are:

  • Apps are slow to launch
  • Slow frame rates while scrolling
  • Backlight dimming
  • Lower speaker volume
  • Gradual frame rate reductions in some apps
  • Camera flash disabled
  • Apps refreshing in background may require reloading upon launch

If you are having these issues mentioned the next step is to check your battery health and you can do that by going into Settings, Battery, Battery Health.

iPhone battery drain
iPhone Battery Drain – Battery Health

The first thing you need to look at is the Maximum Capacity %. As you can see here on my older iPhone 7 the Maximum Capacity 75%. Well what does that mean?If you compare that with my iPhone 8 which has Maximum Capacity of 100%. It means that every time I charge my iPhone 7 I am only getting a 75% charge of the battery.

iPhone Battery Drain – Check your Maximum Capacity.

So guys go ahead and check what the Maximum Capacity % is on your iPhone right now what number is it set too? I would be interested in knowing. So if my brand new iPhone use to give me 10 hours of battery life on a full charge and I am missing 25% I only get 7.5 hours now instead of 10 hours I use to get.

What do the other messages mean?

Under Peak Performance you will get a series of other messages and they mean different things. The first one is Performance is normal which means just that its normal. Nothing to worry about. The second one is Performance management applied. This means your iPhone shutdown because it couldn’t handle the power needed to perform a function. This management should stop the iPhone from crashing in the future.

The Battery Health unknown message – means that the iPhone can’t talk to the battery for some reason. Could be due to a hardware fault. If you get this take your iPhone into Apple.

Performance management turned off – if you get this message you have turned the Performance management off and your iPhone has crashed. The iPhone will turn this feature back on to stop future shutdowns.

Battery health degraded – This is the error I was getting on my iPhone 7. This means the battery is not as good as it was and it will need replacing to improve the performance and battery life.

Important Battery Message –
This error only Applies to the iPhone X series. It means that the iPhone can’t verify if the battery is genuine. This might be helpful to check if you are buying the iPhone second hand. Otherwise you can take the iPhone to a Apple Authorized service provider.

Also guys don’t forget to check out my other videos like Low Power Mode on iPhone. Do me a favor and hit the subscribe button and smash the bell icon.

Setup Bedtime on iPhone

Apple Shutting Down iTunes

Setup Bedtime on iPhone

If you want a really nice way to wake up in the mornings you can setup Bedtime on your iPhone.
Bedtime has a slow rising volume alarms that don’t shock you to wake you up.

iPhone Bedtime Setup

To setup bedtime go to Clock and then tap on Bedtime.
Next tap on Set up and then set you Wake up time.
I am going to set my wakeup time for 6:30am. Then tap Next.
Go ahead and choose your alarm. The have some really good alarms let me play a few for you now.

iPhone setup
Setup iPhone Bedtime – Choose your alarm.

Once you have selected your alarm tap next. Set your bedtime, this will play the alarm when its time to go to bed. I am going to set mine for 11:15pm.
And then press next and choose your bedtime schedule days. I don’t want the alarm to wake me on the weekends, so I am going to remove Saturday and Sunday.

Tap next and you are done. Once your in the Bedtime screen if you want to make changes to your schedule tap on your alarm.
In your bedtime schedule you can use the slider wheel to edit your times.

How to turn off Bedtime?

If you want to turn off your bedtime schedule use the toggle switch at the top.
Go back out of bedtime schedule and go into options to see more options.
If you tap on bedtime reminder you can change the ammount of time that the iPhone will remind you.
If you want you can also turn off Track time in Bed and Do Not Disturb During Bedtime.
And lastly you can ajust your Wake Up sound volume. This controls how loud your alarm volume will be.
Tap Done and if you use the health app you can tap Show more in health.

Also guys down forget to check out my other videos like how to setup low power mode on iPhone, Do me a favor and hit the subscribe button and smash the bell icon.

Apple Shutting Down iTunes

Low Power Mode on iPhone

Backup Samsung to PC or Mac