PG27UCDM Review – ASUS ROG Swift 4K OLED Gaming Monitor

PG27UCDM review of the ASUS ROG Swift PG27UCDM 27 inch OLED gaming monitor. This post covers what you get in the box, the monitor features, connectivity, stand adjustments, and the things I have liked after using it for a few months.

If you want to upgrade to a 4K gaming monitor for work, video editing, and fast online gaming, this monitor has some very impressive specs.

PG27UCDM Review Overview

The model in this video is the ASUS ROG Swift PG27UCDM. It is a 27 inch 4K OLED gaming monitor with a default resolution of 3840 x 2160. With 166 pixels per inch it delivers very sharp image quality and clear text.

On the outside of the box, you can see the key specs. These include 4K HDR, 240Hz refresh rate, 0.03ms response time, NVIDIA G-SYNC, HDMI 2.1, USB-C, DisplayPort 2.1a, and a 3 year warranty.

PG27UCDM review

What You Get in the Box

First out of the box is the metal stand which feels sturdy and well made. You will need to remove the little plastic protective pieces before putting it together.

You also get the ROG logo lighting cap which fits on the bottom of the stand and lights up.

A VESA mount is included as well, so you can mount the monitor to a monitor arm or desk stand instead of using the ASUS stand.

There are also customizable plastic caps included. These let you swap out the logo projected onto your desk. I didn’t think I would care much about this at first, but it turned out to be a pretty cool feature.

Inside the box, you also get the usual cables, including USB-C, USB 3.2, DisplayPort, and HDMI. They are branded with the ROG logo, which makes them easier to identify if you have a bunch of spare cables lying around.

Other items in the box include the documentation, a colour calibration report, a felt cleaning cloth, and a useful setup guide. The guide shows you how to connect everything and use the on screen display.

Build Quality and Setup

Putting the monitor together is simple. Plug the stand into the back and tighten the screw underneath. Once that is done you can attach the stand to the back of the display and it is ready to go.

The stand also includes cable management, which helps keep your desk clean and tidy.

If you are tight on desk space, the stand footprint is around 11 inches, so that is something to keep in mind before buying.

Screen Finish

One of the first things you will notice is the semi gloss screen finish. This helps improve picture quality and colour vibrancy, which works really well on an OLED panel.

The downside is that you can get some reflections in brighter rooms, so if your setup is near a window or strong lighting you may want blinds or better light control.
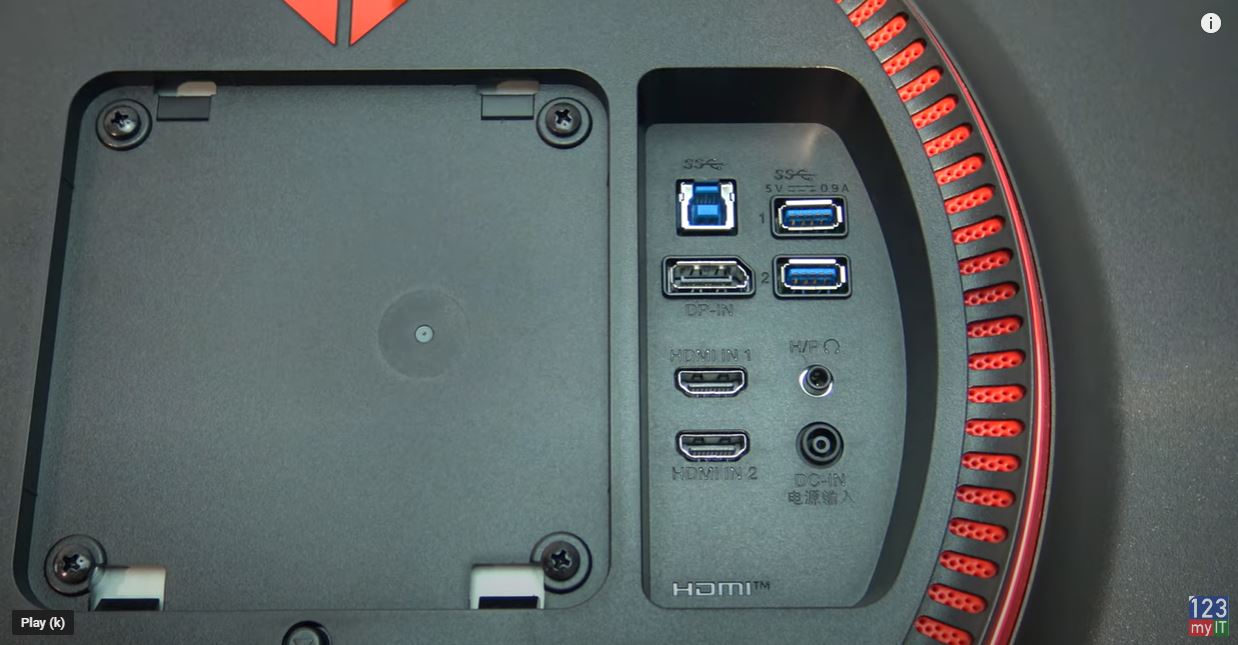
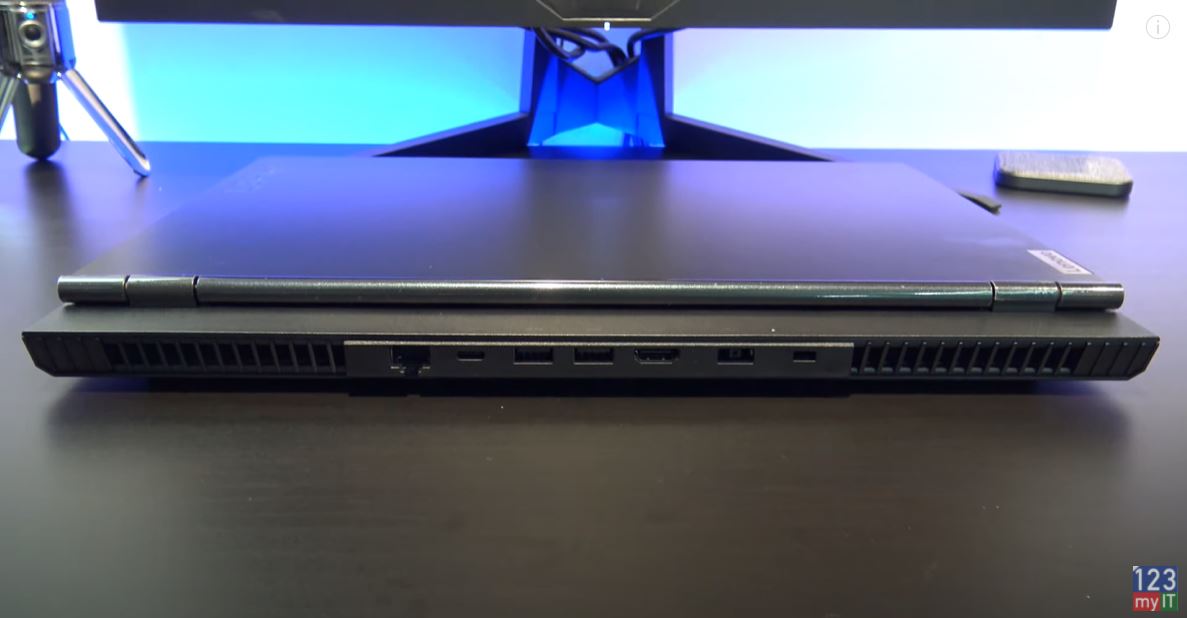
Connectivity

  • Power input
  • 3 x USB 3.2 ports
  • USB hub
  • Kensington lock
  • 2 x HDMI ports
  • DisplayPort
  • USB-C
  • Earphone jack

This gives you plenty of flexibility for gaming PCs, consoles and accessories.

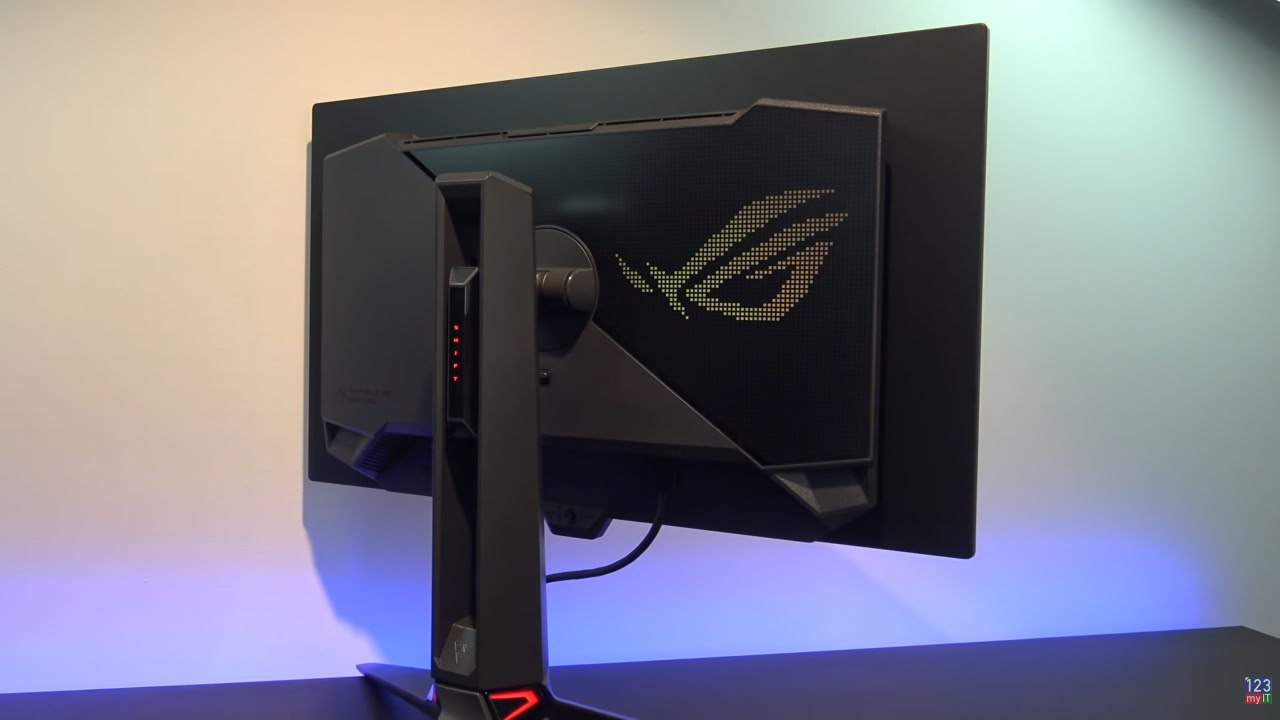
Stand Adjustments and Lighting

The ASUS stand gives you a good range of movement. You can adjust the height, tilt it back and forward, swivel it side to side, and rotate it 90 degrees into portrait mode.

There are also ROG lighting effects on the back of the monitor and on the stand. You can change them in the on screen display menu under Lighting Effect. From there, you can change colours and effects such as breathing and strobing.

Features I Use After 4 Months

After using the monitor for around four months, one feature I have found useful for FPS games like PUBG is the built in crosshair overlay. In games where the normal crosshair disappears, this makes it easier to keep track of your aim.

The second feature I use is the Auto Adjust preset. It turns up the brightness and helps me see enemies more easily in PUBG. There are other modes you can choose from, such as Racing and Cinema, but I don’t really use those.

PG27UCDM Review: Image Quality and Gaming Experience

In terms of image quality, the first thing you will notice is the more vibrant colours and deeper blacks. The next thing you notice is the pixel density. Because this is a 4K screen at 166 pixels per inch, text and images look sharper and more detailed.

What I noticed in PUBG was the extra detail on the characters and the guns. Everything looked amazing and it honestly made me wonder why I didn’t upgrade sooner. That is one of the biggest reasons this PG27UCDM review is so positive.

PG27UCDM Review: PUBG Crashing Fix

Upgrading wasn’t completely without issues. I made the mistake of setting PUBG max frame rates to unlimited and it caused constant crashing.

What fixed it for me was setting the max frame rate to 237, which is 3 frames lower than the 240Hz refresh rate of the monitor when using G-SYNC.

After I changed that setting, the PUBG crashing stopped for me. I’m not saying it will fix every setup, but it worked on my system with this ASUS monitor and an RTX 4070 Ti.

PG27UCDM Review: Neo Proximity Sensor

Another feature worth mentioning is the Neo Proximity Sensor. Go to OLED Care, then Neo Proximity Sensor. There you can set the display to turn off when it detects no movement in front of it.

It works a bit like an iPhone screen turning off when you are not using it.

This can be a good feature for office work, but it can be annoying for gaming. The display may switch off if you are not moving enough in front of the monitor. It reacts to movement in front of the screen, not your keyboard or mouse input.

PG27UCDM Review: Price and Value

Pricing starts at around $1099 USD, so this is definitely not a cheap monitor. I got a better deal during the Black Friday sales, so it is worth waiting for a sale if you are interested in upgrading.

If you want a 4K OLED display with fast refresh rate, low response time, and good connectivity, this monitor has a lot going for it.

PG27UCDM Review Verdict: Should You Upgrade?

Would I recommend upgrading? Absolutely, especially if you are using an older lower PPI display or if you want to move up to a 4K screen. As I mentioned earlier, I don’t regret upgrading.

If you want to check out the ASUS ROG Swift PG27UCDM and other new ASUS monitors, I have left a link in the description below. You can also check out my earlier post on how to fix MacBook Touch Bar issues.

Guys as always thanks very much for watching the video. If you could do me a favour and leave a thumbs up on the video, I will catch you in the next one. If you like gaming gear and monitor upgrades, have a look around 123myIT for more hardware posts and guides.

LG 27GL850-B Gaming Monitor Unboxing & Gaming Settings

Hi Guys Matt from123myit here, in this video I will show you how to an unboxing and first look at the LG UltraGear Gaming Monitor.

The Specs -LG 27GL850-B Gaming

The LG 27GL850-B is a 27-inch 1440p QHD Gaming monitor with a 1 ms response time. It has a refresh rate of 144Hz and its also Gsync and Free sync compatible by using Adaptive Sync. The 27GL850-B is a great buy at the moment retails for around $350 usd and $550 Aussie at the time of this video. If you are interested, I will put a link in the description below.

Other features include black stabilizer and HDR10 support. Let’s take a look what you get inside the box.

Inside the box

First up inside the box you have the base of the monitor stand. It has a black plastic cover with red highlights. Inside the LG UltraGear black box, you get a power plug. So, an Australian New Zealand power plug, but if you are in the US, you would get a US power plug. The power supply is not built into the monitor, and it comes as a separate power brick much like you see with laptop designs. I tested the power draw with HDR Effect turned on which is a bright setting, and the monitor uses about 26 watts of power. When I changed it to Reader it used 13 watts.

Power usage

The worst part when the monitor was turned off totally it still was using 1 to 2 watts while not in use.

Next in the box you have a little cable tidy, Display Port, USB 3.0 and HDMI cable. Also, in the box you have a driver CD, quick start guides and warranty information.

Next up is the arm that connects to the monitor to the base. Taking the monitor out of the box it’s an IPS display so blacks should look darker and colours will be brighter than a TN display. On the back you will see two HDMI and USB down ports. Along with one display and USB up ports. And if you have a VESA stand you can also attach your own.

The Stand

While the stand is solid there is some wobble, but it’s not a deal breaker. You can adjust the height and swivel as well as put it in portrait mode. Here it is beside the Aorus KD25F, which is a TN panel. Can you make out the deeper blacks and brighter colours?

Remembering that its a Nano IPS panel with a resolution of 2560 x 1440 and 350 nits of brightness.

FreeSync and G Sync

To start the OSD there is a little joystick under the logo. The thing I really like about this is it tells you the refresh rate straight away. Sweet so its running at 144Hz and you can see Adaptive Sync is on. In Game Mode it has some modes already to go which is nice. For best results in games, I set this to FPS with and went into the Game Adjust menu and turned Adaptive Sync off. The reason for this is when Adaptive Sync is turned on the Frame Rate in PUBG dropped making it terrible to play.

Adaptive Sync

If you can’t get Adaptive Sync to turn off, go into the NVidia control panel and take the tick out of Enable G-Sync. I am assuming it will be the same thing for AMD graphics cards. Once you have that turned off, go down to Response Time and make sure it is set to fast not faster. This is because the Faster setting only works with allot of errors and it looks bloody terrible.

Try it an test a game. Don’t take my word for it try it yourself. Next up to add a cross hair, go down to the Cross Hair menu and select the cross hair you want to use. I always go for the red one works best for me. Alright go in and check your display settings and make sure your 27GL850 is set to 144Hz.

On the Back

On the back the monitor has a USB hub which I really like as it allows you to plug in extra devices for your desktop. I use a desktop mic so when I turn my monitor off it also turns the mic off which is handy.

Testing how well games play

Alright let’s fire up PUBG and do some testing. So, with Adaptive Sync turned on I was getting around 71 to 74 frames per second. And with it turned off the frames improved all the way up to 110 frames per second. So, you can see why some BenQ monitors don’t even include Gsync FreeSync as it might not always be suitable.

Also, guys don’t forget to check out my other video such as How to Arrange your iPhone icons the Easy Way!. And do me a favour hit the subscribe button and smash the bell icon.

Turn On Background Sounds on iPhone to Help you Sleep

Dont Use Nicehash Optimized Settings

How to Create a Windows 11 Bootable USB

Hi Guys Matt from 123myit. In this video, I will show you how to create a Windows 11 bootable USB. Creating a Bootable Windows 11 USB will allow you to install Windows 11 on multiple computers. You will need a USB flash drive that is at least 8GB in size and you will need a copy of Windows 11. To download a copy of Windows 11 you can check out the how to download Windows 11 video I did earlier and I will put a link in the top of the video now.

Download Windows 11 – Windows 11 bootable usb

Once you have followed my other video and downloaded the Windows 11 iso file. Plug in your USB drive to your computer and double click the Windows 11 iso file. We will be formatting the USB so make sure you backup any files on the USB as this process will wipe any files on the USB.

Windows 11 bootable usb

Open up Disk Management by right clicking the Start button or in the search field type “partitions” and click the top result. The Disk Management screen should pop up. Find you USB drive in this case I know my USB drive was around 60 GB in size so this 57 GB drive is the correct one. Just make sure you have the correct drive because this next step will delete data on the USB.

Deleting Partitions – Windows 11 bootable usb

Delete all partitions on your removable USB drive by right clicking on each and selecting “Delete Volume.

Cool, once you have done that right click again and create New Simple Volume. Click next and type 1000 in the Simple volume field. Click next and next again. Then set your file System to FAT32 and rename your Volume label as BootPart. Then click next and finish. IF done right the drive will pop up in Windows. Do the same steps again, but in the Volume label type DATAPART. Click next and then finish.

DATAPART

The DATAPART window will also popup just close it.

Double click on the Windows 11 ISO file and Copy all the files and folders, except the “sources” folder, from the Windows 11 ISO to the FAT32 BootPart partition on the USB drive.

To do this select all your files then hold down CTRL and click on the sources folder. This will exclude the folder from the copy. Once you have done that just drag the files across to the BOOTPART partition on the USB.

Once they are, all copied go ahead and create a new empty sources folder. Make sure it is the same name as the source folder you did not copy across.

Sources Folder

Next, go into the sources folder and find a file called boot.wim and copy to the new sources folder on the USB drive. Cool, now go to the Disk Part partition on the USB and copy the all the files from the Windows 11 ISO to the DISKPART partition.

Awesome, once the files have copied across you have finished creating a Windows 11 bootable USB. You can now use this USB to install Windows 11 on any computer. In my next video, I will show you how to use this USB to do a clean install of Windows 11.

Guys don’t forget to check out my other videos such as how to fix The PC must support TPM 2.0 error on HP. In addition, do me a favour if you know anyone who might need this video please share it will them, hit the subscribe button and smash the bell icon.

Fix The PC must Support TPM 2.0 Error ASUS

Fix The PC must Support TPM 2.0 Error Gigabyte

Fix The PC must Support TPM 2.0 Error HP

Hi Guys Matt from 123myit. In this video, we will show you how to enable TPM PTT on your HP computer. Guys if you are trying to install Windows 11 and you are getting the error The PC must support TPM 2.0 then this video will help. TPM stands for Trusted Platform Module and it can prevent malicious attacks on your hardware. And is required to be turned on to run Windows 11. TPM 2.0 Error HP can be annoying. Lets fix it.

TPM 2.0 Error HP

Find the TPM setting – TPM 2.0 Error HP

Go ahead and restart your computer and you need to log into your computer bios. To do this when your computer starts up you need tap the delete button on your keyboard. For my Asus motherboard the button is Delete, however if can be different on different motherboard. If its HP it could be F10. Other models it could be Esc, F1 or F2 keys.

Bios Settings

Once you are logged into, your Bios go to the Security and down to TPM embedded security. On the TPM device in the drop down change it from Hidden to Available.  Press  F10 to save. The computer will restart and then it might ask you to press F1 to accept the change. Press F1 and that is that all you need to do. To fix the TPM 2.0 Error HP.

Awesome, this time when you go to install Windows 11, you should get past that error and get the ready to install screen.

Guys don’t forget to check out my other videos such as how to fix The PC must support TPM 2.0 error on Asus. And do me a favour if you know anyone who might need this video please share it will them, hit the subscribe button and smash the bell icon.

Fix The PC must Support TPM 2.0 Error Gigabyte

Download Windows 11 ISO File

Fix The PC must Support TPM 2.0 Error ASUS

Hi Guys Matt from 123myit. In this video, we will show you how to fix the TPM 2.0 Error ASUS on your Asus motherboard. Guys if you are trying to install Windows 11 and you are getting the error The PC must support TPM 2.0 then this video will help. TPM stands for Trusted Platform Module and it can prevent malicious attacks on your hardware. And is required to be turned on to run Windows 11.

Heres where you can find the setting on Asus motherboard – tpm 2.0 error gigabyte

TPM 2.0 Error ASUS

Go ahead and restart your computer and you need to log into your computer bios. To do this when your computer starts up you need tap the delete button on your keyboard. For my Asus motherboard the button is Delete, however if can be different on different motherboard. If its HP it could be F10. Other models it could be Esc, F1 or F2 keys.

Once you are logged into your Bios go to the advanced mode down the bottom, you can also press F7. Then click on the Advances Tab up the top and click to highlight the TPM Device Selection menu. Change the discreet TPM to Firmware TPM, click ok. Then go to the Exit Tab and click Save Changed & Reset. That is that all you need to do.

Awesome, this time when you go to install Windows 11, you should get past that error and get the ready to install screen.

Guys don’t forget to check out my other videos such as how to fix The PC must support TPM 2.0 error on Gigabyte. And do me a favour if you know anyone who might need this video please share it will them, hit the subscribe button and smash the bell icon.

Download Windows 11 ISO File

Record Your Screen on iPhone or iPad

Fix The PC must Support TPM 2.0 Error Gigabyte

Hi Guys Matt from 123myit. In this video, we will show you how to enable TPM PTT on your Gigabyte motherboard. Guys if you are trying to install Windows 11 and you are getting the error The PC must support TPM 2.0 then this video will help. TPM stands for Trusted Platform Module and it can prevent malicious attacks on your hardware. And is required to be turned on to run Windows 11.

Heres the error to look out for – tpm 2.0 error gigabyte

tpm 2.0 error gigabyte

Go ahead and restart your computer and you need to log into your computer bios. To do this when your computer starts up you need tap the delete button on your keyboard. For my Gigabyte motherboard the button is Delete, however if can be different on different motherboard. If its HP it could be F10. Other models it could be Esc, F1 or F2 keys.

Once you are logged into your Bios go to the Peripherals tab up the top. Then to Intel Platform Trust Technology PTT. And then set it to Enabled. That is that all you need to just make sure you save it by going to Save & Exit. tpm 2.0 error gigabyte.

Awesome, this time when you go to install Windows 11, you should get past that error and get the ready to install screen.

Guys don’t forget to check out my other videos such as how to download Windows 11. And do me a favour if you know anyone who might need this video please share it will them, hit the subscribe button and smash the bell icon.

Record Your Screen on iPhone or iPad

Turn on Speak Screen on your iPhone or iPad

Download Windows 11 ISO File

Hi Guys Matt from 123myit. In this video, we will show you how to download Windows 11 ISO file. You can use this Windows 11 ISO file to install Windows 11 directly or create a USB drive to do clean installs of Windows 11. I will do a video on how to setup a Windows 11 USB after this video. So hit subscribe if you are interested in seeing that one.

UUPdump.net website – Download Windows 11

We are going to download Windows 11 from the uupdump.net. website to find the link, head over to 123myit.com and click on downloads. I will put all the links in the description below. Once you are on the downloads page. Scroll down to where is says create Windows 11 ISO file here and click that.

IT will then take you to the uupdump.net website. Click on the x64 button for 64 bit computers and you can use the arm64 for non x86 computer and Raspberry Pi.

download windows 11

Next click on the Cumulative Update link.

Click Next. And then select the version of Windows you want to download. I already downloaded the Pro version so I will try the Home version next. Click next.

Cool, Make sure you have “Download and convert to ISO” and the “Include updates” selected and click on Create download Package.

Go down to the Zip file and click on open when done. It will download and when it opens you will need to click on extract all files. I am just going to extract them to my desktop.

Awesome, just minimise your other windows. And Double click the file that says uup_download_windows.cmd.

Run the batch file

Ok that will run a batch file that downloads all the files from Microsoft and creates the Windows 11 ISO file for you. Depending on your internet, this might take a while so go get a cup of tea or coffee and maybe hit that subscribe button.

Because this takes a while, I will cut the video until the end. Ok so you should see your Windows 11 ISO file appear on your desktop. When the script finishes press 0 to exit.

Cool so you are complete, your Windows 11 ios file has downloaded and you can rename it if you want. You can also delete the other files on your Desktop you do not need them anymore. I want to show you one more thing before you go.

Install Windows 11

To install Windows 11 just double click and open the file and double click the setup.exe file. If you run the install and click, next and you come up with this error. The PC must support TPM 2.0. Do not worry I will show you how to fix this error in a video after I publish this one. I will put a link to that video and in the top of this video and the description below.

Guys don’t forget to check out my other videos such as Record your screen on iPhone or iPad. And do me a favour if you know anyone who might need this video please share it will them, hit the subscribe button and smash the bell icon.

Turn on Speak Screen on your iPhone or iPad

Scan a QR code on iPhone iPad or iPod Touch

Lenovo Legion 5 with Intel

Hi guys and welcome to 123myIT. In this video, we will show you everything you need to know about the Lenovo Legion 5 with Intel.

What is the Legion 5?

The Legion 5 has almost everything you need in mid-range gaming laptop. This includes a Intel i7 Hexa-Core CPU. NVIDIA GTX 1660 TI Graphics and 256GB SSD.  All for around the $1000 USD. Check for updated prices in the description below.

This 15-inch laptop is built with what Lenovo calls Phantom Black plastic. On the inside the plastic is rubberised which makes it comfortable to use. The build quality is good and there is not sharp corners or edges.

Dimensions – Lenovo Legion 5

Lenovo says the starting weight is 2.3 KGs or 5 pounds and mine was the same. When you add the brick and cables it was 3.2kgs or 7 Pounds. In term of size the its pretty average for a gaming laptop at this price point. So it not super thin but its not massive either.

The display is a 15.6 inch 1080p, however just be careful when you buy as my model didn’t include the 144 Hz display rather 60hz only display. Its not all bad as when I plug it into an external monitor I can get 144Hz, but its something to be aware of.

In the Legion Edge software you have the option of disabling Hybrid Mode which will give you a performance boost in games at the expense of battery life. Backlight bleed on my display was fine and I didn’t notice it at all.

Across the top you have a 720p camera with a privacy shutter. The camera itself is pretty blurry and you can see its slow to respond when I move my hand. My keyboard looks pretty cool and it came with a single zone of backlight, along with many other RGB colours over 4 zones.

Keyboard

Typing on the keyboard was fine. However I am use to a desktop keyboard and I found some of the keys in slightly different position to what I am use to. So it may take a bit to get use too.

The function and Q keys allow you to cycle through performance modes and the power button changes colour to reflect the performance mode you are in. A really cool feature.

Trackpad was fine sometimes I miss click and it does pick up fingerprint, but seems to clean ok. The lid is designed well and you can open it with one finger and it folds all the way back 180 degrees. The keyboard flex was great. I didn’t find my flex at all. There was more flex on the display, but it wasn’t annoyingly wobbly.

Lenovo legion 5

Lenovo Legion 5 Ports and Connectivity

On the left side you have an air vent along with a usb 3.1 gen one port and an audio jack.

On the right side you have a power light, novo button, USB 3.1 gen 1 port and another air vent.

The back you have a gigabit Ethernet port, USB 3.1 display port, two usb 3.1 ports a HDMI, power connector and a Kensington lock.

On the bottom you have two big air vents which push hot air away from the CPU and GPU. And on both sides you have 2 two watts speakers. Lets test how good they are.

So they are a little bit tinny, definitely not as good as the M1 MacBooks review I did link in the description.

Benchmarks

Let test it out with Heaven benchmark and the laptop is in performance mode. While that’s running I will try and give you an idea of how loud the fans gets. Heaven benchmark result was FPS: 147 with a score of 3718. Min FPS was 39 and max was 296. If I put pubg in Ultra settings I was getting about 88 to 101 fps. Doing the same thing with Fortnight and putting it into Epic settings I was able to get around 100 fps it did drop to 45 but that was temporary.

In terms of heat the keyboard does seem to heat up quite allot, but not around the WASD keys which is nice design. This means that your hand should get to uncomfortable when gaming. Viewing Angles on the display were very good take a look.

So would I recommend the Legion 5. Yeah I would I think it’s a great laptop the only concern you might need to have is to make sure you get the right screen with 144hz refresh rate. It makes a big difference.

Guys don’t forget to check out my other videos such as How to clean a GPU in 2021. And do me a favour if you know anyone who might need this video please share it will them, hit the subscribe button and smash the bell icon.

Transfer Data Android to Android 2021

Transfer Data Android to iPhone 2021