Clean GPU in 2021

Hi Guys and welcome to 123myit. In this video, we will show you how to clean GPU in 2021. Ok Guys If you are like me and you have a Crypto GPU or a Gaming GPU and you have been using it a while and it needs a clean then follow me and I will show you how to fix it up.

In this video, we will clean the GPU as well as replace the heatsink thermal paste and the thermal pads.

Dirty GPU to Clean GPU

The model I have here is the Radeon RX 570 and I was using it on a mining rig and as you can see its really dirty and clogged up with dust and to the point where its just over heating all the time. And even some of the heat sink is starting to corrode.

Take the GPU apart

Let us get started. The first thing you will need to do is take apart the card. You can do that by finding the screws that attached the fans to your heatsink. Once you have found them, just go ahead to and remove them. If you have, a different model and you are unsure. My best advice is to take it slow and gently. Moreover, do not get frustrated with it, as you will wreck your card.

When you have the screws loose gently, try to remove the Fans. With my card I have 3 fan cables which I need to remove. Be very gentle with these cables. Make sure you pull them out by the plug and not by the cables. If you pull it out by the cables, there is a chance the cable can break.

Go slowly

Just do your best to kind of slow massage them out. This top one was in awkward position so I just leave it and try doing the bottom one. Try not to force things.

Finally, I get the bottom cable off and wow check out all that dust and the corrosion. To clean the dust off the heat sink, some people use a can of compressed air and blow It everywhere. I just use a vacuum with brush attachment. In addition, do the same cleaning on the fans.

Remove Heatsink

Next step is to remove the heat sink screws. Generally, they will be the four screws on the back of the card. Gently try to remove the heatsink. If it does not move, do not force it. Go back and check there are no more screws to remove.

Cool, there it goes I had two more screws to remove. Therefore, we are going to replace the Thermal pads and Thermal paste. As you can see, the Thermal Pads are pretty much gone on the memory. Gently remove the Thermal Paste. I very slowly just peal it off where I can.

The harder dry pieces gently remove with a screwdriver. Make sure you do not scratch the memory.

How to Clean GPU

You can use a damp cloth or an alcohol wipe to remove any leftover thermal pads and thermal paste.
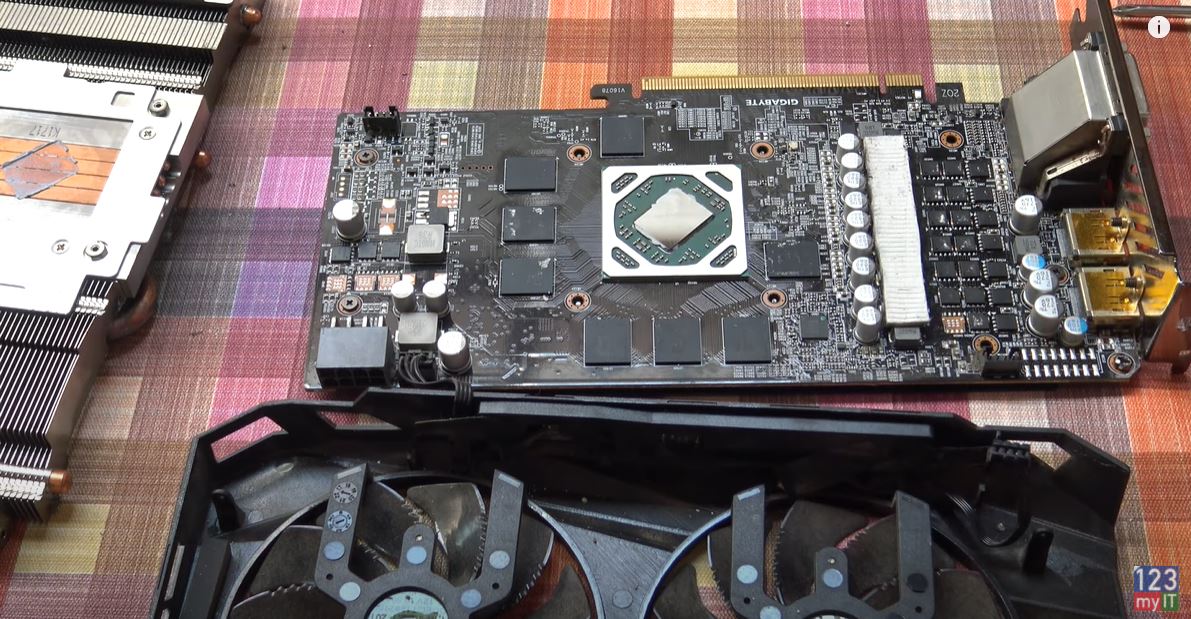
Clean GPU

Ok time to apply the new Thermal Pads and Paste. There is different thicknesses of thermal pads that go on the memory. On this RX570, .05 thickness goes on the memory and 1.0 goes on the VRMs. However, the VRM Thermal pads seemed ok on this card so I am not going to replace those. I will show you what they are in a second. Also, If you want an Amazon link the Thermal paste and Pads I will leave a link in the description. Cut the thermal pads to size and remove the two bit of plastic either side. Then place it carefully on the memory. If you need to know what thickness, Thermal pads go on your GPU then Google your GPU along with Thermal pad size.

Adding Thermal Paste

Do the same clean for the heatsink and then apply the Thermal Paste. I just put a little bit of Thermal Paste on the GPU. It will spread out when the heatsink and GPU are pushed together.

Both sides of the heatsink have guiding screws, which allows me to place the heatsink on in the right spot.

You can see there is more Thermal pads on the heatsink. It is in good condition so I did not change it.

Once the heatsink is back on flip the card over and replace the screws. Next up replace the fan power cables and screw the fans back on to the GPU.

Awesome you have now cleaned the GPU and replaced the Thermal Pads and Paste. Time to put it back to good use.

In addition, people do not forget to check out my other videos such Transfer Data Android to Android. And do me a favour if you know anyone who might need this video please share it will them, hit the subscribe button and smash the bell icon.

Transfer Data Android to iPhone 2021

Samsung Galaxy S21

Gaming PC Settings – Nvidia Control Panel

Use the Nvidia control panel to increase performance of your games.

Nvidia Control Panel – What can it fix?

If you are having issues with your Gaming Pc such as Low Frame rates
Game lag or Game Stuttering, then this video should help. By following this video and optimizing the Nvidia control panel you can do the following.

  • Increase your Frames rates.
  • Fix Game Stuttering
  • Increase power
  • Optimise Nvidia GPU
  • Best colour settings and brightness for games
  • Smooth out your gameplay

As mentioned this video is for Nvidia GPU, If you have an AMD GPU I plan to do video for AMD as well so make sure you hit the subscribe button.

Nvidia Control Panel – Config

Alright first step is to open your Nvidia control panel. You can do this by right clicking the Desktop and selecting Nvidia control panel.
If you cant find it there try looking in the bottom right hand corner of your screen near the time. If you still cant find it, check what GPU you have installed by right clicking the start button and selecting Device Manager.
Under Display adapters you can check what Nvidia GPU you have and download the driver for it.

Download your GPU drivers – Nvidia.com

Head over to nvidia.com and download your driver or you can download the GeForce Experience software and I will leave links to those pages in the description below.

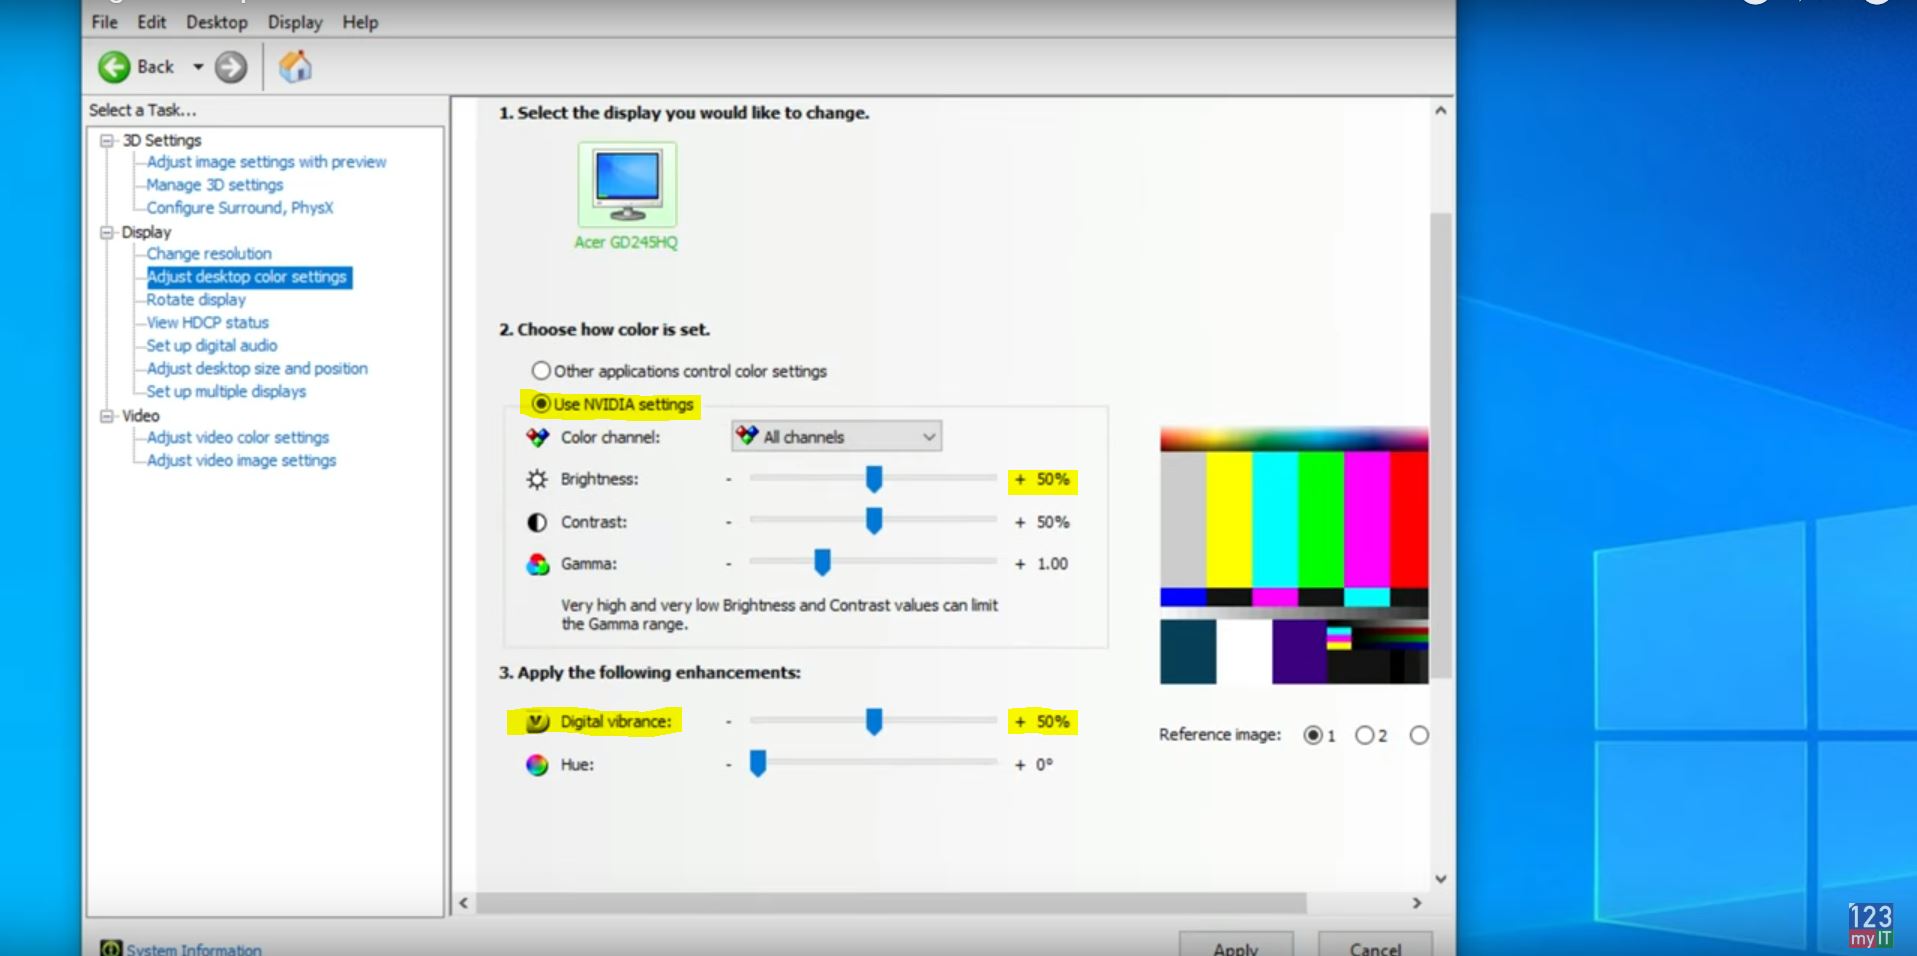
In the Nvidia control panel go to Adjust image settings with preview. Click on use 3D image settings and click Apply.
Next up click on Manage 3D settings and make sure you are on the Global Settings Tab. These settings will apply globally you can change these at any time or click restore if you want to set settings back to defaults.

  • Set Ambient Occlusion to Off
  • Anisotropic filtering to Off
  • Antialiasing to Off
  • Leave Gamma correction On
  • Antialiasing – Mode Off

Antialiasing on or off?

Don’t worry you can still turn Antialiasing on in Game. Also if the options aren’t the same as this video just change the options that are the same.

  • CUDA -GPUS Should be set to all.
  • DSR Factors should be off.
  • With Maximum pre rendered frames set this to 1, if you have an older pc you can try setting this to 2 or 3. But if you have a newer PC set this to 1.Multi-Frame Sampled AA set to Off. Open GL set to Auto.
  • Power Management Mode set this to Prefer Maximum Performance.
  • Preferred Refresh rate set it to Highest Available.
  • Shader Cache set to On.
  • Turn on – Texture Filtering – Anisotropic
  • Texture Filtering – Negative LOD Bias set to Allow
  • Texture Filtering – Quality set to High Performance
  • Threaded Optimisation you can set to Auto, however if you play games like PUBG, FORTNIGHT and Battlefield which are quite demanding. You can set this to On.
  • Triple buffering set to Off
  • Vertical sync to Off
  • Last setting Virtual Reality pre-rendered frames set this to the same value as Maximum pre rendered frames.

Once you are done make sure you click Apply. Once you have set this go ahead and click Apply.
Next up go back to the left hand side and click on Adjust desktop colour settings.
Select the Use Nvidia Settings on the right.
Click Apply then click Yes.

PRO TIP!

Heres a little secret. If you play first person shooters you have just made the colours much better than the default ones by selecting Use Nvidia settings. Also if you scroll down to the Digital vibrance slider its default settings is 50%. If you slide this upto 80% suddenly the dark areas of your game will become much brighter. This will allow you to see your emimenes in game before they see you. This really helped me allot in PUBG.

nvidia control panel
PRO TIP: Use Nvidia settings to control brightness and colour – this helps when spotting enemies.

Best image and colour settings

Click Apply and then go to the Adjust video colour settings.
Next up select the with the Nvidia settings. Click onthe Advanced tab.
In the Dynamic range drop down menu select Full. Next click Apply this should allow you to see better colours when watching videos.

Next go to the Adjust video image settings.
In here you can also use the Nvidia settings and change these however you like. These last two settings only change video and image settings outside of Games and they wont effect Gaming performance.

Another point to mention is, if you update your Nvidia driver, make sure you come back to this video and check that the driver update hasnt reset your Nvidia control panel settings back to defaults. And lastly I get asked allot of questions about customising Windows 10 and AMD settings I will do a few more videos on this topic so do me a favor. Hit the subscribe button and smash the bell icon.
iPhone Battery Drain – Is your iPhone letting you down?

Setup Bedtime on iPhone

Apple Shutting Down iTunes

Nvidia Mining Rig – The Gambler Build

Nvidia Mining Rig – The Gambler Build

This video will show you how I went about creating an Nvidia Mining Rig for my friend Phil. Phil likes to Gamble so I called this build The Gambler!
I have setup a full list of parts below if you wish to copy this build. And I have tried to add in some secondary parts list incase some parts are no longer available.
The Gambler build is very simular to my RX570 The Kraken build accept I swapped out the AMD RX 570 cards with Nvidia 1070s.
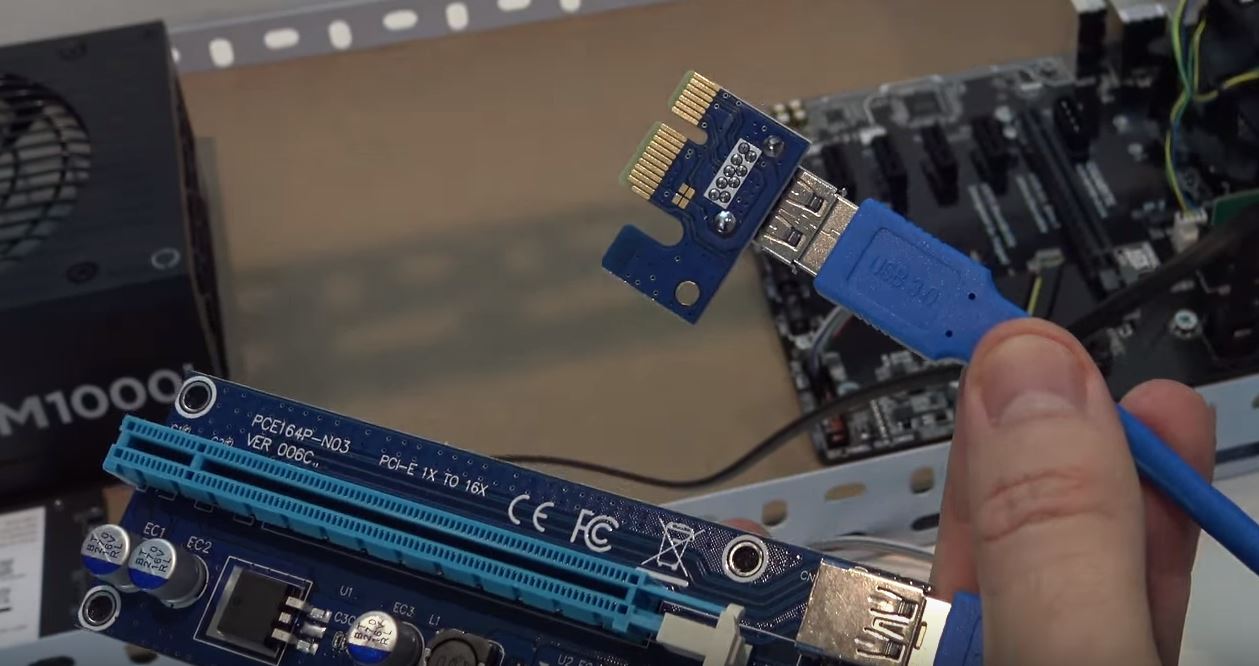
Through this video I also give some tips when building a new rig to do with troubleshooting setup and faulty risers.

Nvidia Mining Rig Riser

a faulty Riser can cause all sorts of issues with mining rigs. The more hardware you add the more chance of failure.

○○○○○○ Want to buy the parts at Amazon ○○○○○○
Gambler Mining Rig Build Parts see below.
► Gigabyte motherboard http://amzn.to/2ivOIUr
(Alternative) Biostar Motherboard
TB250 http://amzn.to/2CvCHVV
► Celeron CPU http://amzn.to/2iwek3v
(Alternative) i7 7700 Intel CPU http://amzn.to/2rgTRGM
i7 Can mine ETN as well.
► Corsair 1000 watts http://amzn.to/2HtzCts
(Alternative) EVGA Power supply http://amzn.to/2iwnIUz
► Crucial 8GB Memory http://amzn.to/2ivo6Tm
(Alternative) G.Skill Ripjaws Series
http://amzn.to/2Djz5aR
► Couldnt find the GALAX model on AMAZON so just grab any
card will do fine. http://amzn.to/2ECsUDz
(Alternative)
1080 TI http://amzn.to/2FPh4mp
1080 http://amzn.to/2DntBAa
1070 TI http://amzn.to/2FTNRa6
1070 http://amzn.to/2rlDt7K
1060 6gb http://amzn.to/2DvTTzl
1050 TI http://amzn.to/2Dlcdbe
RX VEGA http://amzn.to/2DMNkWT – 64
http://amzn.to/2DhNXGK – 56
RX580 http://amzn.to/2DQTeq5
RX560 http://amzn.to/2DMrNgS

► PCIE Riser cards http://amzn.to/2iv1nXK
(Alternative) Mailiya 2-Pack PCIe Risers Dual Chip
http://amzn.to/2BDyIKv
or
Rebbic Latest VER009S 2-Pack PCI-E 16x
http://amzn.to/2HqyXsH
► SSD SanDisk http://amzn.to/2Cx9IBq
(Alternative) Any 120gb will do. http://amzn.to/2Hq4hrD
► Frame if you need one. http://amzn.to/2CuqIrN
► Fans to Keep rig cool http://amzn.to/2Gmk759
► Power Button Cable for motherboard.
http://amzn.to/2FUGMpU
(Alternative) http://amzn.to/2sEkAgT
► Power meter http://amzn.to/2FQgW6l
(Alternative) TP LINK Smart Plug http://amzn.to/2Grlsb0
P3 P4400 Kill A Watt Electricity Usage Monitor
http://amzn.to/2BCiCR9
► PCIE M.2 Adapter Card http://amzn.to/2mOofTl
(Alternative) http://amzn.to/2C6lYNi
► Tripp Lite Heavy-Duty Power Extension Cord 15A
http://amzn.to/2CtRf8N

Asus Strix Geforce GTX 1070 O8G Unboxing Firstlook

Asus Strix Geforce GTX 1070 O8G Unboxing Firstlook

This video will show you an unboxing of the Asus Strix Geforce GTX 1070 O8G graphics card.

8 GB 256-Bit GDDR5
Core Clock 1,657 MHz – OC Mode
1,632 MHz – Gaming Mode (Default)
Boost Clock 1,860 MHz – OC Mode
1,835 MHz – Gaming Mode (Default)
1 x DVI-D 2 x HDMI 2.0 2 x DisplayPort 1.4
1,920 CUDA Cores
PCI Express 3.0

○○○○○○ Want to buy the Asus at Amazon ○○○○○○
►Amazon US – http://amzn.to/2t4eIcA

For this guide and other 123myIT social pages see the links below.

Facebook: http://www.facebook.com/123myit
Twitter: https://twitter.com/123myit
Google+: https://plus.google.com/+123myIT
Instagram: http://instagram.com/123myit