This video will show you how to Downgrade iPhone 3GS iOS Firmware from 6.1.6 to 6.1.3.
How to Downgrade iPhone 3GS iOS Firmware from 6.1.6 to 6.1.3
13

This video will show you how to Downgrade iPhone 3GS iOS Firmware from 6.1.6 to 6.1.3.
This video will show you where to Find iPhone iPad & iPod iOS Firmware on the 123myIT.com website.
This video will show you an Unboxing and First Look the at HP Probook 430 G1 Laptop.
Want to see a review on the bigger brother of this laptop? click here for the review on the HP 650 G1 Probook.
This video will show you how to install Windows 8.1 on a Mac running OS X Mavericks.
What you will need.
* A blank DVD to burn Windows 8.1
* 1GB USB Drive to store the Windows Support Software
Step 1. Go to Go and Utilities and click on Bootcamp assistant. Run the Bootcamp assistant and click continue. Put a tick in Download Windows Support Software and tick Install Windows 7. On later versions of Mac it will have Install Windows 8.
Step 2. Make sure you have your USB drive plugged into your Mac. This will be formatted with the MS Dos FAT file system. Once this is formatted you will be adding the boot camp drivers for your Mac hardware to the USB drive. To find out more info on the boot camp drivers needed for your model of Mac click your model below.
MacBook Pro
MacBook Air
MacBook
iMac
Mac mini
Mac Pro
Step 3. After clicking continue you will need to select the USB drive that you just formatted with FAT. Then the next screen should display as “Downloading Windows support software . . .” and then “Saving Windows support software”.
Step 4. You can install Windows 8.1 via DVD or ISO file depending on the age of your Mac. For this video we use a DVD and if you don’t have a copy of Windows 8.1 handy you can actually download and use the Windows 8.1 preview version from the 123myIT.com website here. This preview version will ask you to buy a copy of Windows after one month.
Don’t know how to burn the Windows 8.1 ISO file to DVD? The two videos below will show you how.
How to Burn an ISO to DVD Windows Bootable
or
How to Burn an ISO or DMG file to DVD on a Mac
Step 5. Click Add helper. Boot Camp will ask you to put in the DVD you just burnt. You will need to go into Utilities and then Disk Utility, select your hard drive and partition your hard drive.
This will create some disk space on your Hard disk to install Windows 8.1. Click the plus button and make the hard drive size equal in size. Click on the second partition and change the name to Windows so you can identify the different drives. Change the format to exFAT. Then click apply and partition.
Step 6. Make sure your Windows DVD is in the DVD drive. Hold down the ALT option Key on your keyboard and restart your Mac. Once your Mac restarts you should see a that has the OS X and Windows drives and DVDs. Like the picture below.
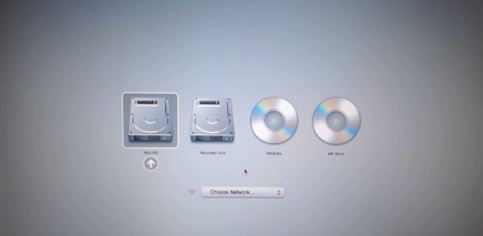
Use your arrows keys and move across until the Windows DVD is selected.
Step 7. You should then see the Windows install screen come up. Select your country and click Next. Enter you serial key. If you are using the Windows Blue Preview version then you can get the serial Key from the Downloads page mentioned earlier. Click here.
Step 8. From here on in you should just be able to follow the prompts. If you find that your mouse track pad or keyboard buttons don’t work, look for your model of the boot camp drivers link above and make sure they are installed.
More info on installing Windows on a Mac, you can check out the official Windows and Apple sites.
This video and article will show you how to do a clean install of OS X Mavericks from USB.
Step 1. Create a OS X Mavericks USB drive. You can do that by following the 123myIT video guide here.
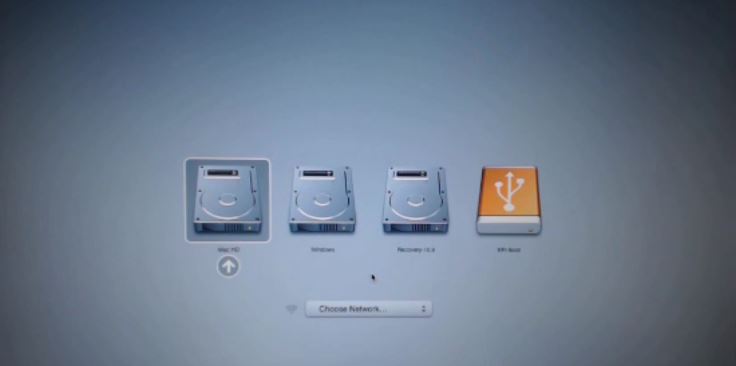
Step 2. Once installed, plug the USB into the side of your computer restart the Mac and hold down the ALT or Option key on the keyboard of your Mac.
Step 3. Use the arrow keys on your Mac keyboard to navigate to the USB drive that you have plugged into your computer. Once highlighted press Enter or Return.
Step 4. That will bring up the OS X Utilities menu. At this stage you can opt to format the hard drive with Disk Utilities. Make sure you backup your data before you do this as you will lose any data on the drive when you format it. If you want to know how to do a backup with Time Machine click here.
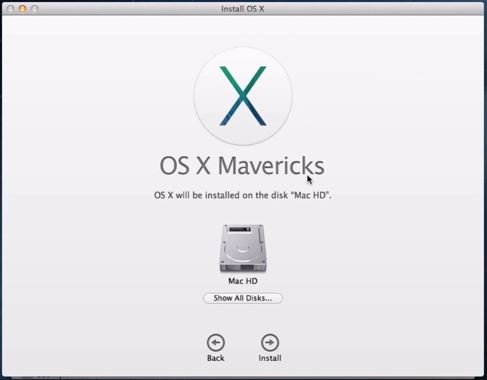
Step 5. Go back to Install OS X and follow the prompts. You will be asked to agree to Apple terms and conditions and you will also need to select the hard drive you want to do a clean install of OS X Mavericks on.
Step 6. This process should take around 30 mins depending on the speed of your Mac. The Mac will reboot a few times while this is happening.
Once the Mac restarts one last time and then you are done you will have to setup your Mac as if it was brand new from the Mac store. You will need to setup the country location, Wifi and there is also an option to transfer some files between your Mac and other computers. Then setup your Computer account.
For more information on OS X Mavericks you can check out the Apple official website here.
This video will show you how to upgrade OS X Mountain Lion to Mavericks using a USB Drive.
NOTE: You will need to create a OS X Mavericks USB drive and if you want to know how to do this you can see the video here. Before going ahead make sure you backup your data just in case anything goes wrong. You can find a video on how to do this here.
Step 1 After creating the OS X Mavericks USB drive, open up the USB drive and click on the Install OS X Mavericks installer.
Step 2 Press continue on the OS X Mavericks install screen. Click Agree and Agree again.
Step 3 Select your Hard Disk that you want to upgrade to OS X Mavericks. This should be your Main Hard Drive. Then click Install and add your password if it prompts you.
Step 4 Once you add in your password you will start the upgrade process. The computer will reboot when it finishes installing. This process can take 30 to 40 mins depending on the speed of your computer.
Step 5 Because this is an upgrade not a clean install of OS X Mavericks all your settings and files should be the same as you left it.
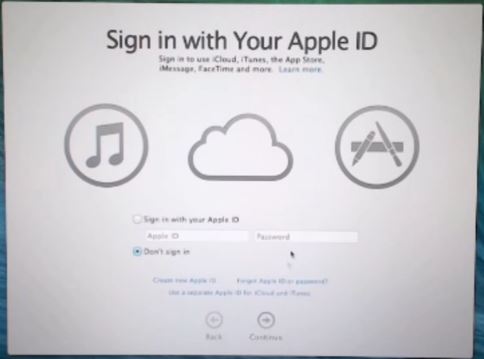
Step 6 You will be prompted for you Apple ID at the log in page. You can choose to sign in or skip this page.
And once you have logged in you should now see your OS X upgrade from Mountain Lion.
If you want some more information you can find it on the Apple Upgrade page here.
If you want to download the upgrade of OS X Mavericks you can find it in the App store here. Just remember that you will need to be running and old version of OS X to that has App Store in the Taskbar.
Good luck and feel free to ask any questions.
Cheers
Matt
This video will show you how to create a bootable Windows 7 8 USB on a Mac.
You can use the bootcamp assistant to create a bootable Windows 7 8 USB on a Mac. However the option may not be highlighted in your bootcamp assistant.
To make the option appear you can try the following steps.
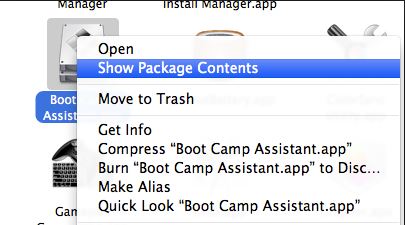
Step 1. Click on Go then Utilities. Find the Bootcamp assistant, right click on it and go to Show package contents and then go into the contents folder.
Step 2.Copy the info.plist file to the desktop and make a backup copy of it and open it.
Step 3. Find the line which says PreUSBbootsupportmodels and remove the Pre from the line. Try running the bootcamp assistant again and this time you should have the Create a Windows 7 or later install disc option.
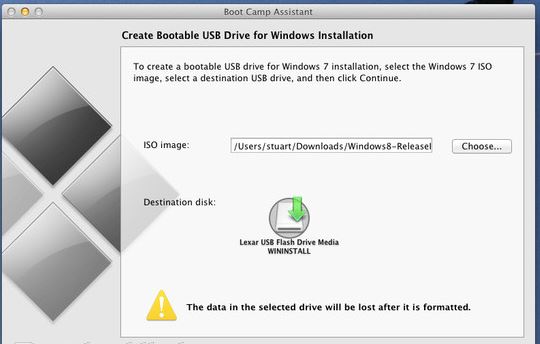
Step 4 Copy the info.plist back to the contents directory. And start the bootcamp assistant again and see if the Create Bootable USB Drive for Windows installation comes up. If not try this next step.
Step 5 Change the USBbootsupportedmodels in the info.plist file.
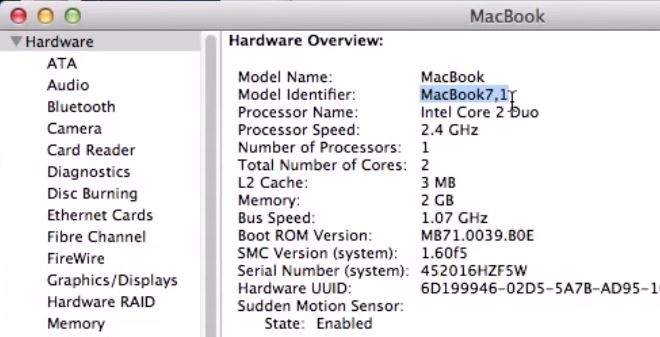
You can find the model on the Mac that you are using by going into the Apple menu then click on About This Mac and then click on More info. Next click on System report and under Hardware Overview look up Model Identifier.
In the example in the video my MacBook model was MacBook7,1.
In the info.plist file I had to change the USB supported models to my MacBook model so that I could create a Windows USB on a Mac.
Hope this works guys. Feel free to leave some feedback.
Cheers
Matt
For more into you can check out Apples discussions page here.
This video will show you how to upgrade Android 4.4 KitKat on a Samsung Galaxy S GT-I9000.
NOTE: This upgrade is for the Samsung Galaxy S GT-I9000 only. Trying this on other model may brick them. You will need to have a rooted you phone first. If you want to know how to do this you can watch the tutorial here.
Step 1. After you have rooted your phone. Go into applications and tap the CWM ClockWorkMod app to install it.
Step 2. You will need to download two files. The first one is the KitKat rom file “cm-10.2.0-galaxysmtd.zip“and the second is Google Apps “gapps-jb-20130813-signed.zip“. Both can be found on the 123 my IT downloads page here.
You can choose which versions you like from the links below. The process for installing them are the same.
For the latest build click here.
Google Apps page click here.

Step 3. Transfer the two files you just downloaded to your phone Backup all your data, contacts, messages and SD card data.
Step 4. Power off your phone and wait until it vibrates. Once the phone is turned off, press and hold the Home, Volume up and Power buttons. The phone will then boot into recovery mode.
Step 5. Once in recovery mode, go down to the menu Wipe data / Factory Reset. Press the Power button and this step will take some time. Next Wipe cashe partition and after that go into Advanced and click wipe delvik cache.
Step 6. Time to flash the rom firmware. Go to the option install zip from SD card. Now scroll down to where you placed the two files above, cm-10.2.0-galaxysmtd.zip and gapps-kk-20140105-signed.zip.
Step 7. After KitKat installs, you will get a blue colour recovery. Then navigate to the location where you have placed the gapps-kk-20140105-signed.zip file and install it. Once its installed go back to the main menu and reboot the phone.
Step 8. The phone will now reboot. It should take around 5 to 10 mins as this is the first time Kitkat has booted so it need to setup everything.
Good luck 🙂
For more info see xda-developers here.
For the latest build click here.
Google Apps page click here.