Backup Samsung to PC or Mac

Step by step guild on Backing up your Samsung device.

In this video and article we will show you how to do a backup and restore of your Samsung device to PC.

Have you ever thought about what might happen to your pictures and videos on your Samsung device if you lose or break it? You don’t need to take the risk you can do a backup and restore with the following steps. Also if you are getting pop up ads on your device and want to clean it these steps will help. If you have a Mac You can also backup your Samsung device to a Mac.

Backup Samsung via Smart Switch app

To do the backup we are going to use an application called smart switch. You can find the direct link to the Smart Switch website here.
In the download section scroll down to where it says smart switch and click that link.
That will take you to the Samsung US website. And you can download Smart Switch for Mobile, Mac and Windows.

Backup Samsung
Plug your Samsung into your computer to start the Backup

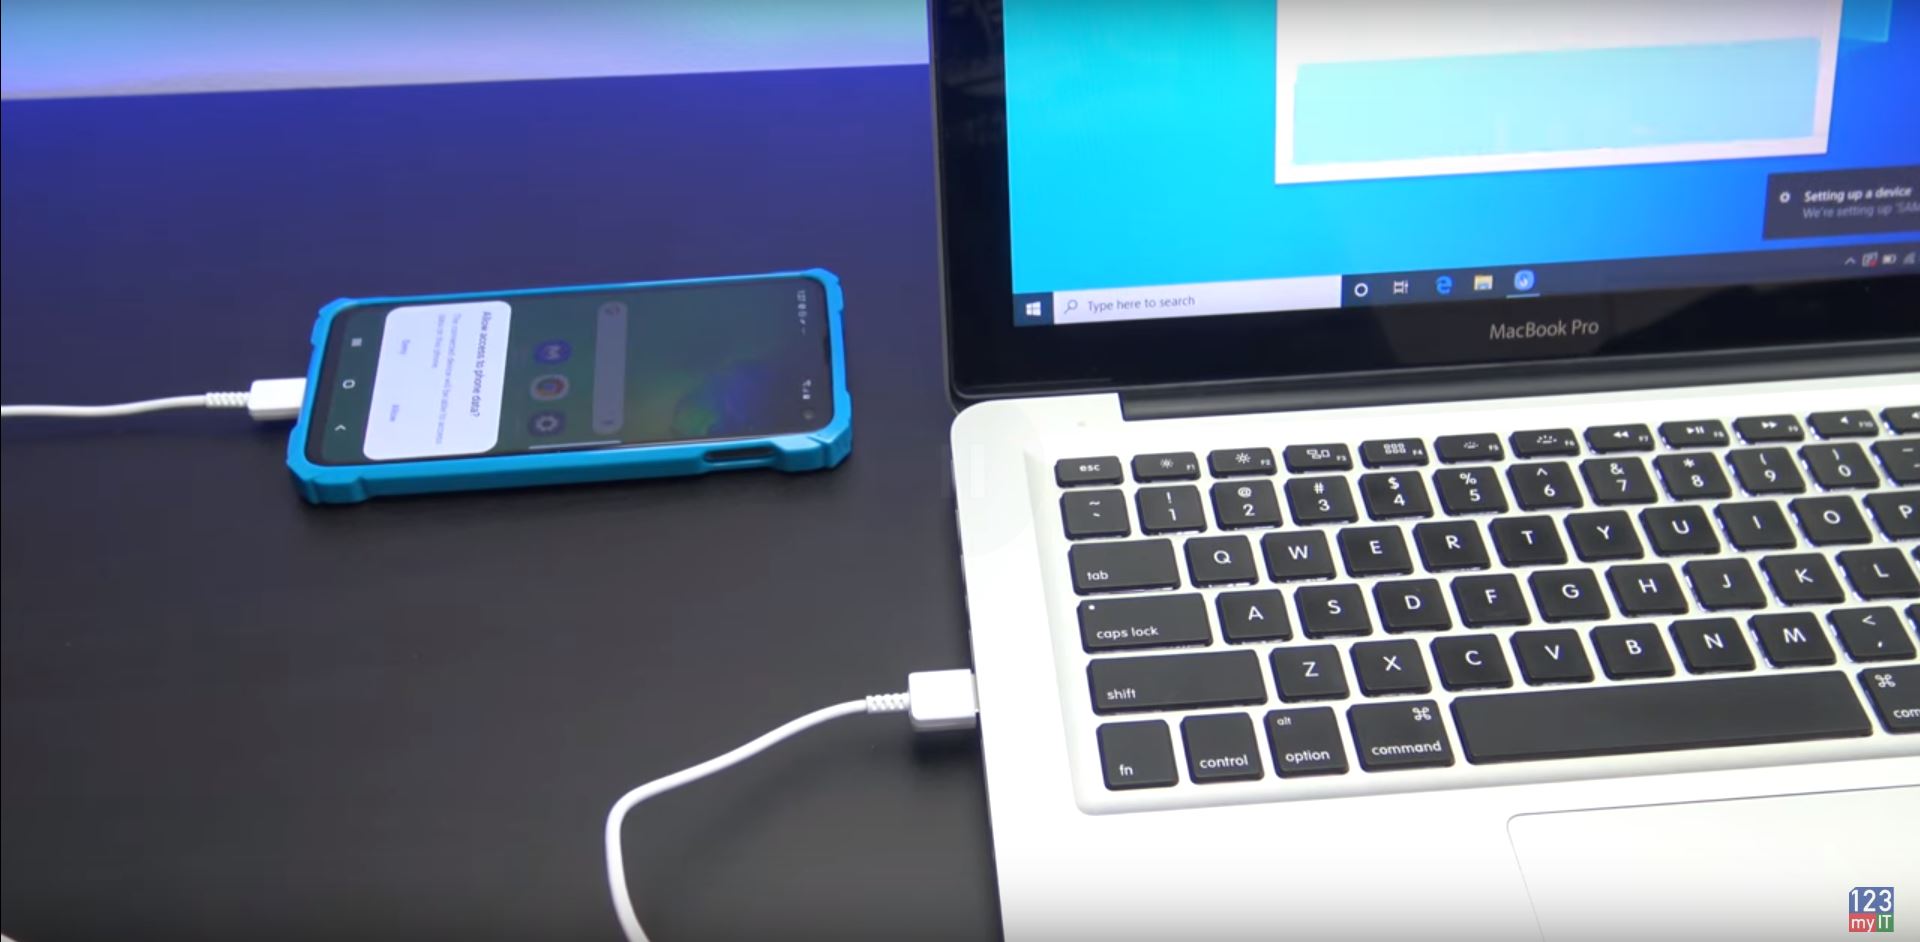
Click the Windows link and download Smart Switch to your desktop.
Once its downloaded install the Smart Switch app. You will need to agree to the terms and conditions. Plug your Samsung USB into your computer. Tap Allow access on your Samsung Device.

Encrypt your data that you are Backing up

If you want to encrypt the data that you store on your Computer with a password go to more and preferences. Then select the checkbox Encrypt backup data. Next up just click on Backup and it will ask you for a password for your backup. You will need to enter the password on your Samsung device. So go a head and Enter a security code on your Samsung device and then confirm it.
Once its finished doing the back up it will give you a list of items that’s have been backed up successfully and a list of items that it didn’t backup.

Click ok and if you want to know what location your files have been backup in simply go back to More and Preferences. It will be under the Backup folder location.

Wiping the Samsung Device

In the video I am going to reset the Samsung device back to factory defaults. So it will wipe any data on the device and I will restore the data from the backup we just created.
I will do this under settings > General Management > Reset > Factory Reset data. However once the Samsung device has been wiped so just go ahead and set it up like a new phone again.

Plug your Samsung back into your computer with the USB and press restore. You will need to tap allow on you Samsung device again. Press Restore now.
And then you will need to enter the password you setup earlier when you created the backup.

Once your data has finished copying you can disconnect your USB cable. Go ahead and double check all our files have been restored and there they are.

Ok Guys, Don’t forget to check out my other videos.

Enable Window Zoom on iPhone or iPad

Make your iPhone iPad speak each word you type

Clean Install MacOS Catalina on any Mac

Enable Window Zoom on iPhone or iPad

Zoom in anywhere on your iPhone or iPad.

In this video we will show you how to enable Window zoom on your iPhone or iPad.
So have you ever needed to zoom in on your iPhone or iPad to see fine text? Have you also noticed that not all apps will allow you to use the pinch to zoom function? What you can do is turn on three finger zoom or window zoom.

How does it work Window Zoom work?

You can use 3 finger double tap to zoom in on any part of your screen. So if you wanted to zoom on your main screen you can just double tap with three fingers. Once you’re zoomed in you can use one finger to move the screen side to side. However if you want to move all around the screen just tap and drag with 3 fingers.You can zoom in on anything and if you want to get back out of zoom simply double tap three fingers.

Enable Windows Zoom
Moving the screen Zoomed in with three fingers.

Turn on Windows Zoom for iOS 13

Lets go through and enable Window Zoom on iOS13 first. Go into settings and then tap Accessibility and then tap Zoom.In your Zoom menu you simply toggle the Zoom switch on. Straight away it starts to zoom just double tap three fingers to zoom back out.

Turn on Windows Zoom for iOS 12

In iOS 12 its a little different. Go into Settings, go into General and into Accessibility and then Zoom. Once again toggle your Zoom button on. In iOS12 it comes up with a little Zoom window which you can drag around with one finger.

You can test it in Safari with some fine text. Simply tap three Fingers and drag the screen around.

Ok Guys, Don’t forget to check out my other videos.

Make your iPhone iPad speak each word you type

Clean Install MacOS Catalina on any Mac

Create macOS Catalina USB Installer Drive

Make your iPhone iPad speak each word you type

Your iPhone iPad can talk!

You probably didn’t know that your iPhone or iPad can speak words back to you as you type. Its pretty good its can actually do full sentences as well. It can even speak EMOJIS! LOL. So if you listen to the start of the video your get the idea of how powerful it can be. The iPhone voice does the video introduction for me.

Step 1 – iPhone iPad Speak – Turn it on

If you are using iOS 13 then you can find the speak words switch under Settings, Accessibility, Spoken Content, Toggle on Speak Selection. Then go down to Typing Feedback and toggle on the Speak words button.

iPhone iPad speak
You can even speak Emojis. 🙂

However if you are on iOS 12 you will find it a little bit different. Go into Settings, General and Accessibility. Then make sure your Speak Selection is toggled on at the top and in Typing Feedback make sure your Speak Words is turned on.

Step 2 – Turn it all off

So to turn off the Speak word function you can just reverse the steps mentions above. So that its guys go ahead and turn it on and have a bit of fun with it.

Ok Guys, Don’t forget to check out my other videos.

Clean Install MacOS Catalina on any Mac

Create macOS Catalina USB Installer Drive

Share files iPhone to Mac with AirDrop

Clean Install MacOS Catalina on any Mac

The clean install process is easy.

In the video we will show you how to do a clean install of MacOS Catalina on any Mac.
In a previous video I showed you how to create a MacOS Catalina installer USB and I here is the link. Create MacOS Installer Drive.

Once you have followed that video and created your USB we can now show you how to do a clean install on any Mac.

One more thing to mention your USB can be USB type A or USB type C it doesn’t matter which one. If you want to buy one similar to what I am using here’s the link.

🔥 Do you want a USB drive like the one in the video? Click here. https://amzn.to/2NqJI5k

Step 1 – Clean Install MacOS

Go ahead and shutdown your Mac. Apple Menu > Shut Down and Select Shutdown again. Next plug in your MacOS Catalina USB. Press and hold your Alt Option Key on your Keyboard and press your power button to turn your Mac on.

You should then see the Boot menu with Install macOS Catalina, use the arrow keys and select Mac OS Catalina drive. Press return on your keyboard.

It will eventually boot you into the macOS Utilities menu. If you want to Upgrade or Install a new copy of macOS, select the install macOS option. I want to show you a clean install so I am going to wipe the hard drive first. Click Disk Utility.

Clean Install MacOS
Disk Utility a program to help you format your hard disk before installing MacOS Catalina.

Step 2 – Disk Utility

When you are in Disk Utility, select your Internal Hard drive in the top left hand corner and press partition. Press partition again. Give your partition an Name in this case I will call it Mac HD. Under format you can select APFS or if you have an older drive Mac OS Extended (Journaled).Click Apply and click Partition. When you have done that go back up to Disk Utility menu and Quit Disk Utility.

Alright you have wiped your hard drive and now you are about to do a clean install of macOS. Select install macOS. Click continue. Agree to the terms. Select Mac HD and then click install.

So by now you Mac would have rebooted and you should get the Welcome screen where you select the country you are from. You have now done a clean install of macOS Catalina and you can just go through all the mac setup prompts, similar to when you first purchased your mac.

Ok Guys, Don’t forget to check out my other videos.

Create macOS Catalina USB Installer Drive

Share files iPhone to Mac with AirDrop

Must have iPhone & Android Accessories

Create macOS Catalina USB Installer Drive

Create a MacOS Catalina USB installer drive

This video will show you how to create MacOS Catalina USB installer drive. This installer drive can be used to do a clean install of MacOS Catalina on any Mac.

Step 1 – Download MacOS Software

You will need to open up a Safari browser and navigate to beta.apple.com. Click on Sign in or join up if you haven’t already. Type in your Apple ID when prompted.

Next up you want to scroll down to where it says “Get Started” and Enroll your Mac. Then the next menu to look out for is the Download the MacOS Public Beta. You will be able to upgrade this version to full version when its released, some time in September 2019. Once downloaded open your beta file and run through the prompts.

Close the installer windows by going to the Apple menu and into the Install MacOS Beta and then quit Install MacOS.

Step 2 – Create MacOS Catalina drive

Go into your Finder menu, then click on Go. Then go down to Applications, find your Install MacOS Catalina app. Right click it and go to show package contents. Go into Contents and go into Resources folder. Then find the create install media file. Drag that Windows to the left side of the screen to give yourself some space.

Go into Finder and do a search for Terminal window. Move your Terminal window to the right so you can see both windows. In the Terminal window type sudo space. Then drag your create install media file into the Terminal window. It should look something like the picture below.

Create macOS Catalina USB
Using the Terminal to create the USB drive.

After that type in –Volume and then press space again. Next go back up to the Go menu then down to Go to folder. In the text box type /Volumes and click on Go.

Plug in your USB to the Mac. I use a SanDisk version but you can buy your own version here. 🔥 Do you want a USB drive like the one in the video? Click here. https://amzn.to/2NqJI5k

Step 3 – Create MacOS USB

Go back into your Volumes folder and you should see your SanDisk USB or whatever USB you are using should appear. Click and drag it into your Terminal window. press Return and the next step will wipe and data on the USB. Type Y and press Return again on your Keyboard. Double click on your USB drive and you should see the installer file. Your drive has been created and you are ready to do a clean install of MacOS Catalina.

Also guys if you want to see more of my videos like share files iPhone to Mac click the links now and help me out by hitting the Subscribe button and smashing the bell icon.

Share files iPhone to Mac with AirDrop

Must have iPhone & Android Accessories

Fix MacBook by resetting SMC

Share files iPhone to Mac with AirDrop

Share files iPhone to Mac with AirDrop

In this video we will show you how to share files iPhone to Mac with AirDrop.
To share Files, Photos and Safari links with other devices nearby you can use Apple AirDrop you can wirelessly.

Step1 – Turn Bluetooth and Wi-Fi on. – Share files iPhone to Mac


On your iPhone swipe up from the bottom to open Control Center. If you are using an iPhone 10, swipe down from the upper right hand corner of your screen and 3D tap in the middle of the network settings box.

Make sure your Wi-Fi and Bluetooth are turned on and if your AirDrop is off, turn it on. When you turn the AirDrop on you will have three options, so you should see Receiving off, Contacts only and Everyone. Select everyone, but be careful leaving this option on in public as you might get Cyber Flashed. What is Cyber Flashing? check out this link here.

Share files iPhone to Mac
Check Bluetooth and Wifi are Turned off

In the Apple menu click on Go and then Scroll down to AirDrop. If your Bluetooth is turned off just go ahead and turn it back on. It is important to make sure your devices are connected to the same Wi-Fi network so that they can see each other.  Can you see your iPhone and other devices in the AirDrop menu? If you can’t see them it is likely because you need to click the drop down menu and make sure Everyone is selected.

Step 2 – Transfer files.


Next up go to the file, photo or document you want to share and tap the Share icon. If you don’t see it tap the more icon to find it.
Next tap your AirPlay icon.
Simply tap the device you want to share with and then you should see a pop up on your iPhone or Mac, you can accept or decline the file.

Step 3 – Turn off AirPlay


To turn AirPlay off go back into your drop down menu and select no one. You can also go into the settings menu and turn blue tooth off. Also guys if you want to see more of my videos like Transfer data iPhone to Android click the links now and help me out by hitting the Subscribe button and smashing the bell icon.

iPhone to Android data transfer 2019 with iCloud

Apple iPhone 8 – is it still good in 2019?

Fix MacBook by resetting SMC

MacBook Pro Unboxing Benchmark

Must have iPhone & Android Accessories

Hi Guys Matt here in this video I will show you what I think are the must have iPhone Smart phone accessories.

Must have iPhone accessories.
iPhone being dropped from a car at 60 MPH. With Element Roll Cage Case.

In the picture above the driver is dropping an iPhone out of a car that is traveling at 65 Mph. Element Case make a case called Roll Cage because it has a protective cage on the back. The case that we use is the one in the video which is made for the iPhone 8 and 7. Element Case also make it for the iPhone X and XS. But the beauty of this case is, you can remove the cage from the back of the case and place it on the front to protect your iPhone.

Other features – Must have iPhone & Android Accessories

– Fast Tap side buttons
– Meets Military grade drop test requirements

Best way to use the Roll cage case?

How could this case be helpful? I think if you were doing some heavy duty work or demanding sports like Skiing or skateboarding you could put the roll cage on your iPhone before hand that would protect your phone from any damage.

The second Element Case is called Rally, it has also been drop tested at 65 mph.
The Rally case fits the Samsung s10e. However they also make it for the Samsung Galaxy 10 and 10 plus as well as the iPhone X and Xs. The features for the rally are the same except its got Table Top protection and Sure Grip.

To fit your Samsung phone into the case just slide it in bottom first and snap the sides into place. The other great thing about the Rally case is it allows wireless charging. So just pop it on a wireless charger and you are good to go. The Roll Cage case also charges on wireless charger as well. But you have to make sure the Cage is on the front of the phone.

Wireless chargers

While we are talking about chargers, the next must have is accessory is a wireless charger. And Tech Matte do a great standup and lay flat wireless chargers. Tech Matte design their wireless chargers in the US.

The standup change has a cool L shape. However if you prefer your phone to be laying down Tech Matte also do a flat fast wireless charger. Inside the box you get a fast wireless charging pad which allows your phone to lay flat rather than standing up.
A bed side table or coffee stand might be a better place for the Tech Matte wireless charging pad. Where as the upright charging stand might be better suited for a study or work place office.
the pad has a really nice felt type material on top which makes for a soft landing for your phone. This wireless charging pad comes with the a USB C cable

One of the great things about wireless chargers is they will work on both an iphone and an Andoird phone.
This means that you no longer need two different phone chargers to charge different phones you can use the one wireless charger and it will work on multiple phones.

Also guys if you want to know how to Stop Pop Up ads on Android click the links below.

Stop Pop-Up Ads on Android

iPhone to Android data transfer 2019 with iCloud

HP ProBook 430 G6 Unboxing & Firstlook