Hi Guys and welcome to 123myit. In this video, we will show you how to use the Accessibility feature called Sound Recognition on your iPhone. This feature will allow your iPhone or iPad to listen out for certain sounds and notify you when it recognizes them.
Here is the Door Knock Notification. Let’s try it again.
Cool, lets go ahead and set it up. You can find it under Settings, Accessibility and Sound Recognition.
Just toggle the Sound Recognition button on at the top and then to select sounds tap sounds below.
My Favorites – Sound Recognition on your iPhone
In here, you have a whole heap of Sounds to try. My Favourites are Door Bell, Door Knock, Baby Crying, Shouting and Coughing. The idea is, let’s say you have a friend coming around to your house but don’t always hear the knock at the door. You could put your iPhone or iPad near the door and when they knock you would be notified on your iPhone, iPad or Apple Watch.
Once you turn on Sound Recognition for the first time. You can access it quickly from the Control Panel. So swipe down from the top on your device and then Tap to turn it on or off.
In your control panel you will see the new Sound Recognition button. Just tap it to turn it off and on. And then if you tap and hold you will be able to change which sounds you want your device to listen for.
Also guys don’t forget to check out my other videos such as the Secret iPhone Trick called Back Tap. And do me a favour if you know anyone who might need this video please share it will them, hit the subscribe button and smash the bell icon.
Hi Guys and welcome to 123myit. In this video, we will show you how to use the Accessibility feature called tap back on your iPhone. This Secret iPhone Trick feature allows you to tap the back of your iPhone two or three times and the phone will perform an action.
You can apply all sorts of different action like invert colours or scroll up and down just by taping the back of your iPhone.
Ok lets go ahead and set it up. You can find Back Tap under Settings Accessibility Touch and then scroll to the bottom and you will find Back Tap.
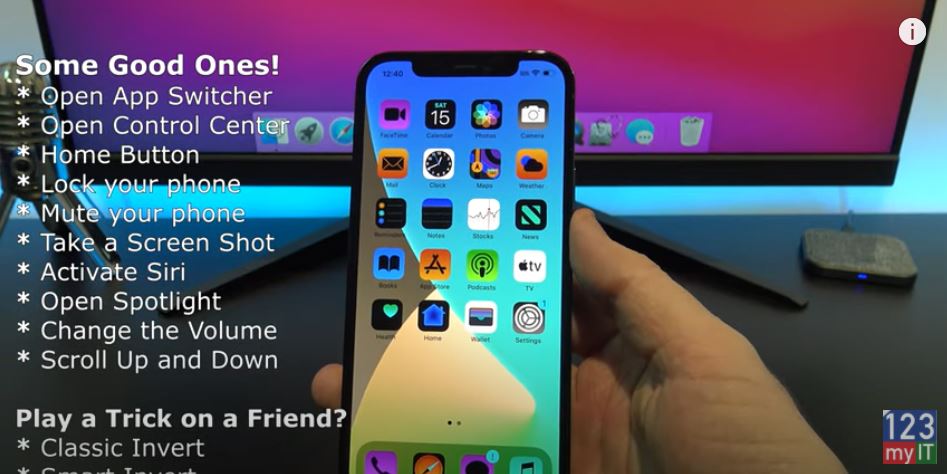
Double tap and Triple Tap – Secret iPhone Trick
In here you have two settings, double tap and triple tap. If we go into double tap it means that you will have to tap the back of your phone two times to perform the action. So you have a whole heap of actions you can perform. Lets test some out. Currently we are on Classic Invert lets change it to Smart Invert. Smart Invert is a bit like Dark Mode. It will change the colours of your iPhone to make it a bit easier on the eye. You could prank a family member with this.
The next one to try is scroll down. So it I select scroll down and tap the back of the phone twice it will scroll down in whatever menu I am in. Also you can set the Triple Tap as a scroll up action.
App Switcher
Next one to try is setting Triple Tap to Control Center and Double Tap to App Switcher. So if you do a double tap it goes to App Switcher so I can change apps or close them. And if you do a Triple Tap it will take you to your control Center where you can change your volume, turn your touch or turn on aeroplane mode.
You can set it up with volume up and down. This is handy if you listen to music allot. You probably want to set these to something you use frequently. You can select other apps like Magnifier. But, its not something I use allot so I would not find it that handy. It is a pretty fun App though.
Also guys don’t forget to check out my other videos such as 8 iPhone settings you need to turn off in 2021. And do me a favour if you know anyone who might need this video please share it will them, hit the subscribe button and smash the bell icon.
Hi Guys and welcome to 123myit. In this video, we will show you how 8 iPhone settings that you should turn off in 2021. Guys, I am going to show you some iPhone settings that you should turn off straight away. These settings are designed to take the load off your phones CPU which will speed your phone up and save the battery life. Along with that, it will increase the privacy on your iPhone which you should consider doing if you are not doing this already.
I am using an iPhone 12 Pro, but depending on the iOS version, it might look a bit different but the settings will be the same. Let’s go into the settings of your iPhone.
Location Services – 8 iPhone Settings
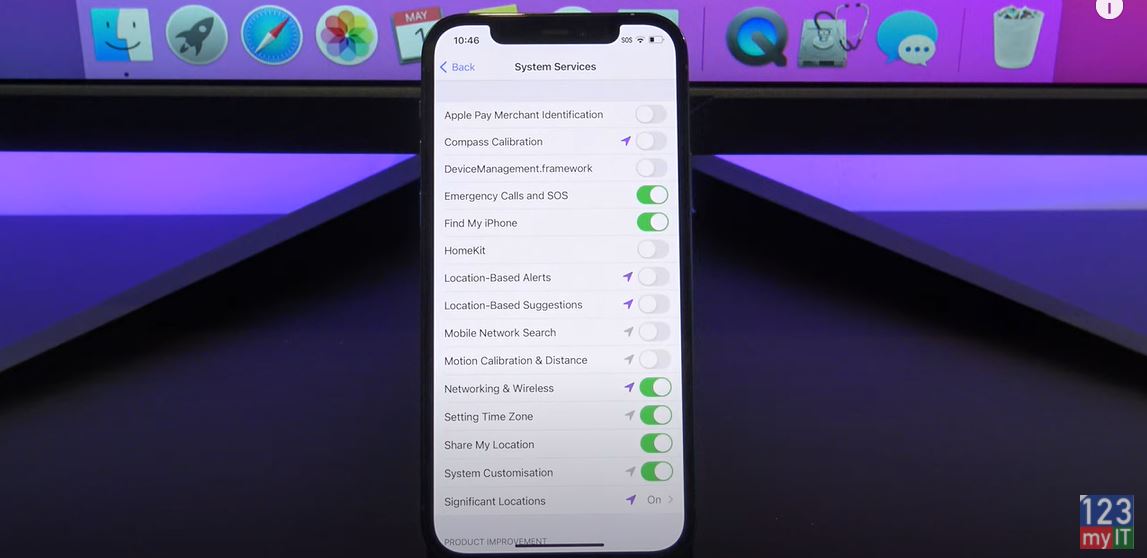
And then scroll down to privacy and location services. If you have a purple arrow this might be a bad sign. It means that an app or service has been using your location. You can read more about it on the Purple arrow here. Lets go into System Services. Ok so you want to turn most of these off. So all of these services ajust your iPhone’s Antenna’s settings when you go to another country. So if you have no plans to go to other countrys. Just turn these things off. I will show you exactly what to turn off and what to leave on.
8 iPhone Settings
Ok so leave on emergency calls and find my iPhone. The networking and wireless works with iPhone 11 and 12. If you are using AirDrop it allows you to point your iPhone in the direction of another iPhone and that iPhone will be the first to appear in the AirDrop list. This might be handy in a crowded situation like an office. But for a regular home user turn it off.
Significant Locations
Next let’s talk about Significant locations. These are places that you have visited and Apple saves those locations, pretty weird. I don’t have any locations because I don’t take this iPhone anywhere but if you toggle this off and clear your history, you will save data and battery life.
Next Tap back and scroll down to Product Improvement and turn these all off. Unless Apple is paying you to help them improve their products, just turn it off.
If you tap back and on the main page of location services, just look for any App that is always using your location and just turn it off. So for example if I go into Apple Maps you can see I have the options. Never, Ask next time and while using the App. If you have an App that says Always. Just set it to while your using the App. If you have an App that says Always. Turn it off straight away. For me I will set it to ask next time I use the app and if I open it I will get a prompt to ask to use my location. So go through all your Apps and anything set to Always. Change it.
Apple Advertising
All right if we go back out of Locations services and scroll down to Apple Advertising. If you tap on View Ad Targeting Information. This will give you some info about yourself. But I don’t find it that useful. Just go ahead and turn off the Personalised Ads button. You will still get ads that meet your criteria. It just means your iPhone will be less snoopy to get these targeted ads.
If we tap back to Privacy and go into Analytics & Improvements. So if you have all these turned on, data is constantly being sent from your phone to Apple and other App developers. So again turn these off to save battery life and Data.
Turn Off Tracking on Apps – 8 iPhone Settings
The next one is to Turn Off allow Apps to Track and you can find this by going back to Privacy scrolling up to Tracking. What this does is it allows Apps like FaceBook to Track everywhere you go on the internet and then use this information to sell Ads about you to Advertisers. Its a creepy way to for Advertisers to make money off you, and if you are not getting a cut of that money, turn it off.
The next setting to turn off is In App Ratings and Reviews. To find it go back out of Privacy and Settings then scroll down to App Store. When you download an App for the first time, it will ask you do you want to write a review how many stars can you give us. So just go ahead and turn this off.
The next setting we should talk about it Push Mail. This is handy if you use your phone to get email. To find it tap back to Settings and scroll down to mail. Once your in Mail tap on Accounts and then Fetch New Data. This setting uses up heaps of Battery life on your iPhone. When you have push turned on, your iPhone is constantly looking for new email. When you turn push mail off your iPhone can choose how often it will check for email.
Toggle off Push
So what you want to do is toggle off Push and then you can go into each account and set it to Manual or fetch. Manual just means when you open the Mail account and refresh it. Otherwise go back to Fetch new Data and put a tick besides Every 30 mins or every 15 mins. This means it will check for email every 30 mins or 15 mins which ever you prefer. Obviously if you set it to every 30 mins you will save more battery life and data.
The last setting to turn of is Background App Refresh and you can find it by tapping Accounts, Mail and Settings. Scroll up to General and tap Background App Refresh. And at the top tap Background App Refresh. This settings Allows Apps to download content and data when running in the background. I would turn this off for Cellular data and set it to WIFI only. And then if you tap back you can go through and choose which apps you want to be able to download data in the background. So just go and turn off any Apps that you don’t use. And again this will save your battery life and data.
Also guys don’t forget to check out my other videos such as 8 Android setting you need to turn off in 2021. And do me a favour if you know anyone who might need this video please share it will them, hit the subscribe button and smash the bell icon.
Hi Guys and welcome to 123myit. In this video, we will show you how 8 Android settings that you should turn off in 2021. Guys I’m going to show you some Android settings that you should turn off straight away. These settings are designed to take the load off your phones CPU which will speed your phone up or save the battery life. Or it will increase the privacy on your phone which you should really consider to start doing if you are not doing this already.
I am using a Samsung Phone, but if you are using a different phone, it might look a bit different the settings will be the same. Let us go into the settings of your phone. It you cannot find the settings button you can just do a search for it at the top.
Device Scanning – Android settings you need to turn off
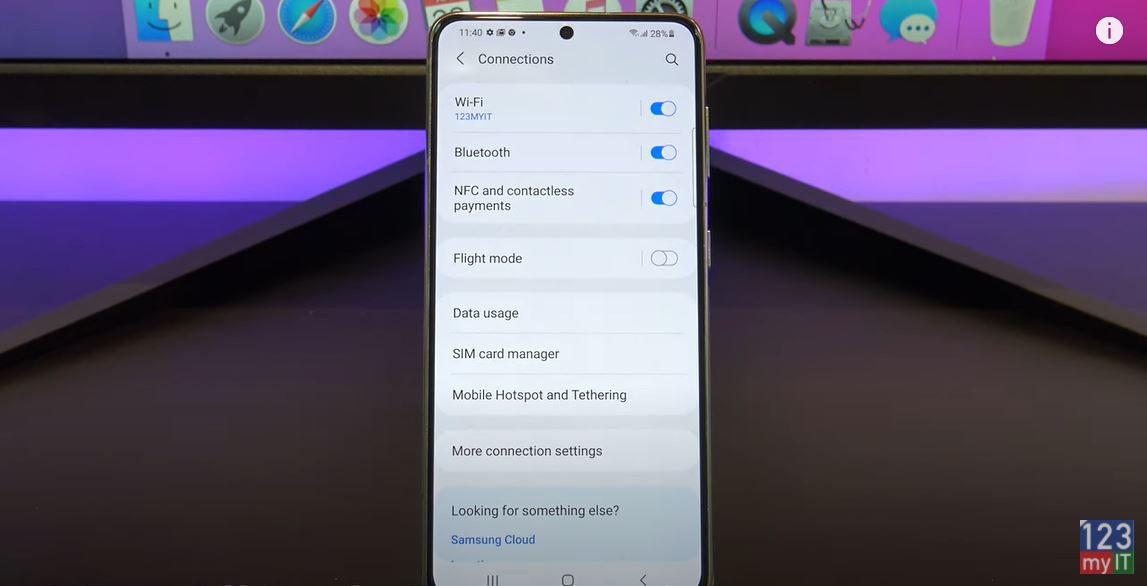
The first thing to turn off is nearby device scanning. This sets your phone to scan for nearby devices. This is constantly running so if you turn it off it will save battery power. You can find it under Connections, More connection settings and nearby device setting just turn that switch off.
Device Scanning
Next, you can turn off usage and diagnostic’s settings. This is information that is being sent to Google or Developers when you not using your phone and it chews up battery life. To find it go to Settings, Google and Tap the 3 dots in the top right and tap Usage and Diagnostics. Then just toggle the button off. Saves your battery life and cellular data.
Ads Personalization – Android settings you need to turn off
Next setting is turning off Ads Personalization. This is a funny one, have you ever been talking about something and then all of a sudden and ad for that starts popping up on your phone? This data is collected and sent to ads networks so they can send you more relevant ads. Its too creepy in my opinion. To turn it off go into settings, Google, Ads and then you need to turn this one on to Opt out of Ads Personalization.
Next, we will talk about Turning off Improve accuracy with WIFI and Bluetooth scanning. If you turn these two settings off you will save a ton of battery life. You will find it under Settings, Location and tap Improve accuracy. And toggle the WIFI and Bluetooth buttons off. Great so now your phone will not be constantly scanning and your GPS will still work no problems there.
Location History
The next one if Google location history. This is a list of all the locations you have been. Its simular to iPhone significant locations where is saves a long list all the places you have been. It’s a bit too weird for me. You will find it under location and Google Location History, Tap on Location History, scroll to the bottom and press pause. Cool its been turned off now.
Now this next one I do not have on my phone but you should check if you do. It’s called Network Data Analytics. In addition, can be installed by your Carrier or Service Provider. You can find it under Settings, Location and it will be sitting down the bottom of location. Go into it and at the top of the screen, you should be able to turn it off.
Restricting Background Data
The next thing we want to talk about is Restricting Background Data for Specific apps. If apps are constantly sending data then it will chew up battery life. To find it go to Settings, Apps and then Tap on your app you want to change, for example Bixby routine. You should see Mobile Data go into that and then Turn off Allow background data usage. DO this for any apps that you don’t think you need. It will save you battery life and cellular data.
The next setting is important and it is called Turn off install unknown Apps. Have you ever installed a game or another app and all of a sudden, you are getting nasty pop-ups? Then this setting might help. What it does is it blocks your apps from installing other apps from unknown sources. Which could ransomware or malware. So go into Apps menu and then tap the three dots and tap special access. If it is turned on, just go ahead and toggle it off. Allot of the time an app will ask for permission and you might not understand that it is turning this on. So now you do!
Background Apps
The last setting we will talk about is choosing which Apps will run in the background of you phone even when you’re not using it. To do this one we need to enable Developer mode by going to Settings, About Phone. Then tap on Software information and tap on build number seven times. You will see the Developer mode enabled message. Go back to the Settings page and on there you will see a new setting Developer options. Tap that and scroll down until you find Background Check.
Ok I do not have any apps in here because it’s a new phone. However if you do, go through and turn off any apps you don’t need.
Also guys don’t forget to check out my other videos such as how to make your phone number private on Android in 2021. And do me a favour if you know anyone who might need this video please share it will them, hit the subscribe button and smash the bell icon.
Hi Guys and welcome to 123myit. In this video we will show you how to make your phone number private on Android in 2021. Ok Guys if you want to call someone’s phone but you don’t want your number to display on their phone then this video will help. There is a few ways you can hide your number so let’s get started.
Hide your number – private on android in 2021
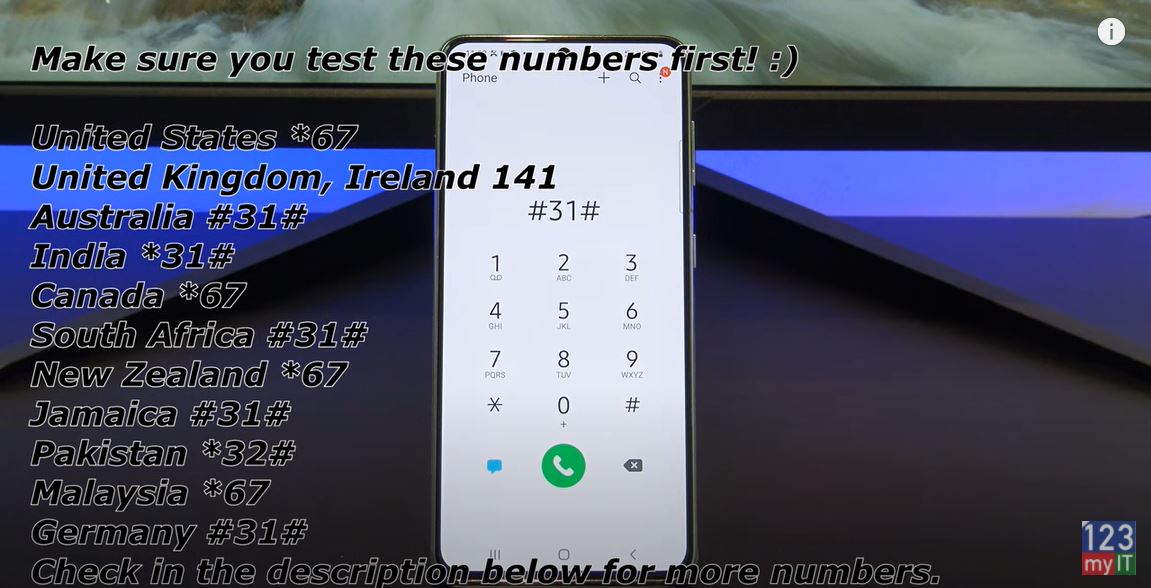
If you just want to hide your number on a single call. The you can dial a prefix before your dial then number. So for example my prefix in Australia is #31# and then the phone number I am calling. Remember this is for a single call so you would have to type your prefix every time. As always test this to another phone before you make that important call.
If you want to make your phone private on all calls then tap on phone and then tap the three dots. If you don’t have the three dots. Just go into the Settings Then Call Settings on your Phone. On my Samsung I tap on Supplementary services and then show caller id and then hide number. Other Android phones might be different. You might have Operator’s Call Settings, Additional Settings, and Owner number. If you can’t find it there then try one of these other locations for different Android phones. Ok before we call that crazy person lets test it to another phone to make sure its hidden.
Awesome its working your number is coming up as No Caller ID or it will Show as private number.
Also guys don’t forget to check out my other videos such Turn On Private Browsing in Safari on your iPhone iPad. And do me a favour if you know anyone who might need this video please share it will them, hit the subscribe button and smash the bell icon.
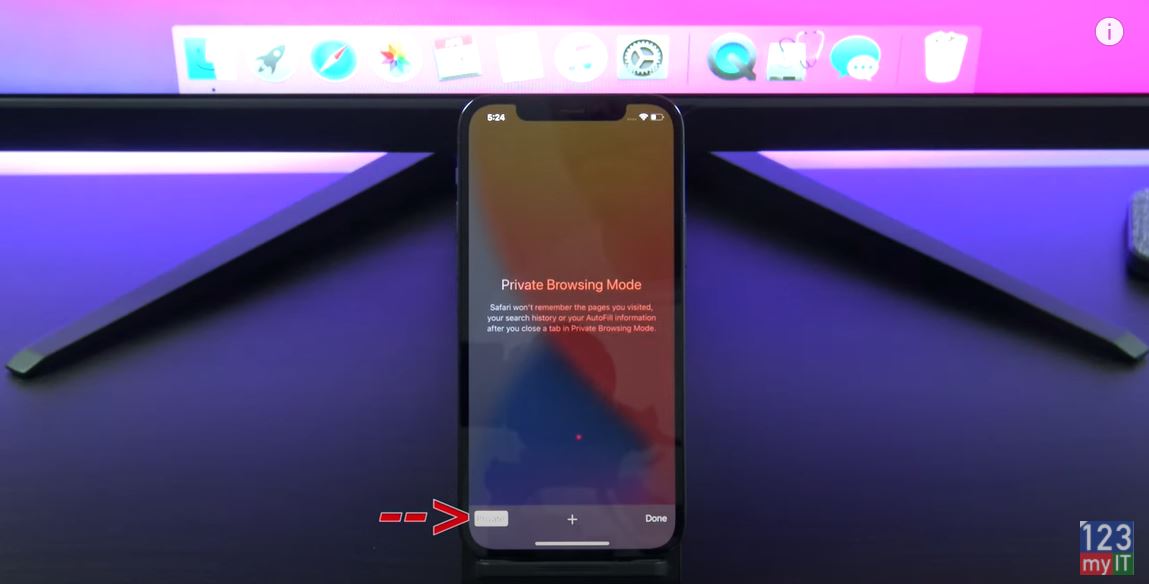
Hi Guys and welcome to 123myit. In this video, we will show you how to use private browsing in Safari on your iPhone or iPad. Private browsing allows you to visit websites without creating search history in Safari. When Private Browsing is turned on, your private information will be protected and it will block some websites from tracking your searches. Safari will not remember your Search History or Autofill information.
Turning on Private Browser is super easy. When you open up Safari you will notice that the Navigation buttons are blue. This means Private Browser is turned off.
To turn it on tap the Tabs button and then tap Private. The Private button will then be highlighted in White. And when you open a new tab you will see an explanation of what private browsing is.
You will notice the Navigation buttons are no longer blue this will let you know that Private Browser is turned on. If you tap the Tabs button and Tap the Private button this will turn the Private Browsing off.
Here’s how to do it on an iPad. Also guys don’t forget to check out my other videos such as Transfer data iPhone to Android in 2021. And do me a favour if you know anyone who might need this video please share it will them, hit the subscribe button and smash the bell icon.