Hi Guys and welcome to 123myIT. In this video, we will show you how to backup your Android phone to Google Drive.
By following this video you will be able to backup Contacts, Google Calendar, SMS, WIFI networks & passwords, Wallpapers, Gmail Settings, Apps, Display Settings, Date and Time and Settings and data for apps not made by Google.
What you need to know first! – Backup Android Phone
Things to be aware of. Restoring data may vary depending on the phone and Android version. In addition, you cannot restore a backup from a higher Android version to a lower Android version. While your Android phone might look different to mine the steps should be simular just the menus might be different.
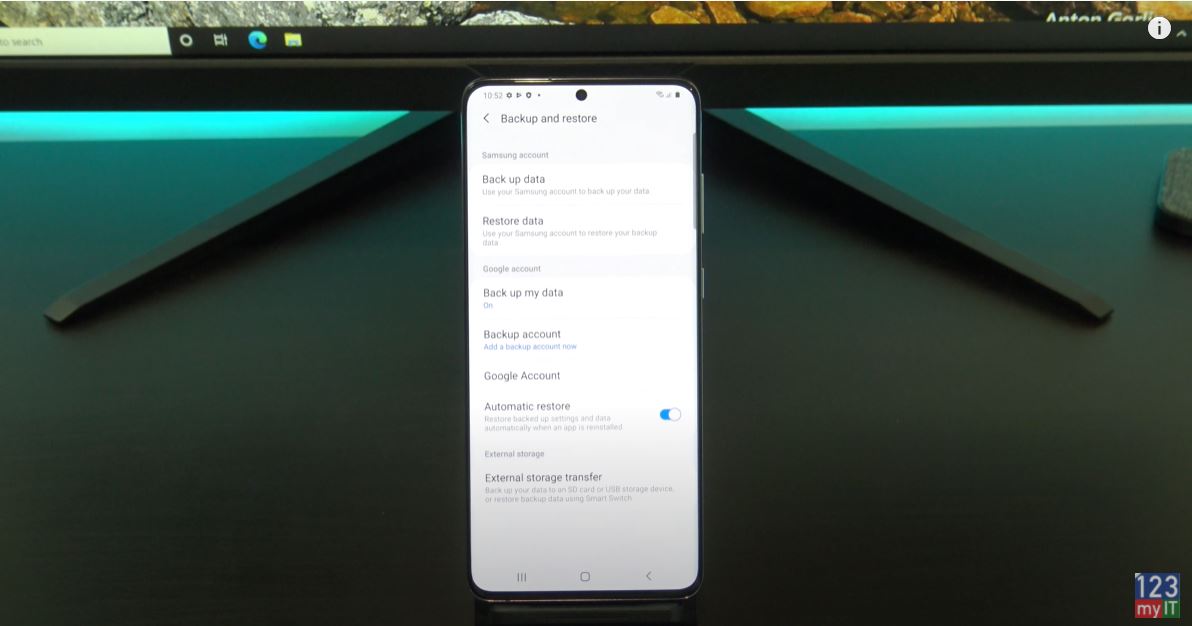
Let get started. Go into settings on your Android phone and scroll down to accounts and backup. Or on your phone it might be System and Backup. Next go into Backup and Restore and tap on Backup my data. Turn the button on and tap back.
Tap on Google Account and then add the Google account that you want to backup your Android too. Cool, here are the steps on my OPPO phone. As you can see, the menus are different but the process is the same.
Backup Settings on your Android phone.
Sign in with the Gmail account you want to back up too. Pop your password in and hit next and Agree. Tap accept and then on the next screen it gives you some info of what will be backed up. Just tap ok. On the next screen tap on Google photos and then Allow. Turn on Backup and Sync and then tap turn on backup.
Selecting which method to backup with. Backup Android Phone.
You have two backup options. Original and High quality. High quality stores the files at a smaller size. Therefore, this doesn’t eat into your storage quota. Im going to select high quality and tap Confirm. The next page you can read through or hit Skip. Alight you can see we have no photos in Google photos yet.
Let’s go in and create a contact to backup. Go into Phone, Contacts and tap the plus icon. Make sure you add the contact to your Google account if it prompts. I’ll just make a fake contact real quick. All right, so we have a contact let’s go and make a video and photo to back up.
Backup your video and photos.
Cool so we have our video and photos now let’s back them up. Go into your back up settings again. And tap on Backup now. If you want to check on the progress swipe down from the top of your screen. Once it’s finished you should get a little message saying its done. You can check Google Photos to see if you photos have been backed up.
The next step here is important. You need to check that your data has been backed up to Google Drive. Remember your back is only as good as the data you can restore. So always, check what has been backed up. Open Chrome up on another computer and login to Google drive by going to drive.google.com. Click on Storage and then click on Backups. Cool you can see here that I have a few Samsung Galaxy Backups. In addition, if you click on one you can see I have backed up 31 apps and my device settings. I can also delete the backup if I want.
But, what about my photos videos and contacts. You can find them by going to the Rubix cube icon. Heres the contact I created earlier. And your photos and video can be found under Rubix cube and photos. And same with your Calendar items. With the photos, you can click on them and remove them and they go to your trash bin. For details on your Storage, you can click the Storage icon.
You don’t need to reset your phone.
Awesome so you have checked you backup and you are happy that it’s working. Let reset your Android phone and restore the data. You do not need to do this. But, this will just show that the backup is working. I am going to just go ahead very quick and set this up.
Go ahead and add in your google account. All right, swipe down at the top and let it finish settings itself up. Allot of the apps and things need to finish downloading so give it some time. If we check out contacts and photos, they are not downloaded yet. Go back into your google apps and photos and turn the backups on. Again, choose your High Quality if you like. Backup over mobile data if you want to backup the photos when you are not on Wi-Fi. Cool, there they are if you want to move them to the gallery on your phone then tap the photo or video. Tap the three dots then tap download. Otherwise, they will be stored on your Google Drive. It also shows you a summary of where the files are stored.
Awesome so there are in the gallery now. But, what about the contacts. Let’s check. Cool and there it is its been restored now.
Logging onto Google Drive to see what’s backed up.
One last thing, if you want to see what data is being synced from the Google drive. Go into Settings, Accounts and backup, Accounts, Tap on the Account and go into Sync Account. Here are all your toggle switches for what’s being synced. Just go ahead and turn off what you do not need.
Guys, don’t forget to check out my other videos such move from Android to iPhone. Also do me a favour if you know anyone who might like this video please share it will them, hit the subscribe button and smash the bell icon.
Hi guys and welcome to 123myIT. Do you have a favourite live photo that you show people all the time? You can set you live photo as your wallpaper. Let us show you how.
Tap on Photos, then Albums and scroll down to Live Photos. Select the photo you want to save as your wall paper. Touch and hold the live photo to see it play.
Next, Tap Share and then scroll down and tap on the Use as Wallpaper button. You can drag and pinch the photo if needed and once done tap on Set.
Live Photos
Once done you can set it for Lock screen only or Home screen only or just set both. Alright here it is on our lock screen now. Ok here it is again.
If you want to remove it and put your old wallpaper back go to Settings Scroll down to wallpaper. Tap choose a new wallpaper. Select your wallpaper. Tap Set and your old wallpaper is back.
Guys don’t forget to check out my other videos such as move from Android to iPhone. And do me a favour if you know anyone who might like this video please share it will them, hit the subscribe button and smash the bell icon.
Hi Guys and welcome to 123myit. In this video, we will show you how to move from Android to iPhone. There is two ways to move from Android to iPhone. The Apple recommended way requires you to reset your iPhone. If you don’t want to reset your iPhone then fast forward to the 4 min mark and I will show you how to move your data without resetting your iPhone.
This video we will help you move contacts, message history, camera photos and videos. Web bookmarks, mail accounts, calendars and free apps.
Resetting your iPhone the Official Apple Way – From Android to iPhone
The first step is to reset your iPhone.
Go into settings > General and scroll down to reset. Once you are there tap on Erase Content and settings. Next Tap Erase iPhone. This will delete all media and data so do a backup first if you need too.
Once your iPhone has reset itself. Just follow the prompts and start setting it up again.
Next up connect to your WIFI and make sure your Android device is connected to the same WIFI.
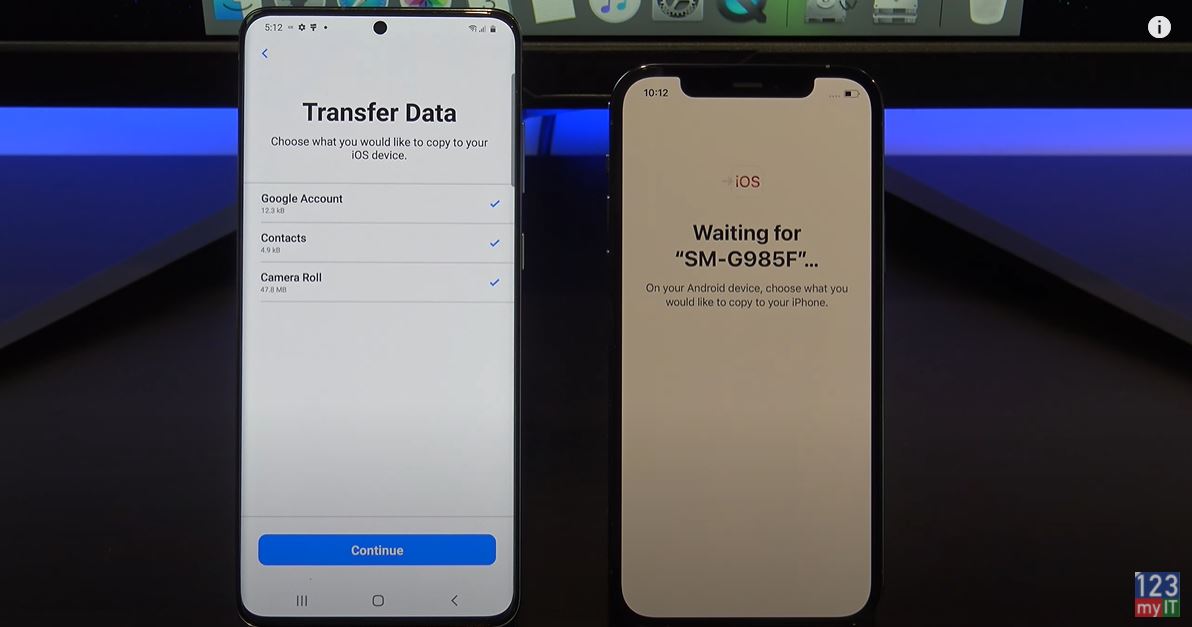
Continue setting up your iPhone until you get to the Apps and data screen. Once you’re on the Apps and data screen. Tap move data from Android. Before you hit continue, go to your Android phone and download the move to iOS app from the Google play store. Play.google.com
Download the Apps Move to iOS – From Android to iPhone
I have already downloaded it therefore, I am going to press open. Tap continue, agree and then go ahead and tap allow.
Tap continue on your iPhone and on your Android device type in the code that you see on your iPhone. It now shows you the iPhone wifi. Tap continue. It comes up again with the wifi to connect to just tap connect.
Transfer Data screen in move to iOS App
Ok great you are on the transfer data screen just deselect anything you don’t want to transfer and press Continue. Also here’s a tip if you have large video files it will take some time. So maybe delete any large video files you don’t need.
Cool your data is transferred now. Tap done on your Android phone and you can close the app. On your iPhone tap, continue setting up iPhone. Go ahead and set up your iPhone.
Install your FREE Apps
Awesome the last step here is to install your free apps. To do this you will need your Apple iD. Just tap add apps and then tap use existing apple id. And your iPhone will download all your free apps for you. If you get the Apple iD Verification just tap settings and then enter in your Two Factor Authentication. This will pop up as a message on one of your other Apple devices if you have it or as an SMS on your phone. Tap agree on the terms and then agree again.
If you swipe across you should see all your apps start to appear. You can also check if your if you photos messages and video copied across.
Don’t want to Reset your iPhone?
The second part of this video is if you don’t want to reset your iPhone. We will move the data with an App called, Copy my data. Go to the google play store on Android phone and download Copy my data. I’ve already downloaded it so I will tap open. Tap on to or From Another Device Over Wifi.
Open up the App store on you iPhone and download the same copy my data app. Tap open and then tap allow to give the app access to your data. If you don’t everything right yu should see the iPhone appear on your Andriod phone. Tap copy data to selected device. Enter the pin number from yoru android device onto your iPhone. On your Android phone deselect any data you don’t want to copy across.
Awesome all your data is copied across now. If you have a SIM card you can move it across now too.
Also guys don’t forget to check out my other videos such as Apple iPhone 12 Pro Pacific Blue do me a favor If you know anyone that might need this video please share it with them hit the subscribe button and smash the bell icon.
Hi Guys and welcome to 123myit. In this video, we will show you everything you need to know about the iPhone 12 Pro. The iPhone 12 Pro is the same as its little brother the iPhone 12 with the A14 Bionic processor. Pricing for the iPhone 12 Pro starts at $999 USD and it comes in three different colours, Graphite, Silver, Gold and Blue.
First up in the box you have the iPhone 12 Pro itself. Next will find the documentation a SIM card eject tool, quick start guide, Warranty information and Apple sticker. The only other accessory is the Lighting USB cable, which does up to 50% charge in 30 mins with a 20-watt adapter. Not to forget that the 12 Pro supports 15 watts wireless charging and is IP68 water and dust resistant.
Minimal Packaging – iPhone 12 Pro
It’s worth mentioning that Apple has removed the USB charger and minimised packaging and documentation. Which I think its great for the environment. However, I would have liked to see Apple minimised the price of the iPhone also.
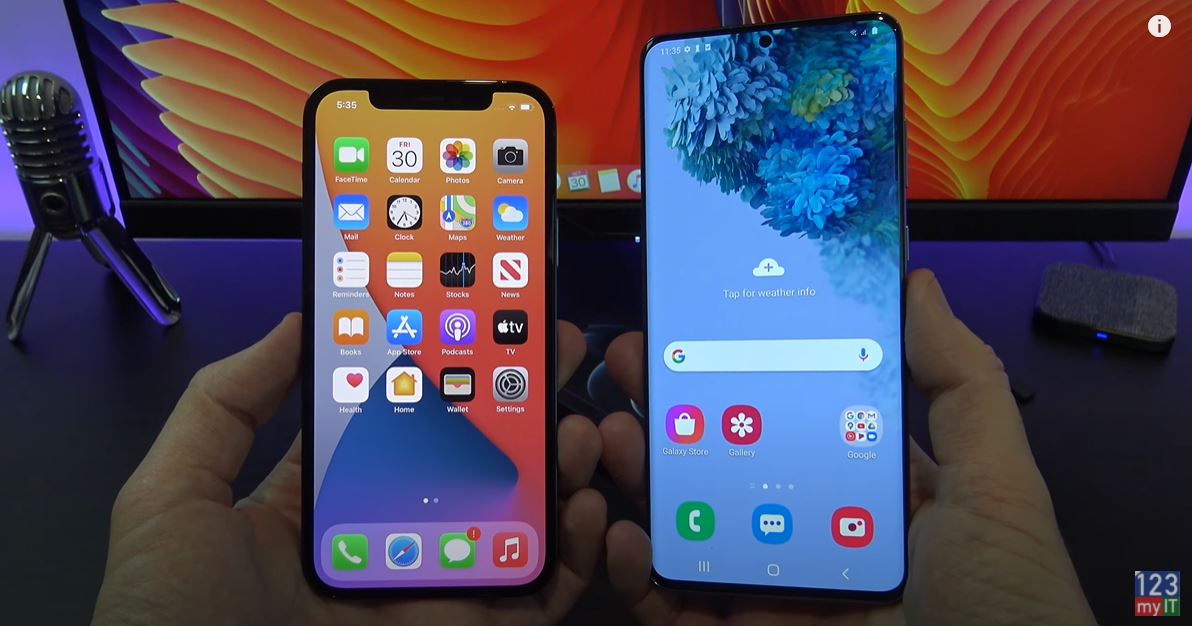
The iPhone 12 Pro has a 6.1-inch Super Retina XDR OLED display. It has a 2532 by 1170-pixel resolution at 460 ppi. If you compare it with the iPhone 8 on the left, you can see the Pro has allot more screen real estate on its 6.1-inch OLED display. In addition, for those of your who are thinking about upgrading from the iPhone 8 it would be a big update.
Compare the screen sizes between Samsung S20+ and iPhone 12 Pro
Here’s a quick compassion between the screen size on the 12 Pro and the Samsung S20+.
Design Change on the iPhone 12 Pro
Apple has changed the design of the iPhone 12 line up as well. It now has smooth flat edges, which allows the iPhone to stand up on its end. I love this design we first saw it on the iPhone SE. However, the aluminium frame does show fingerprints. This might not be an issue if you decide to buy a cover.
The left side of the iPhone, you have the Ring Silent and Volume up and down buttons and a SIM card slot.
On the right side, you have the Sleep Wake power button. On the bottom, you have the lighting connector, microphone and 1 of the stereo speakers. Actually, the Stereo speakers are impressive. Take a listen.
Face Unlock
Face unlock is standard on the iPhone 12 models. Along the front top of the 12 Pro we have a 12 megapixel True Depth Camera which has a F2.2 aperture. While you can’t see them there is actually a whole bunch of sensors hidden here. Ambient light, Proximity, Flood illuminator, infrared camera and dot projector.
On the back of the 12 Pro you have a Triple Camera setup which features a Ultra Wide, Wide and Telephoto cameras. The Ultra Wide camera has a 120-degree field of view. The new Wide camera has a f 1.6 aperture and a 7 element lens which lets in more light. Moreover, the last camera on the iPhone Pro 12 features a 52 millimetre telephoto camera for stunning portrait shots.
Camera
Therefore, out of the box the iPhone 12 Pro will take amazing photos. Here are some comparisons between the iPhone 12 Pro and iPhone 8. Can you spot the difference?
The iPhone 12 Pro has the A14 processor. A fast processor is important when playing games and videos or when generally moving around the iPhone. Here’s the Geekbench scores for the iPhone 12 Pro and the iPhone 8.
In terms of Battery life for the iPhone, you can expect up to 17 hours video playback. This will get you about 11 hours of streamed video playback. Say from the web.
So what’s my thoughts pretty amazing phone you can’t really go wrong. However I think the price could have dropped a bit since Apple no longer includes a charger and battery life could be also be improved in my mind. I would like to see it last longer.
Guys, don’t forget to check out my other videos such as everything you need to know about the HP EliteBook 840 G7. Also do me a favour if you know anyone who might like this video please share it will them, hit the subscribe button and smash the bell icon.
Hi guys and welcome to 123myIT. In this video, we will show you everything you need to know about the HP EliteBook 840 G7.
The design of the HP EliteBook 840 G7 has changed somewhat from the previous model the HP EliteBook 840 G6. The biggest change is its thinner and lighter and this is mainly due to the reduced bezels around the screen.
This is 14-inch mid-range business laptop and it sits between the lower-end ProBook series and the high-end EliteBook 1000 series. And the only difference between the EliteBook 840 G7 and EliteBook 830 G7 is the screen size.
Pricing for the G7 starts around $1400 USD for the Intel i5 CPU and goes up to $1600 USD for the i7 CPU.
Inside the box – HP EliteBook 840 G7
In the box, you will get a gray HP laptop bag. Warranty and setup documentation. Along with a 65 watt USB C power adapter. The laptop uses around 7 to 31 watts of power. And you can expect to get around 11 hours of battery life. Charging the battery will take just under one and a half hours.
Next you will have the G7 itself. The 840 G7 comes with a 14 inch FHD LED Anti-Glare HD Display. With a resolution of 1920×1080 and 250 nit of brightness. Because the bezels are thinner the laptop footprint is smaller. So you are saving space on bezel overhang. Which is awesome.
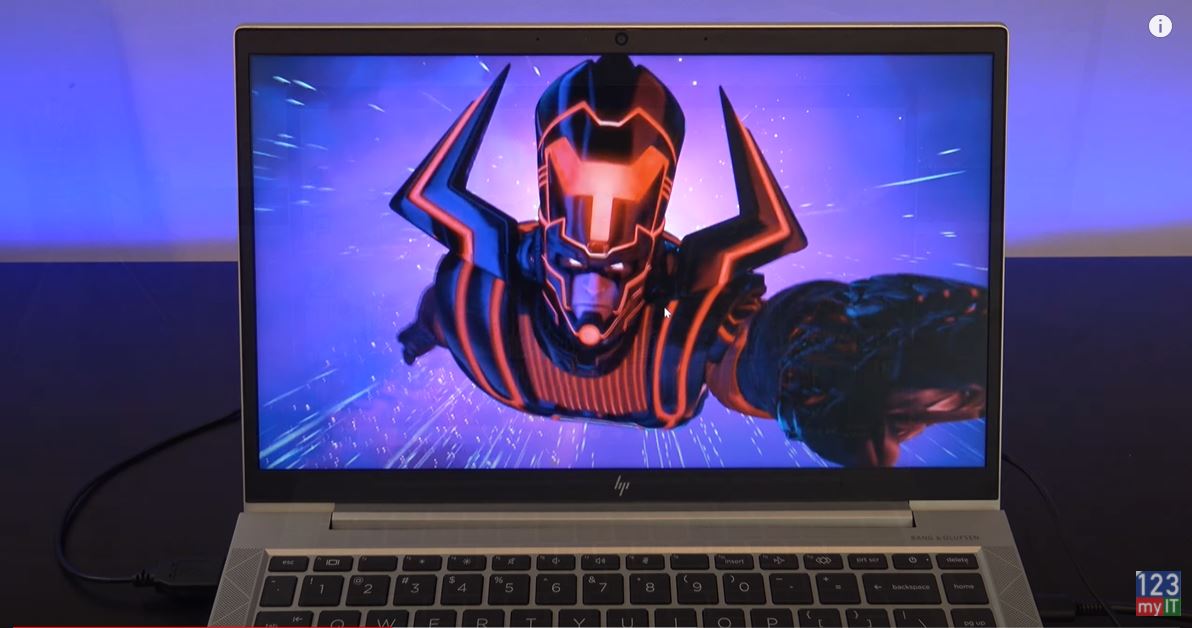
Testing Fortnite Frames Per Second.
Out of the box, though I was able to get FortNite to run ok on giving up about 35 to 50 Frames per second. This would be mostly due to the Intel quad core i5 10th gen CPU and 8gb of ram as the Intel GPU is not the best for gaming.
Finger Print Scanner – HP EliteBook 840 G7
The G7 does also have a finger print scanner. Thich allows you to unlock Windows with a touch of the button. Along the top, you will find an integrated HD 720pwebcam with dual microphone and indicator light. One of the cool things about the G7 design is you can close the camera off with a sliding button.
On the right side, you have the charging port, one HDMI 1.4 port, two USB C ports and a SIM card slot. No RJ45 Ethernet, so this model is WIFI only. You also have an indicator light to show when the laptop is being charged. The USB C doubles as a display port so if you have a USB C to HDMI adapter you can plug in an external display.
On the left, you have a Kensington lock, two USB 3 ports, Audio Jack and SC card reader. Annoyingly there is no SD card reader because of the size of the laptop.
Speakers – Bang & Olufsen
The 840 G7 comes with Bang & Olufsen-tuned speakers, they are designed to point upwards towards your ears. The speakers sounds pretty good but missing a little bass.
The Trackpad is nice and wide but I do find myself right clicking allot because to left click you need to press on the left side of the Trackpad. And for me it feels like the trackpad sits too far to the left.
This model comes with an extra right and left mouse button along with a rubber nipple which I know some people prefer over the Trackpad.
The keyboard is a delight to type on and does not bend when pressing the keys. Also the letters printed on the keys are bigger than normal which would be great for some users.
Build Quality
The overall build feels like good quality and display hinge folds all the way back 175 degrees, however other laptops go all the way to 180 degrees, so 175 feels a bit awkward.
You can also upgrade the G7 by removing the screws from the bottom cover. The system supports 64 GB of RAM so you can upgrade that along with a 1TB NV Me SSD if you want. The WIFI has also been upgraded to WIFI 6.
Here’s the Geekbench CPU score and the GPU score.
If you are looking for a gaming laptop then you are better off looking for a laptop with the GeForce MX or Radeon RX GPU configured. While this laptop is small and easy to carry, I feel the lack of and SD card reader and other ports a bit of a letdown for me.
Guys don’t forget to check out my other videos such as How to use the Camera app One-Handed on iPhone. And do me a favour if you know anyone who might need this video please share it will them, hit the subscribe button and smash the bell icon.
Hi guys and welcome to 123myIT. In this video, we will show you how to use the Camera App one-handed on iPhone. In iOS 14 you can use the Camera App one handed. Lets show you how.
First of all start up your camera app.
If you want to take photos in burst mode swipe the shutter button left.
Using the Shutter Button – swipe to the left.
If you want to record quick take video, touch and hold the shutter button. You can see the video recording time at the top. To stop recording the video just lift your finger.
Recording a Video – One-handed on iPhone
To record video without having to hold down your finger. Just hold to start recording the swipe right to the lock icon. To stop recording just tap the stop button.
Guys don’t forget to check out my other videos such as Install Windows 10 on a Mac external drive. And do me a favour if you know anyone who might need this video please share it will them, hit the subscribe button and smash the bell icon.
Hi Guys, In this video, we will show you how to Windows 10 on a mac external drive SSD on your Mac. If you don’t have much hard disk space on your Mac or you just want to run Windows 10 games and Apps on your Mac then I am going to show the whole process, step by step and this is the end result.
What you will need – Windows 10 on a Mac External Drive
Ok so things you will need are an external SSD. I am using a Samsung 512GB SSD attached with a SATA to USB 3 Adapter you can get it off Amazon for $10. I will link it in the description below. You can also use a Seagate Hard drive and even an old laptop hard drive if you have one laying around.
If you have a newer Mac you can also get the USB C to Sata adapter, Amazon link below as well. Or you could just buy a new Samsung USB C SSD like this one.
You might need a USB mouse and keyboard initially till you get the drivers working correctly and ill show you how to do that. Open Safari and go to the 123myit.com website and click on downloads.
Get your files from the Downloads Section
Scroll down to where it says Install Windows 10 on a Mac and click the first link download Windows 10. On that page in the drop down box select Windows 10 and confirm and choose your language in the second drop down box. Next click on 64 bit and that will download the Windows 10 iso file. The file is fairly big so it might take some time to download. Check it in your downloads. I’ve already downloaded these files so I will just cancel them.
Close that tab and download the WintoUSB file. Again close that tab and download the VMware fusion. Ok so you should see all three downloads in the downloads folder. The next step is to download Windows Support folder. So Quit Safari and go into finder and search for bootcamp. Start up bootcamp and on the Action menu at the top click download Windows support software. Just change the where menu to Downloads. That way all your downloads are in the same spot. Ok now it’s time to plug in your windows 10 on a mac external drive or external hard drive.
Just make sure you have no data in the SSD that you need as the next step will delete any data on that external drive. Close the drive and click on Go, Utilities and the Disk Utility. Highlight your external drive and click Erase. Rename it as BootCamp and change the format to MS Dos Fat. This will make it recognisable in Windows. Click don’t use and Done. And then close Disk Utility.
VMWare
Next we want to run the VMware installer file we downloaded earlier. So click Go and Download and open up the VMware installer file. If you get this message saying the VMware file can’t be opened go to System Prefs, Open up Security & Privacy, click on the General tab unlock your pad lock enter your password and click on Open Anyway. Click open and close the Security & Privacy window. Double click to Install VMware. Click open. Type in your password. Click open. Agree to the terms. Put a dot in the, I want to Try VMware fusion. You can use the software for 30 days which is more than we need. However if you like the software you can always buy it. Click ok and Ok again. Open System preferences and unlock your pad lock and give VMware the access it needs.
It wants to install from disk or image. So click go and downloads and drag the Windows 10 iso file you downloaded earlier to the VMware menu. And then click continue to proceed. You are setting up a new Virtual Machine here so you need to click the drop down menu and select Windows 10 Home. Click continue and continue without a key. Click More Isolated. Now you can click Finish now or if you want to customise the Virtual Machine click customise settings. Then click Save.
Customise your Virtual Machine
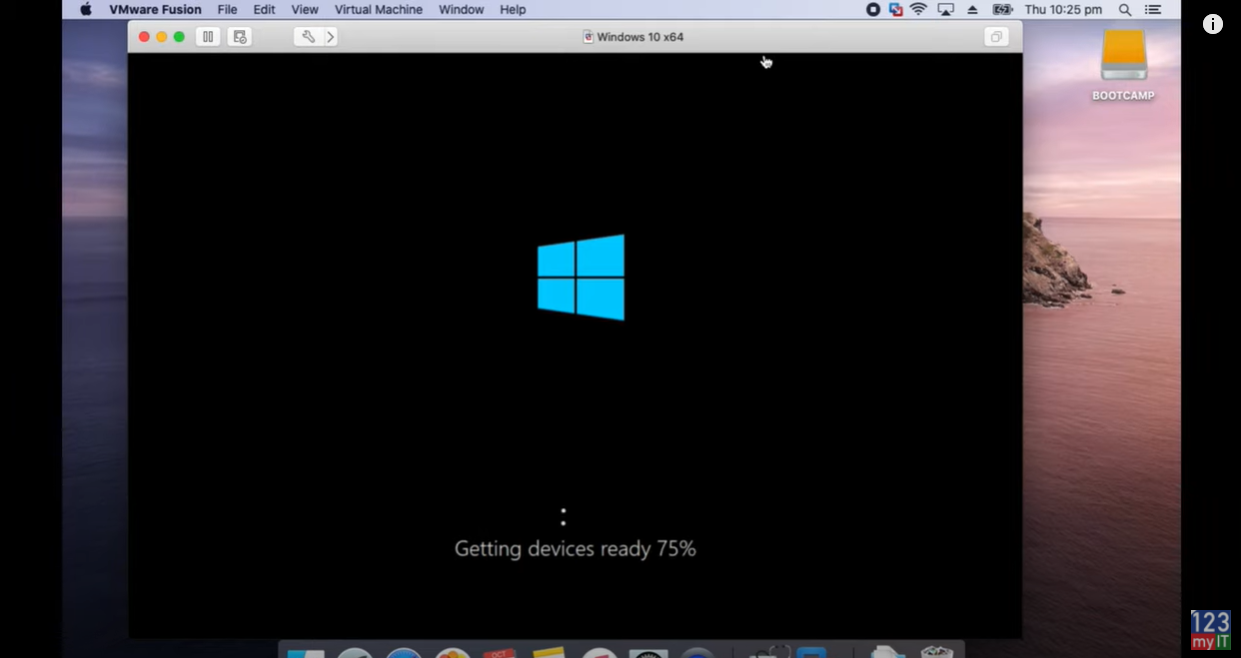
Ok to customise the install click on Processors and Memory. I am going to give it a little bit more memory. From 2GB to 4GB. That should be enough. Alright you can close that window now and click play to start Windows. If you get the broken pipe errors go Quit VMback into System preferences Security & Privacy, General tab and click allow again. Click ok. Close your padlock. Restart VMware. Press play again and it should start your Windows install now. Awesome that’s going to take a while I will speed up the install here. This is not installing Windows 10 on your external drive just yet. We are setting up a Virtual Machine which will allow you to install Windows on the external drive.
Using VMware to create a Virtual Machine.
Ok so Windows has finished installing. Click on the Go menu then click downloads and copy the WintoUSB and Windows Support folder onto your Windows desktop. I could drag the WinToUSB file. But I had to right click copy and paste the WindowsSupport folder to get it to copy across.
Connecting the SSD
Now let’s connect our External SSD to our Windows Virtual Machine. You want to go up to Virtual Machine USB & Bluetooth, find your BootCamp drive and add it. Therefore, it’s gone now on your Mac side and there it is on the Windows side now. Now go back to Virtual Machine click CD/DVD and then choose disk or image. And then choose your Windows 10 iso file. Click open. Then go back to Virtual Machine select CD DVD and Connect CD DVD. It should also pop up.
Ok so all the ground work is done its time to create the Windows 10 external drive. And the Windows support folder has just finished coping. Next thing you want to do is double click on the WintoUsb executable and follow the install prompts. So click yes. English Ok. Accept the agreement. And then next next install.
If you get Microsoft Edge popping up just close it. It doesn’t it a few times. Now you want to launch WinToUsb the shortcut with the little arrow. Click your CD DVD drive and in the drop down menu select your Windows disc. And then choose Windows 10 home click next. And then select your destination. So this will be your external drive.
Older and Newer Macs – Audio and drivers not working.
Ok heres an important bit. If you have an older Mac like mine select MBR for Bios if you have a newer Mac select GPT for UEFI. If you select the wrong option here when you start your Mac your Audio might not work. Don’t worry simply come back to this step and select the correct method for your Mac. I will select the wrong option for my Mac to show you what it does.
Ok this part shows you how your external drive will be partitioned. No changes here just hit next to start. This part will take a long time especially if you have an older sata drive. This will take at least 15 mins or more this process will install Windows 10 on your external drive and you will be able to boot into that drive shortly. Once that is complete just hit Exit and yes to quit. Alright open up Windows Explorer and click on the newly created WinToUSB drive and you want to drag the Windows Support folder into that drive.
Once that’s copied you can shut down your Virtual Machine. Because you are done here. So Restart your Mac and you want to hold down the Alt Option Key when you Mac starts up. This is so you can select the external drive to boot. If you are on a newer Mac you can use the Command R to access the start up security utility. Once that starts up go into Utilities and Startup Security Utility. If you are on a Newer Mac you might have to enter a password here. Otherwise on an older Macs just close that menu. On Newer Macs select the No Security check box and also the Allow booting from external media. This will allow you to boot to your external Windows drive.
Startup Disk – Windows 10 on a mac external drive
Alright click close on MacOS Utility’s window and select Choose Startup Disk. You can see our SSD drive starting to flash it the background. Go ahead and select your WinToUsb external drive. And this will set the external drive to boot into by default.
If for some reason it doesn’t boot restart your Mac and hold down the Alt option key. And go ahead and select your external usb drive from the menu. It should then start booting into Windows for the first time. Select your Region and follow the setup prompts. If your Trackpad doesn’t work try using the USB Mouse and Keyboard I mentioned at the start of the video. If your keyboard is not working you can open up the on screen keyboard by click the icon in the bottom left of the screen. I don’t need a password and we are going to turn all this stuff off. You don’t need that.
Ok cool we are now running windows from an external drive. The next step is to get the Windows driver installed. You can do this by opening up Windows explorer and going to your WintoUsb C drive. Go into the Windows support folder. Go into the Bootcamp folder and run the setup file. The just follow the prompts and restart Windows. If you open up device manager you can see the drivers being installed. Go ahead and click finish and restart.
Checking the Device Manager
When you are back up open your device manager again and check any drivers that have not installed properly. You can see the audio driver has not installed correctly. Let add our WIFI password first. Ok if we right click and Update driver and if that doesn’t work we can run the Windows updates. So just click check for updates. This will take some time. Click restart now. Ok once you have done the updates and restarted. Check to see if your keyboard buttons all work on the Mac. So I test the display brightness, Audio Volume and Keyboard brightness. You can see here the Audio is still not working so there are two more things you can do to get this working.
Open up device manager again. Go back to your Audio device right click it and update driver, click on browse my computer for drivers and then click the browse button. And navigate to your Windows Support folder on the C drive. Click on the WInPEdriver folder and then click ok and next and do this for any other drivers.
If you still have drivers that aren’t working go into the Start menu and right at the top you should have Apple Software update. Click that. So its gunna search the web and find any updates that are necessary. It will ask you to restart go ahead and do that.
Issues with sound Troubleshooting – windows 10 on a mac external drive
If you are still having issues with your sound then you have an older Mac and should have selected the MBR for Bios option when setting up the external drive. So head back to the 10 min mark of the video.
Here’s a tip as well. If you selected GPT for UEFI then you will have a EFI boot drive. If you have selected MBR for Bios then you will have a Windows boot drive.
Cool ok we have restarted now and if you check your buttons should all be working and if you check device manager you shouldn’t have any outstanding drivers to install.
Awesome so you are ready to go you can install Windows games and apps on your external SSD and let the fun begin. You can also setup an Xbox controller to play games with. You have finished installing windows 10 on a mac external drive.
Also guys don’t forget to check out my other videos such as Apple iPad 8th Gen 2020. And do me a favour if you know anyone who might need this video please share it will them, hit the subscribe button and smash the bell icon.
Hi guys and welcome to 123myIT. In this video, we will show you everything you need to know about the Apple iPad 8th Gen2020 in four minutes. Apple has released two different versions of the iPad and iPad Air. Pricing for the base model iPad starts around $329 USD and it comes in three different colours, Silver, Gold and Space Grey.
First up in the box you will find the iPad 8th Gen and the colour that we have is Space Grey. Next you get the documentation, Quick start guide, Warranty information and Apple stickers. Other accessories are USB C to lighting cable and a 20 watt USB C charging adapter. Twenty watts should charge the battery from empty to 50% in thirty minutes. Don’t quote me on that because it was hard to find any exact data on this. However Apple says you should get Up to 10 hours of surfing the web on Wi-Fi or watching video and 9 hours on Cellular models.
Display 10.2-inch
The 2020 iPad has a 10.2-inch LED-backlit Multi-Touch Retina Display with IPS technology. It has a 2160 by 1620-pixel resolution at 264 pixels per inch. And the display also has 500 nits of brightness which is fine. Here’s the viewing angels and stereo speaker test.
The display is also not laminated this means it has a small pocket of air between the LED display and the glass surface. This might make the touch feel a little less sensitive. But Unless you are use to an older iPad you might not even notice.
Slight gap on the display which might make the touch less sensitive.
In terms of size this iPad is thicker than all previous models going back to the iPad Air 1. And you do notice this. Does it really matter though? Probably not.
Space for a Keyboard – iPad 8th Gen
On the bottom, you have 3 little dots which allows you to attach an Apple keyboard. However they are expensive and not that great to type on so you might be better off with a Logitech keyboard and I will leave an Amazon link in the description.
Around the back of the iPad we have the space grey finish with colour matched apple logo.
At the back of top we have an 8 megapixel camera with a f2.4 aperture and beside that one of the dual microphone pin holes. On the top right side you have Sleep Wake power button. Along with that the another microphone pin hole and headphone jack. Down the right side you have the volume up and down buttons. On the bottom you have a lighting port and stereo speakers.
Around the hardware
On the front bottom you have the all familiar Home button and it comes with finger print unlock. There is no face unlock on this model.
The top you have a 1.2 mega pixel FaceTime HD Camera with a f2.4 aperture. Not super outstanding but it does the job.
The biggest upgrade for the iPad 2020 is that it includes the A12 Bionic processor which is a 64-bit chip. A fast processor is important when playing games and videos or when generally moving around the iPad.
And for those that are interested in the Geek Bench 4 scores here is the single and multi core scores and compassion.
The Apple iPad 8th gen is a stock standard iPad with a fast processor. And would be perfect for most people. If you are doing design work however you might want to look at the iPad Pro model instead.
Guys, don’t forget to check out my other videos such as Huawei to iPhone. Also do me a favour if you know anyone who might like this video please share it will them, hit the subscribe button and smash the bell icon.