Clean Install MacOS Catalina on any Mac

The clean install process is easy.

In the video we will show you how to do a clean install of MacOS Catalina on any Mac.
In a previous video I showed you how to create a MacOS Catalina installer USB and I here is the link. Create MacOS Installer Drive.

Once you have followed that video and created your USB we can now show you how to do a clean install on any Mac.

One more thing to mention your USB can be USB type A or USB type C it doesn’t matter which one. If you want to buy one similar to what I am using here’s the link.

🔥 Do you want a USB drive like the one in the video? Click here. https://amzn.to/2NqJI5k

Step 1 – Clean Install MacOS

Go ahead and shutdown your Mac. Apple Menu > Shut Down and Select Shutdown again. Next plug in your MacOS Catalina USB. Press and hold your Alt Option Key on your Keyboard and press your power button to turn your Mac on.

You should then see the Boot menu with Install macOS Catalina, use the arrow keys and select Mac OS Catalina drive. Press return on your keyboard.

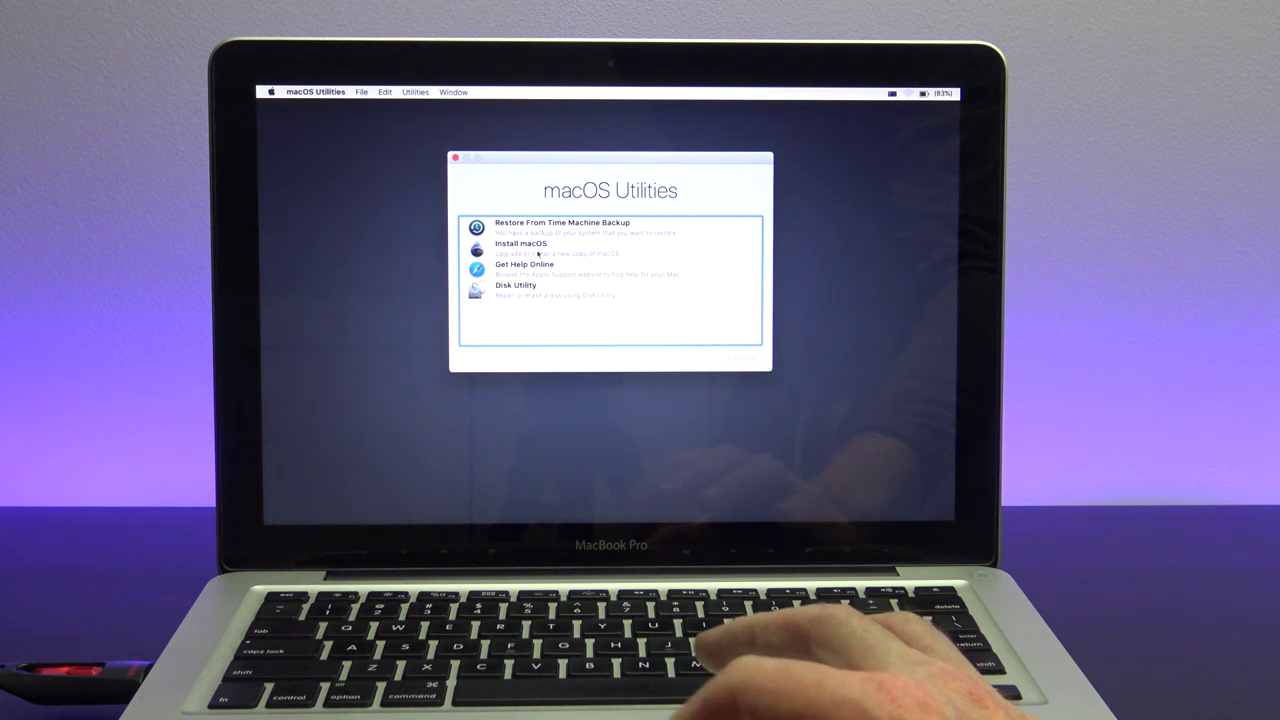
It will eventually boot you into the macOS Utilities menu. If you want to Upgrade or Install a new copy of macOS, select the install macOS option. I want to show you a clean install so I am going to wipe the hard drive first. Click Disk Utility.

Clean Install MacOS
Disk Utility a program to help you format your hard disk before installing MacOS Catalina.

Step 2 – Disk Utility

When you are in Disk Utility, select your Internal Hard drive in the top left hand corner and press partition. Press partition again. Give your partition an Name in this case I will call it Mac HD. Under format you can select APFS or if you have an older drive Mac OS Extended (Journaled).Click Apply and click Partition. When you have done that go back up to Disk Utility menu and Quit Disk Utility.

Alright you have wiped your hard drive and now you are about to do a clean install of macOS. Select install macOS. Click continue. Agree to the terms. Select Mac HD and then click install.

So by now you Mac would have rebooted and you should get the Welcome screen where you select the country you are from. You have now done a clean install of macOS Catalina and you can just go through all the mac setup prompts, similar to when you first purchased your mac.

Ok Guys, Don’t forget to check out my other videos.

Create macOS Catalina USB Installer Drive

Share files iPhone to Mac with AirDrop

Must have iPhone & Android Accessories

Windows 10 on MacBook Pro 2015

This video will show you how to install Windows 10 on MacBook Pro 2015.

Well here it is guys, the video you guys have all been waiting for. I have had quite a few people ask me about installing Windows 10 on MacBook Pro 2015 and 2014 models and have been a bit slow to get this video out as the hardware is not cheap as you all can imagine. So if the above video helps you out, please help 123myIT out by clicking on the donate button on the left hand side of the page. All donations will help purchasing new hardware.

Some of you will be upset to know that I didn’t get any errors when going through the video. To be honest I kind of expected maybe 1 or 2 problems. But the setup went very smoothly. Even the Boot Camp drivers at the end of the video applied correctly.

You will need 2 things to complete the setup.
1. USB drive 8GB or larger
2. Windows 10 or 8 ISO file which you

In the Windows 10 on MacBook Pro 2015 video I link to another video called Windows 10 Media Creation Tool. This will help you get the Windows 8 or 10 ISO file which allows you to then create the USB which you use to install Windows 8 or 10.

I was able to get a copy of the Boot Camp Drivers from the WININSTALL USB that I can confirm work with Windows 10.
I have labelled it Windows 10 64-bit Captured by 123myIT.com BCD and you will find under the MacBook Pro page here.

All up the install took about 1.5 hours, with the downloading of the boot camp drivers seeming to take forever. The file being around 1.2GB in size meaning if you are on a slow internet connection it could take hours for just that part to complete. So be prepared to wait.

Windows 10 on MacBook Pro 2015

Overall Windows 10 on MacBook Pro 2015 seems to run very well and I will take a closer look at how Windows 10 works in future videos. So stay tuned. 🙂

Want to know more about Windows 10? Click here for the Official Microsoft website.

Install Windows 8.1 on an External USB Windows To Go

This video will show you how to Install Windows 8.1 on an External USB Windows To Go.

Hi All,
So I get loads of people on the 123myIT.com website and on the YouTube channel about how can they install Windows on an external drive USB drive so they can just carry that around and use the USB to plug into their Mac or PC hardware.

Well I was able to find a solution for this issue from most people and it is Microsoft’s “Windows to Go”. This allows you to install Windows on an external USB drive to and allows you to run the a copy of Windows basically on any PC or Mac, without having to go ahead and install it locally. Is Windows to go the answer?

Why would you want to do that? Well there are many benefits to this however the main benefits are:
* You can save disk space on the PC or Mac local drive.
* Its very portable, which means you can carry the hard drive and plug it into a friends or work PC.
* Your files stay on the USB so its safer.
* You can also setup the drive to be encrypted, which means if you lose the drive no one will be able to get your data.

Ok so let get into it. What do you need to make this happen.
You will need a few things. The first is you will need to get yourself a copy of Windows Enterprise. This is a special copy of Windows designed to large companies, however I found a place where you can get the Evaluation version.
So to do that watch this video.
Where to Download Windows 8.1 Enterprise Evaluation

The next step is to install that Enterprise copy like you would on a Mac or PC. To help out I made a video on how this is possible to install it on a Mac. Watch the video below.
Install Windows 8.1 Enterprise on a MacBook Air OS X Yosemite

Windows to Go

Once installed you can watch the video above Install Windows 8.1 on an External USB Windows To Go

Of course you will need an external USB drive to install Windows too. I suggest a USB 3 external hard drive with at least 40GB of disk space. You might be able to get away with a smaller drive but I would advise it, because you may want to have some space for App like Mcirosoft Office or some personal data like photos and videos.

Well I hope this helps out guys and good luck!
Matt

Install Windows 10 Tech Preview on a MacBook Pro OS X Yosemite

This video will show you how to Install Windows 10 Tech Preview on a MacBook Pro OS X Yosemite.

Hi All
In this video we take a closer look at Windows 10 Tech Preview. This is just another option for Mac users who want to run Windows on their computer.
You will need to download the Windows 10 Tech Preview iso file and have a USB drive that is 8GB or larger.

You can download the Windows 10 Tech Preview on the 123myIT.com Downloads page. For link click here.
Windows 10 Tech preview comes in the follow different flavours.
English (United States) 64-bit (x64)
English (United States) 32-bit (x86)
English (United Kingdom) 64-bit (x64)
English (United Kingdom) 32-bit (x86)
Chinese (Simplified) 64-bit (x64)
Chinese (Simplified) 32-bit (x86)
Portuguese (Brazil) 64-bit (x64)
Portuguese (Brazil) 32-bit (x86)

The main thing you will notice about Windows 10 is the Start menu has been added back and the apps have now been incorporated directly into the Start menu.

Windows 10 Tech Preview Start Menu

Anyone can download this version it will expire on 04/16/2015 and should only be installed for people who want to give feedback to Microsoft about the workings of the new operating system. For more information see the Microsoft website here.

I didn’t get prompted for a product key. However if you need one you can use the one below.
Product key: NKJFK-GPHP7-G8C3J-P6JXR-HQRJR

If Windows 10 Tech Preview is not your thing you can take a look at install Windows 8.1 preview on your Mac videos for both MacBook Pro and MacBook Air below.
MacBook Pro
MacBook Air
After installing Windows 10 Tech Preview on your MacBook, if you are still having some problems with the sound buttons are not working, then it could be an issue with the Windows support or boot camp drivers.
Find out what model your Mac is and start looking for the drivers here. Boot Camp Drivers.

Cheers
Matt

Create a bootable OS X Yosemite installer USB drive

Apple have made it much easier to create an OS X Yosemite installer USB drive and this same process can also be done for OS X Mavericks. In this video and article I will show you what you need to do to make this happen.

You can check out the older video 123myit.com video for the Mavericks USB here.

What do you need to get started?
* 8GB or larger USB drive, SD Card or USB hard drive
* OS X Yosemite.app or Mavericks.app (this can be downloaded from the App Store)
* An Apple computer with access to the Apple App Store
* A user account with administrator rights

Step 1. Download Yosemite, Mavericks from the App store.
Apple direct link here.
Step 2. Insert your USB into the Mac and run the Disk Utility.
Step 3. Erase the USB, so it becomes a clean USB with no data on it.
Step 4. Download OS X Yosemite App, get it from the Apple Store.
Step 5. Open Terminal and use the command below. Make sure the Yosemite App is located on your Desktop of your Mac.

NOTE: Change the USB name to MyVolume or you can change code “MyVolume” to the same name as your USB drive.

OS X Yosemite
sudo /Applications/Install\ OS\ X\ Yosemite.app/Contents/Resources/createinstallmedia --volume /Volumes/MyVolume --applicationpath /Applications/Install\ OS\ X\ Yosemite.app

OS X Mavericks
sudo /Applications/Install\ OS\ X\ Mavericks.app/Contents/Resources/createinstallmedia --volume /Volumes/MyVolume --applicationpath /Applications/Install\ OS\ X\ Mavericks.app

OS X Terminal Command

This install may take some time depending on the speed of your Mac hardware. Once the Terminal finishes copying everything across you will then be able to use the OS X Yosemite installer USB drive to do clean installs of OS X Yosemite.

If you are looking for a video on how to setup OS X Mavericks USB you can use the code above if that doesn’t work you can find the 123myIT.com video.
How to do a clean install of OS X Mavericks from USB

Good luck,
Matt