This video will show you how to reset the NVRAM on a Macbook Macbook Pro and Macbook Air.
How to reset the NVRAM on a Macbook Macbook Pro and Macbook Air
1
This video will show you how to reset the NVRAM on a Macbook Macbook Pro and Macbook Air.
This video will show you how to Reset the SMC System Management Controller on a Macbook Pro Macbook and Macbook Air.
Apple have said
Note: It is possible that the SMC could encounter an issue that may cause unusual system behavior typically related to the symptoms described below. In some cases, resetting the SMC may be the only correct method to resolve the issue, however, an SMC reset should only be attempted after all other standard troubleshooting has been performed.
You should try the following steps before you reset the SMC on your Mac and test the issue after each troubleshooting step and see if the issue still occurs.
Step 1. Press the Command, Option and Escape to quit any application that might not be working properly.
Step 2. Put the Mac in sleep mode by selecting the Apple menu button in the upper-left menu bar and choose Sleep. Wake the Mac after it goes to sleep.
Step 3. Restart the Mac by going into the Apple menu and choose Shut Down.
Step 4. Shut down the computer by going into the Apple Menu and choose Shut Down.
Sometimes your Mac might appear to be running normally but it doesn’t seem to be responding, you can force the Mac to shut down by pressing and holding the power button for 10 seconds.
NOTE: Any unsaved work will be lost.
Hi All
If you have purchased a second hand Mac and had a hand me down from a family member. The Mac may still hold the Computer Name that the previous owner had entered when they initially configured the Mac.
The video above shows you how to change the computer and also shows you how to add the computer into the Finder sidebar.
Step 1. Go into the Apple menu, and click on System Preferences.
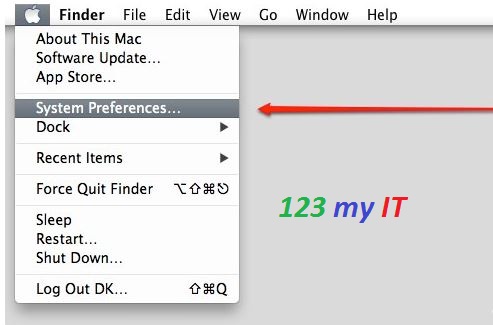
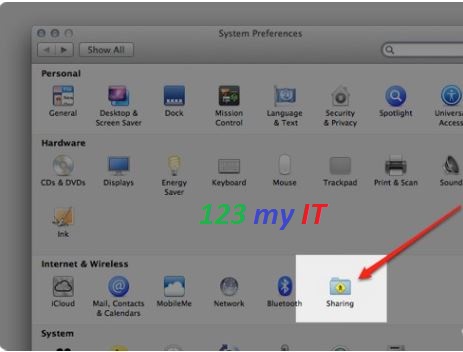
Step 2. In the System Preferences menu click on Sharing.
Step 3. In the top of the Sharing window you will see Computer Name followed by the current name of the Mac.
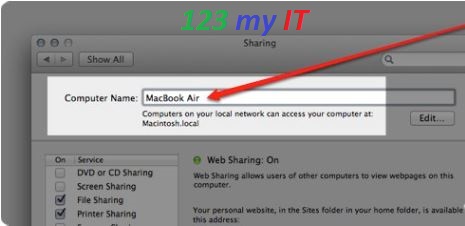
Step 4. Delete the Computer Name and type what ever name you would like the Mac to be.
Once you have changed your Computer name if you would like to display your MacBook in the Finder Sidebar do the following.
Step 1. Click on Finder and then Preferences.
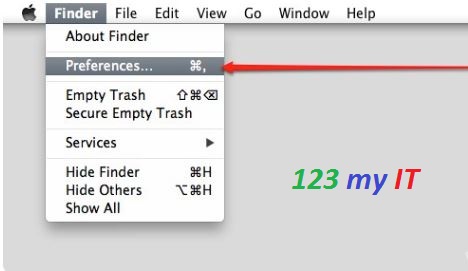
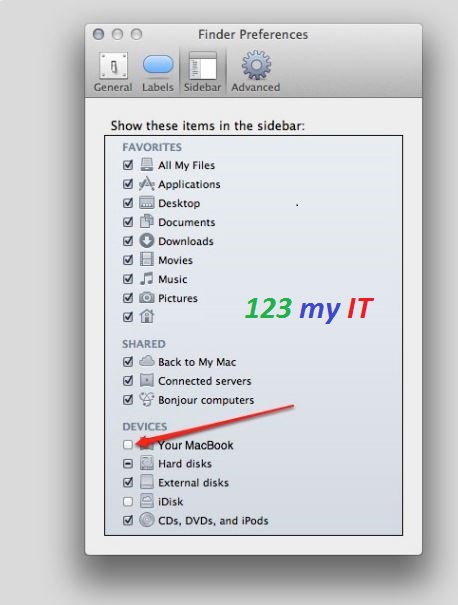
Step 2. Click on the Sidebar Tab across the top of the Finder Preferences Window.
Then down the bottom of the Window out a tick beside the Name of your Mac. Close you Window and your Mac will now appear in your Finder Sidebar.
To see it click Go then Computer.
I hope that helps out.
Good luck 🙂
Hi All
This is my latest video on how to clone OS X Mountain Lion and Lion by using an app called Carbon Copy Cloner.
The direct download links for Carbon Copy Cloner are listed on under my Downloads section which can be found here.
The are many benefits to using this method, but the main reason to use this is to allow you clone the same copy of OS X Mountain Lion or Lion, including all your applications and settings from one PC to another PC. So lets say you are in a work place environment and you have 10 laptops to install apps and wifi settings, rather than installing one at a time, you can create one master image and take a copy of that on your USB drive then clone that image onto all your other laptops.
There are some buts to doing this, you can only close software to the PC that’s can load and runs that version of OS X. For example you cannot clone a copy of Mountain Lion and expect it to run on an old Tiger laptop or one first Intel model Macs.
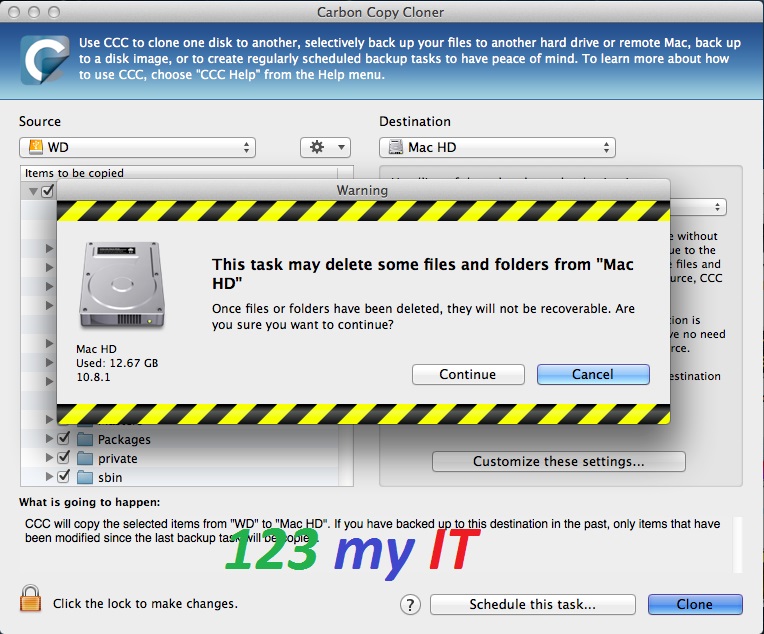
In the video I have show you a trial version of the software, however if you are using the software for work use I would suggest you buy a copy at $39.95 its a bargain!! And it helps the developer make better software.
Give it a try!
Good luck and have fun.
Matt
Hi All
So I have revamped the how to install Windows 8 on a Mac with Boot Camp video, I have tried to explain more detail about the install in the video.
I have also added the direct Apple boot camp downloads which can be found here.
If you have any questions about the boot camp install and installing Windows 8 on your Mac you can find it here.
Good luck 🙂
This video is a step by step guide on how to install Windows Vista on an Apple Mac Book Pro running OSX and bootcamp.
1. Log into your Macbook Pro.
2. Open up finder and in the spotlight bar type: bootcamp.
3. Select bootcamp from the menu.
4. On the introduction screen click continue.
5. Make sure that the download the latest support software from Apple option is ticked. If you already have a Windows partition installed you will have an option called Remove Windows 7. If you dont already have Windows installed you will have an option called Install Windows 7. Make sure you tick install Windows 7.
6. Have your 1GB USB key handy to download the Windows Support Software from Apple.
7. Now you can choose to save a copy of the Windows support software to DVD or USB. I prefer USB.
8. Select save a copy to an external drive. You can run this software after Windows have been installed.
9. The Windows support software will download to the USB.
10. At the create a partition for Windows screen you can make the partition as big as you want. However press divide equally so you will have a shared amount of space on both drives.
11. In-cert your Windows Vista DVD and click install.
12. Boot camp will start to Partition the drive.
13. Your Macbook will restart.
14. Windows is loading files screen.
15. At the Windows Vista install screen select your Language, time and currency format and Keyboard and input methods. Click next.
16. Click install now.
17. Enter your serial key and click next.
18. Select your version of Vista that you want to install and tick the terms and agreements and click next.
19. Click on custom menu.
20. Select your bootcamp partition and click drive options. Hit Delete then click Ok.
21. Select the partition again and click on New, Apply and Next. And Vista will start to install.
22. The Mac will restart.
23. Setup your new Windows Vista profile and you are done.
If my video helps in some way please like it. 🙂
This is a tutorial on how to do a clean install of OSX mountain lion on a macbook pro from a DVD.