Windows 10 Release

This video will talk about the Windows 8.1 and 10 links on the 123myIT website, why Microsoft has removed them and some info on Windows 10 release.

Hi All,
So its been a pretty exciting week on the Microsoft front, with the Windows 10 Release. On Wednesday 29th of July, Microsoft started preparing for the full version of Windows 10 to be released.
And I have had to scramble to remove the old Windows 8.1 and Windows 10 preview version links for the Downloads section of the 123myIT.com website. Which thanks to Microsoft no longer work.

To all those 123myIT subscribers out there that were lucky to get the preview copy. Maybe make a back up of it to USB so that you always have that copy in the future. Link below for video on how to do that.
How to create a bootable Windows 8.1 USB
Its the same process for Windows 10 Release as well.

For those that did miss out on the preview versions there is other options for you.
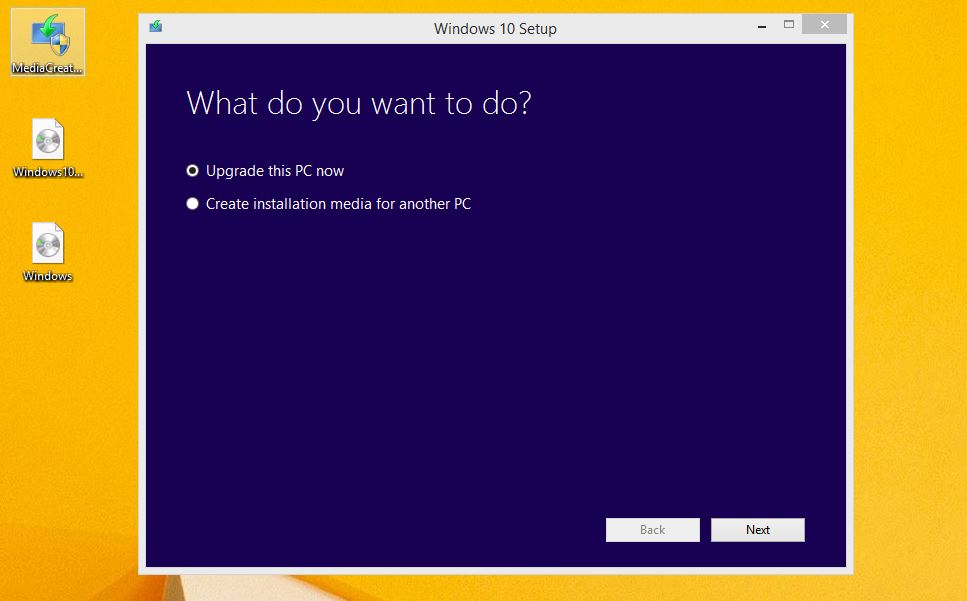
The first option and probably easiest way to get your hands on Windows is to buy and you can buy it through the links in the 123myIT.com Store. Once you have your product key, you can use the Media Creation Tools to download Windows as an ISO file or directly to a USB key.
Download the Media Creation Tools from the Downloads part of the 123myIT.com website.
Create installation media for Windows 8.1 link here. Create Media
Windows 10 Media Creator Tool 32 bit link here. Create Media Tool 32 Bit
Windows 10 Media Creator Tool 64 bit link here. Create Media Tool 64 Bit

The picture below shows you what you can expect from the Media Creation Tools.
Media Creation Tools

The second option is to upgrade the versions that you already have, so if you have a Windows 7, Windows 8 or Windows 8.1 computer you can simply upgrade that computer. And I go into more detail about that in this video.
Windows 10 FREE Upgrade

So if you have an older computer boot it up and make sure you are getting your Free Windows upgrade. Windows 10 Release seems to have gone pretty smoothly so far some people seem to be having issues getting drivers to work. But that will come along once manufactures have time to create suitable drivers.

Cheers
Matt

Install Windows 8.1 Enterprise on a MacBook Air OS X Yosemite

This video will show you how to Install Windows 8.1 Enterprise on a MacBook Air OS X Yosemite.

Hi All,
I setup this video to show people how to Install Windows 8.1 Enterprise on a MacBook Air OS X Yosemite. You need to know how to install Windows 8.1 Enterprise to allow you to then setup Windows to Go. Windows to Go is installing Windows 8.1 on an external USB drive rather than installing it to the computers built in hard drive.
You need to have a copy of Windows 8.1 Enterprise install on a Mac or a PC to allow you to setup the Windows to Go USB drive and I will do the next video on exactly how to do this.
So this video is in actual fact one step closer to setting up Windows to Go.

If you want to know more about the Windows to Go process you can check out the official Microsoft page here.
And for the techies out there, you can take a look at the TechNet version here.
So where do I get Windows 8.1 Enterprise version from I here you ask? Well you can follow the 123myIT.com video here. On the downloads page you will have a choice of Windows 8.1 or Windows 10 Enterprise version. For the Windows to go setup it probably doesn’t matter a whole lot which version you choose.

Windows 8.1 Enterprise on a MacBook

Once you have downloaded the Windows 8.1 Enterprise version, you can burn that ISO to a DVD and then install it either on a Mac or PC. Burning the copy to DVD allows you to install any computer but it also allows you to make sure you have a back up copy if anything does happen to the ISO file or to the computer that the ISO file is stored on.

Subscribe to the 123myIT.com YouTube channel to keep up to date with the latest 123myIT.com videos. Click here.

Install Windows 10 Tech Preview on a MacBook Pro OS X Yosemite

This video will show you how to Install Windows 10 Tech Preview on a MacBook Pro OS X Yosemite.

Hi All
In this video we take a closer look at Windows 10 Tech Preview. This is just another option for Mac users who want to run Windows on their computer.
You will need to download the Windows 10 Tech Preview iso file and have a USB drive that is 8GB or larger.

You can download the Windows 10 Tech Preview on the 123myIT.com Downloads page. For link click here.
Windows 10 Tech preview comes in the follow different flavours.
English (United States) 64-bit (x64)
English (United States) 32-bit (x86)
English (United Kingdom) 64-bit (x64)
English (United Kingdom) 32-bit (x86)
Chinese (Simplified) 64-bit (x64)
Chinese (Simplified) 32-bit (x86)
Portuguese (Brazil) 64-bit (x64)
Portuguese (Brazil) 32-bit (x86)

The main thing you will notice about Windows 10 is the Start menu has been added back and the apps have now been incorporated directly into the Start menu.

Windows 10 Tech Preview Start Menu

Anyone can download this version it will expire on 04/16/2015 and should only be installed for people who want to give feedback to Microsoft about the workings of the new operating system. For more information see the Microsoft website here.

I didn’t get prompted for a product key. However if you need one you can use the one below.
Product key: NKJFK-GPHP7-G8C3J-P6JXR-HQRJR

If Windows 10 Tech Preview is not your thing you can take a look at install Windows 8.1 preview on your Mac videos for both MacBook Pro and MacBook Air below.
MacBook Pro
MacBook Air
After installing Windows 10 Tech Preview on your MacBook, if you are still having some problems with the sound buttons are not working, then it could be an issue with the Windows support or boot camp drivers.
Find out what model your Mac is and start looking for the drivers here. Boot Camp Drivers.

Cheers
Matt

Fix Error Your bootable USB drive could not be created

This video and article will show you how to Fix Error Your bootable USB drive could not be created.

Hi All
When installing Windows on a Mac I came across this error when I was trying to create a USB drive. The problem is the DVD is already mounted in Disk utility and when this is the case the Boot Camp Assistant cannot mount the DVD at the same time so you get this Error Your bootable USB drive could not be created.

Your bootable USB drive could not be created

The fix for this is pretty straight forward. You need to unmount the USB drive in order to get this to work. But also you will need to make a copy of that DVD so that you will be able to continue along with the setup.
If you want to know how to create a ISO or DMG file from a DVD then you can follow the 123myIT.com video here.
How to create an ISO file on a Mac

Once you have created your DMG or ISO file, you can then start the process again with the Boot Camp Assistant. However this time instead of selecting the DVD drive, go into your Documents folder and select the newly created DMG or ISO file. This should then allow you to continue on with the installation as normal and Fix Error Your bootable USB drive could not be created one and for all.

Users that have upgraded to Yosemite may also get this same error. If this is the case just follow the steps outlined above and you should hopefully resolve the same error.

If you want to see the official Apple page on how to create an ISO image file click on the link below.
Boot Camp: Creating an ISO image from a Windows installation DVD

Good luck
Matt

Boot Camp Drivers

This video will show where to find your the correct boot camp drivers for your Mac.

Boot Camp Drivers

Which Boot Camp supports your model of Mac?
Click the links below to see which version of Boot Camp you need for your Model of Mac.
MacBook Pro
MacBook Air
MacBook
iMac
Mac mini
Mac Pro

Running Windows on your Mac with Boot Camp
Want to run Windows application on your Mac every now and then? No problem.
You can run Windows on your Mac at native speeds with a built-in utility called Boot Camp.
The setup is easy as 123 and its safe for your Mac OS X files.
Once the setup is complete you can boot into Mac OS X or Windows.

Windows running at native speed
Windows can run on your Mac at native speed without comprising performance, that would happen if you were to run a “virtual machines” or software emulation.
All you Windows applications will have full access to multiple cores and processors, 3D graphics and all your Mac hardware ports such as FireWire, Wi-Fi, AirPort, and Gigabit Ethernet.

Once installed you can change between OS X and Windows by holding the (Alt) or Option key when restarting your Mac.
Of if you want to set the Start Up disk permanently you can watch the following video on how to do this.
https://www.123myit.com/2014/06/boot-camp-set-default-startup-disk-windows/
or
https://www.123myit.com/2014/06/boot-camp-set-default-startup-disk-os-x/

Boot Camp Requirements
What do you need to run Boot Camp?
* You will need an Intel-based Mac.
* OS X v10.5 or later.
* Update the firmware on your Mac.
* The Boot Camp Assistant, which should be located under your Applications, Utilities.
* ISO or DVD which you can find on the 123myIT.com downloads section here.
* Need more info? check out General Boot Camp questions about installing Windows 8 on a Mac

If you would like to read more on Boot Camp click here for the official Apple website.