Microsoft has released Windows 8 and 8.1 in digital and physical formats. You can install the new Windows operating system by either downloading the ISO file or by a DVD. But what can you do if none of these options are suitable for your situation? You can create a bootable Windows 8.1 USB drive.
The main benefits to using a bootable Windows 8.1 USB drive is that its compatible with every device that runs Windows. You don’t need to have a DVD drive on your hardware to install it, just a USB port. Its easier to store and carry and installs times are much faster than a DVD.
So what do you need to set up the USB?
You will need the following to create a Windows 8.1 USB drive:
* A 4GB USB drive or larger;
* Windows 8.1 ISO file or DVD, you can download an ISO file from the downloads section of 123myIT website here.
* Any device that can run Windows.
* Windows product key. You can find it on the 123myIT Downloads page here.
I already have a Windows 8 Product Key, can I update it?
The answer is yes. If you own Windows 8 or Windows 8.1, you can download and install Windows by using your product key. Click here.
How do I create the Windows 8.1 USB drive from a DVD or ISO file?
After downloading the Windows 8.1 ISO follow the steps below.
1. Insert your 4GB USB drive.
2. Open the Command Prompt by pressing Windows Key + R and type “cmd” of go to Start Run and type “cmd”.
3. In the black command windows type “diskpart” and this will open the partitioning software, so that you can start to format the USB drive.
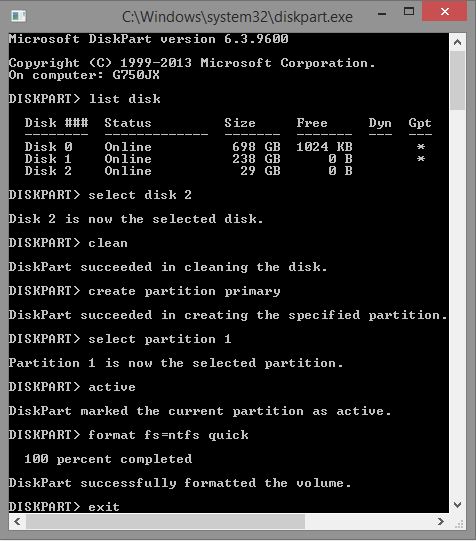
4. Run the following commands.
* DISKPART> list disk
“list disk shows all of the active disks on your computer”
* DISKPART> select disk #
“# represents the number for your USB flash drive”
* DISKPART> clean
“deletes any existing partitions on the USB flash drive”
* DISKPART> create partition primary
“creates a primary partition on the USB flash drive”
* DISKPART> select partition 1
“selects the partition you just created”
DISKPART> active
“makes the partition active”
DISKPART> format FS=NTFS quick
“This command will format the USB with the NTFS file system”
* DISKPART> assign
“assign a volume and drive letter to the USB drive”
DISKPART> exit
“exit Disk Partition”
Once complete your CMD or command window should look something like this.

Copying the Windows 8.1 files from the ISO file or DVD drive to your Windows 8.1 USB drive.
The next step is to use XCOPY to copy all the files on your ISO file or DVD to the Windows 8.1 USB drive. Use the command below to get started. Change the “H and F” drive to suit the letters of your ISO file or DVD drive and USB drive. For more info watch the video above.
XCOPY H:\*.* F:\ /E /H /F
Once you finished typing the command it should look like the screen shot below.
And the hard part is now done. Simply plug in your bootable Windows 8.1 USB drive into any Windows PC and you will be able to boot and install Windows 8.1.
Good Luck.

