Backup & Restore WhatsApp Messages on iPhone

Ok guys so you have a new iPhone or you want to reset your iPhone and don’t want to lose your WhatsApp messages you will need to do a backup and restore. In this video I will show you how to do a backup and restore via iCloud. Lets get started.

iCloud Login

The first step is to log onto your iCloud account with your Apple ID and turn on a service called iCloud drive. So go into Settings and iCloud. Scroll to the bottom and you should see your WhatsApp toggle switch. If its off turn it on. And then also make sure your iCloud drive button is turned on.

Backup & restore Whatsapp messages.
Use iCloud to backup your messages first.

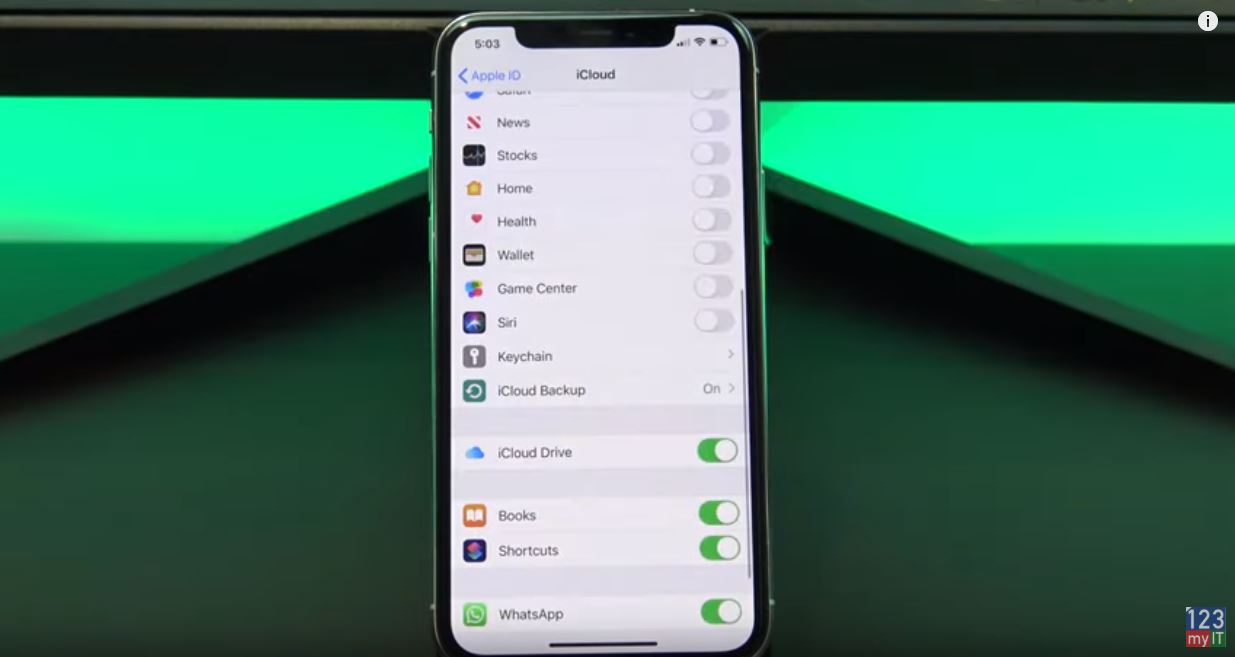
If you go into your iCloud backup it should be on as well and feel free to turn off anything you don’t need like Book and Shortcuts.

How to Backup & Restore WhatsApp Messages?

Ok we have now turned on iCloud backup for WhatsApp, let go ahead and do a backup of the messages in WhatsApp. Go into WhatsApp and tap the settings tab down the bottom. Next go into Chats and then Chat backup.

Chat Backup
Chat Backup

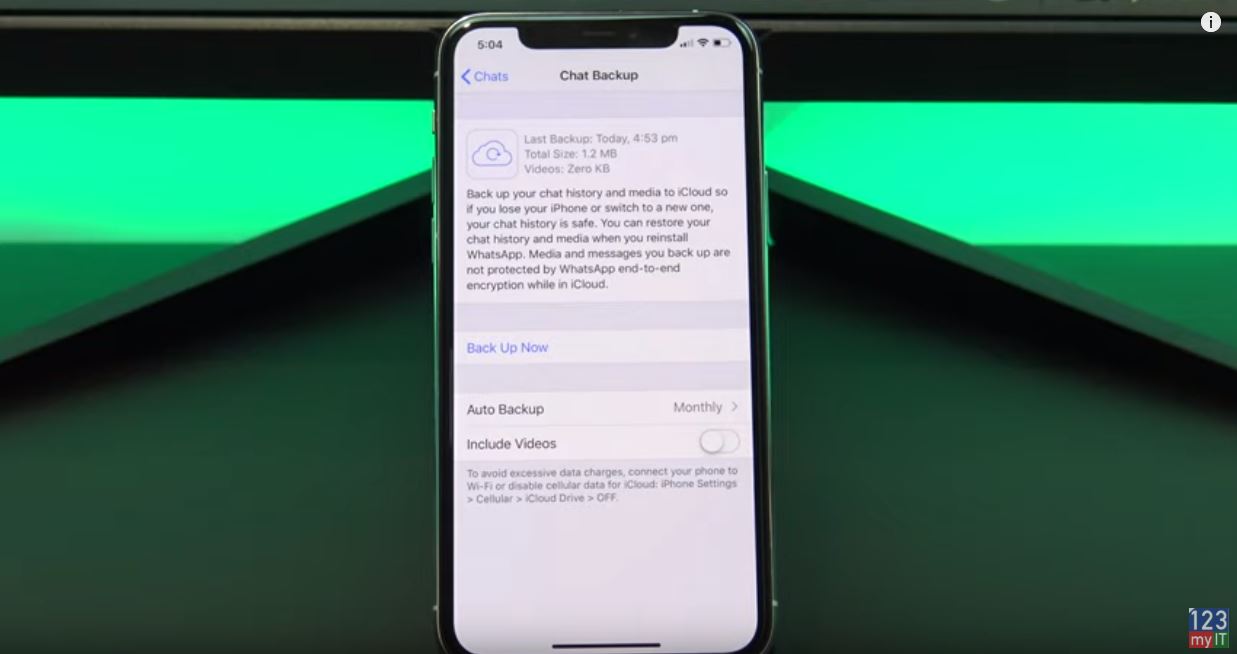
Under Chat Backup you will have a few options. The first one is auto backup. This allows you to set an auto backup of the chats to iCloud drive. Maybe set this to once a month. The second option is include videos, remember that if you only have 5GB of backup space on your iCloud drive than maybe leave this option turned off. Tap backup now and it should start saving your messages to iCloud Drive. Press backup now and this should start to backup your WhatsApp messages. Make sure you do this when your on WIFI, otherwise it might eat up your cellular data.

Restore Backup

Ok now you have done a Backup. Lets see how you do a restore. So I will delete the WhatsApp app and reinstall it. Enter in your phone number and setup WhatsApp. After you enter your phone number it will ask you if you want to Restore from iCloud. It should then go ahead and download all your chat history messages videos pictures etc.

You can see here it says it has Restored 10 messages. Enter in your display name.

Once this is done you should be able to go in an check your chats. Also guys don’t forget to check out my other video such as unboxing of the Aorus KD25F Gaming Monitor. And do me a favour hit the subscribe button and smash the bell icon.

Media PC Build – The Witcher

Setup XBOX controller on Apple TV, iPad or iPhone + Games

Transfer Data Old iPhone to New iPhone

Move your data from old iPhone to your new iPhone.

Hi Guys and welcome to 123myit. This video will show you how to transfer data from your old Phone to your new Phone.

Start the Transfer – Old iPhone to New iPhone

If you have a new Phone you can transfer data by turning it on and placing it beside your old Phone. You should see the Quick Start screen appear on your old Phone.
On your old Phone make sure you are logged in with your Apple ID and check that your iOS is 11 or later.
Next you should see an animation appear on your new Phone scan it with the rear camera on your old iPhone.
If you get prompted for a passcode enter your old iPhone passcode on your new Phone.
I didn’t have a passcode on my old Phone so its gone into the activate step.

Old iPhone to New iPhone
Quick Transfer window.

Also If you didn’t get the Quick Start screen try restarting your old Phone and make sure you have the WIFI turned on.

Follow the steps to setup Face ID or Touch ID on your new Phone. I am going to set mine up later.
Awesome you have made it this far! Hit continue to Start the transfer between your iPhones. This will take a while so now is a good time to plug your iPhones into power.

Logon to your Apple ID account

Next up enter you Apple ID password.
Agree to the terms and conditions. And then follow the next few setup prompts.
Awesome your iPhones are starting to transfer data. Depending on how much data you have this could take some time.

Your Phone will restart and you should see the Restore completed message. Hit continue. Again follow the prompts to setup your new Phone.

Ok you should be all done now. check your new Phone and make sure all your data is there. I am going to check that my pictures have copied across.

Also guys done forget to check out my other videos like Apple Watch series 5 Unboxing and do me a favor hit the subscribe button and smash the bell icon.

Apple Watch Series 5 Unboxing First Look

Apple iPhone 11 Pro Silver Unboxing First Look

Transfer data Android to iPhone 2019

Transfer data Oppo to iPhone 2019

Hi Guys, Welcome to 123. In this video we will show you how to transfer data from your OPPO to iPhone in 2019.
Ok guys to transfer data from your Oppo phone to iPhone we are going to use an app called Move to iOS.

Oppo to iPhone – What will transfer?

The move to iOS app will try to transfer the following data for you.

  • Contacts
  • Mail accounts,
  • Message history,
  • Calendars,
  • Camera photos
  • videos
  • Web bookmarks
  • Free apps.

To start the transfer you will need to reset your iPhone. You can do this by going into Settings > General and Reset menu.
If you don’t want to reset your iPhone you will need to manually copy the data across. I will do a video on this later so hit the subscribe button.

Reset and Connect

Once you are in the Reset menu tap on Erase All content and Settings. And then tap the erase iPhone button twice. Once you have doen this the iPhone will reset itself back to factory defaults. Making it the same as brand new iPhone.
Follow the prompts like you would setting up your iPhone for the first time.
Go ahead and add your iPhone to your wifi. Make sure its the same wifi that you Oppo phone is connected too.

Keep going through the prompts until you get to Apps and Data. Once you get to Apps and Data, tap on Move Data from Android. And tap continue. Next up you will need to download the Move to iOS app from the Google play store.

Oppo to iPhone apps and data
Apps & Data screen

I have already downloaded the Move to iOS app, so I just press open.
On your Oppo phone press continue and then Agree. Hit next up the top and then enter the code that is displayed on your iPhone.

You should then see a Data Transfer screen. Select the data you want to copy from your Oppo phone to your iPhone and tap next.

Fix Could not communicate with the device Move to iOS

If you get the Could not communicate with the device Move to iOS message, click the link to help you get past that error.
Once the transfers complete just tap Done on your Oppo phone.
Go ahead now and continue setting up your iPhone.

This last part of the setup will add the free apps to your iPhone. So go ahead and enter your Apple ID. After entering in your Apple ID, tap Agree and then the Apps will start to install.

Check your iPhone and all your data should have copied across. If you are missing something check the 123myIT future videos for Manually copying your data to iPhone. I will put links in this video description.
Also don’t forget to check out my other videos such as Fix the Could not communicate with the device error and do me a favor hit subscribe and smash the bell icon.

Gaming PC Settings – Nvidia Control Panel

iPhone Battery Drain – Is your iPhone letting you down?

Setup Bedtime on iPhone

Fix Could not communicate with the device Move to iOS

If you are getting the error Could not communicate with the device when using the Move to iOS app. This video can help. If you have a new iPhone like the iPhone 11 and you are transfering your data via the move to iOS app. You might get the Could not communicate the with device. here’s how you can fix it.

Could not communicate – Move to IOS

If you not familiar with the move to iOS app don’t worry I will have two new videos coming out shortly so keep checking this website, or subscribe on our YouTube page for updates. So here I will show you that I am trying to transfer data from Android to iPhone and I am getting the Could not communicate with the device error.

You will need to connect the Android phone to the iPhone manually. To do this go into the WIFI settings and find the iPhone WIFI. The iPhone WIFI will come up as iOS and then a random number, tap on that to connect to it.

Could not communicate
Connecting the Android phone to the iPhone WIFI

Enter the iPhone WIFI password

Next enter the WIFI name as the WIFI password. Make sure you use upper and lower case. When you are done double check you have entered it right and hit connect. On the next screen make sure you are connected to the iPhone WIFI and restart the Move to iOS apps on both phones.

Next up on your Android phone enter the code that is displayed on your iPhone.
There you go now the Could not communicate with the device error is gone and your phones have moved to the next step Data Transfer.

Simply untick and data you dont want to transfer and hit next.
Hit Done on your Android phone. And now just continue along with the Move to iOS prompts to setup your new iPhone. Thats it you have now got past the Could not communicate with the device error.

Also Guys dont to check out my other videos like iPhone battery drain and do me a favor hit the Subscribe button and smash the bell icon.

Gaming PC Settings – Nvidia Control Panel

iPhone Battery Drain – Is your iPhone letting you down?

Setup Bedtime on iPhone

Setup Bedtime on iPhone

If you want a really nice way to wake up in the mornings you can setup Bedtime on your iPhone.
Bedtime has a slow rising volume alarms that don’t shock you to wake you up.

iPhone Bedtime Setup

To setup bedtime go to Clock and then tap on Bedtime.
Next tap on Set up and then set you Wake up time.
I am going to set my wakeup time for 6:30am. Then tap Next.
Go ahead and choose your alarm. The have some really good alarms let me play a few for you now.

iPhone setup
Setup iPhone Bedtime – Choose your alarm.

Once you have selected your alarm tap next. Set your bedtime, this will play the alarm when its time to go to bed. I am going to set mine for 11:15pm.
And then press next and choose your bedtime schedule days. I don’t want the alarm to wake me on the weekends, so I am going to remove Saturday and Sunday.

Tap next and you are done. Once your in the Bedtime screen if you want to make changes to your schedule tap on your alarm.
In your bedtime schedule you can use the slider wheel to edit your times.

How to turn off Bedtime?

If you want to turn off your bedtime schedule use the toggle switch at the top.
Go back out of bedtime schedule and go into options to see more options.
If you tap on bedtime reminder you can change the ammount of time that the iPhone will remind you.
If you want you can also turn off Track time in Bed and Do Not Disturb During Bedtime.
And lastly you can ajust your Wake Up sound volume. This controls how loud your alarm volume will be.
Tap Done and if you use the health app you can tap Show more in health.

Also guys down forget to check out my other videos like how to setup low power mode on iPhone, Do me a favor and hit the subscribe button and smash the bell icon.

Apple Shutting Down iTunes

Low Power Mode on iPhone

Backup Samsung to PC or Mac

Low Power Mode on iPhone

Enable Low Power Mode on your iPhone to extend battery life when you need it.

Hi Guys, have you ever been caught out where you didnt get a full charge on your iPhone and you are not near a charger but you need to get some more battery life out of your iPhone?
Or is the battery on your iPhone not lasting as long as you would like? This seems to always happen when your expecting an important phone call or text message? Low power mode can help!

You can buy a portable battery brick, but you have to charge that as well and you its just another thing to carry.
Or you do another option which is built into your iPhone automatically and its called low power mode.

Step 1 – Enable Low Power Mode on your iPhone

low power mode
You can buy power bricks that allow you to double or tripple your iPhone battery life.

To add low power mode to your Control Centre go into Settings > Control Centre > Customise Controls.

Scroll down until you see Low Power Mode.
Tap on the green plus icon beside Low Power. This will add it to your control centre.
And if you scroll back to the top you should see it there.

Go back out of settings and into your control centre. To access Control Centre just swipe up from the bottom . If you are using an iPhone X you will need to swipe down from top right conrner.

You should now see a new Low Power Mode icon in your control centre. Simply tap it to turn it on and tap it to turn it off.

To remove the Low Power icon from your Control Centre. Go back into Settings > Control Centre > Customise Controls. Tap the red minus icon and tap remove.
Then if you go back out and into your Control Centre, Low Power will be gone.
Another point to remember guys is Low Power will effect some features to make your iPhone last longer.

Also guys down forget to check out my other videos like Enable Windows Zoom on iPhone or iPad.

Backup Samsung to PC or Mac

Make your iPhone iPad speak each word you type

iPhone to Android data transfer 2019 with iCloud

Moving content? make a backup first.

iPhone to android 2019

This video and article will show you how to transfer data, such as clips, messages and contacts from your iPhone to Android device.

Getting a new phone is great. But there is always the problem of moving your data from your old phone to your new one. I have done a few transfer videos before however this changes year on year depending which model phone you have. So this is the 2019 version which will hopefully make it an easy process.

Step 1 – Back up your iPhone to icloud

The first step is to backup your data to iCloud. You can do this by going into Settings and at the top sign into iCloud with your Apple ID. You want to make a backup of your data before you move to the next step. Also now is a good time to get rid of any data you don’t want moved over to your Android phone. In your iCloud account setting go through and toggle off anything you don’t want. Lastly go onto the iCloud.com website and check your data has been backed up. Very Important!

iPhone to android
Using iCloud to backup your data before moving it to Android.

step 2 – use smart switch app to download data from icloud to your android device.

If you don’t have smart switch on your phone already you can pick up this app from play.google.com. Direct link here. Go through the options. Bring data to your new phone. Next select the WIFI option and make sure both phones are on your WIFI.

You can also use a cable if you prefer. An option should now come up asking you to Get Connected. Choose the device you want however in this video we choose iPhone/iPad. Next put in your Apple ID. Select the data that you want to download from iCloud. Simply press Import and you are done.

Guys don’t forget to check out my other great videos.

Forgot your Passcode iPhone X, 8, 7, 6, iPad, iPod

Apple iPhone 8 – is it still good in 2019?

Fix MacBook by resetting SMC

Forgot your Passcode iPhone X, 8, 7, 6, iPad, iPod

The step by step video on how to fix the forgotten passcode.

The Problem – Forgot your Passcode

So you have restarted your iPhone and you have forgot your Passcode. This can happen because you use your finger print scanner or face recognition software and when you restart your iPhone it asks you for your passcode. This can be really frustrating however we should be able to step you through this problem.

Step 1 – Remember the Passcode

The first and easiest thing to do is to try and remember the passcode. This might seem obvious, but it might be easier than wiping your device which is what we will have to do to get rid of it.

Step 2 – Computer with iTunes

Next up you will need a computer with iTunes. This is because you will actually need to restore the iOS software on your phone. Kind of like reloading the iPhone so it is the new as if you just brought it from Apple.

Forgot your passcode
Forgot your passcode, restore your iPhone with iTunes.

Once this is done the next step here is too put the iPhone in recovery mode screen. Depending on your model the steps to do this are different. Watch the video above for more info on recovery mode for your iPhone. You should know what your device is in recovery mode as it will come up with a lighting USB picture on your phone or it will come in with a message in iTunes that your device is in recovery mode.

Next you will have three options: Cancel, Update and Restore. Now is a good time to mention that this process will wipe any data on the iPhone including your passcode. So just try to remember your passcode one more time before going to the next step.

Next click restore and then next option will be restore and update. Then your iPhone should reset itself and you should be able to setup your device again from scratch. Good luck ! 🙂

Check out the other helpful IOS videos below.

iOS 12, Is it faster? Benchmark & Features

Transfer data from iPhone to Oppo with iCloud

Fix iPhone, iPad or iPod Black Screen