Transfer Data Old iPhone to New iPhone

Move your data from old iPhone to your new iPhone.

Hi Guys and welcome to 123myit. This video will show you how to transfer data from your old Phone to your new Phone.

Start the Transfer – Old iPhone to New iPhone

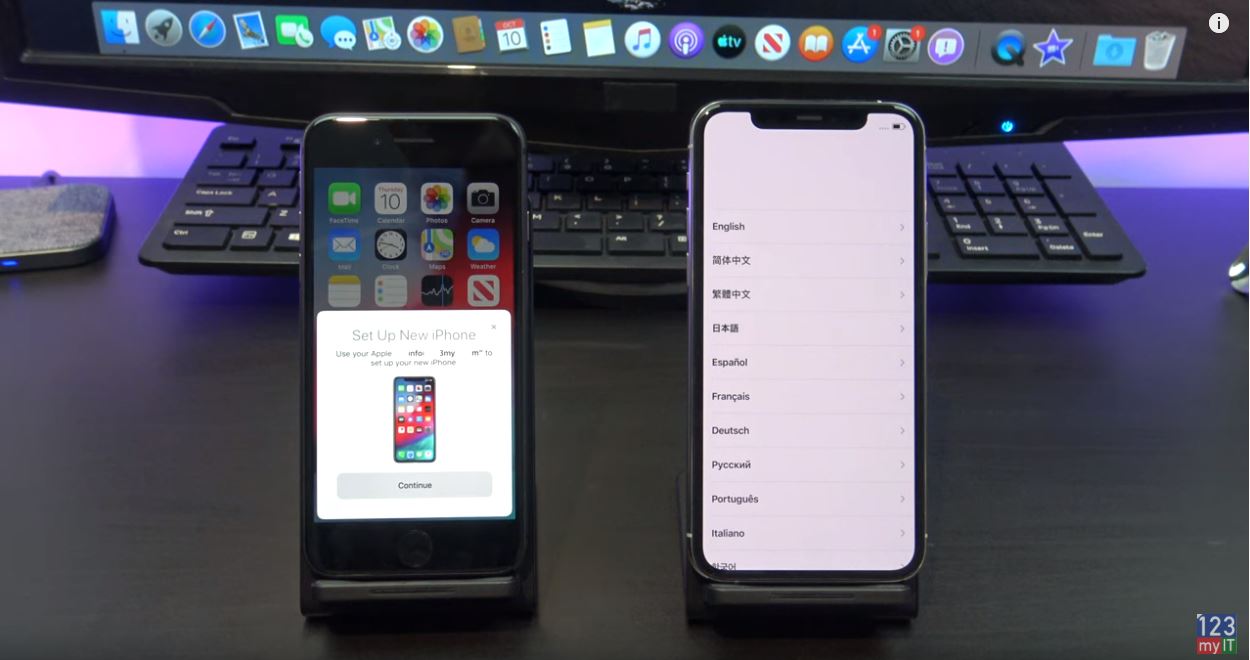
If you have a new Phone you can transfer data by turning it on and placing it beside your old Phone. You should see the Quick Start screen appear on your old Phone.
On your old Phone make sure you are logged in with your Apple ID and check that your iOS is 11 or later.
Next you should see an animation appear on your new Phone scan it with the rear camera on your old iPhone.
If you get prompted for a passcode enter your old iPhone passcode on your new Phone.
I didn’t have a passcode on my old Phone so its gone into the activate step.

Old iPhone to New iPhone
Quick Transfer window.

Also If you didn’t get the Quick Start screen try restarting your old Phone and make sure you have the WIFI turned on.

Follow the steps to setup Face ID or Touch ID on your new Phone. I am going to set mine up later.
Awesome you have made it this far! Hit continue to Start the transfer between your iPhones. This will take a while so now is a good time to plug your iPhones into power.

Logon to your Apple ID account

Next up enter you Apple ID password.
Agree to the terms and conditions. And then follow the next few setup prompts.
Awesome your iPhones are starting to transfer data. Depending on how much data you have this could take some time.

Your Phone will restart and you should see the Restore completed message. Hit continue. Again follow the prompts to setup your new Phone.

Ok you should be all done now. check your new Phone and make sure all your data is there. I am going to check that my pictures have copied across.

Also guys done forget to check out my other videos like Apple Watch series 5 Unboxing and do me a favor hit the subscribe button and smash the bell icon.

Apple Watch Series 5 Unboxing First Look

Apple iPhone 11 Pro Silver Unboxing First Look

Transfer data Android to iPhone 2019

Transfer data Android to iPhone 2019

Hi Guys and welcome to 123, in this video we will show you how to Transfer data from Android to iPhone in 2019.

Android to iPhone 2019 – What can you transfer?

This video will help you transfer Contacts, Message history, Camera photos and videos, Web Bookmarks, Mail Accounts, Calendars and Free apps.
The first step is to reset your iPhone, if you don’t want to reset your iPhone then you will have to Transfer the data manually. I plan to do some videos on this method so hit subscribe.

Ok you can go into Settings > General and scroll down to reset. Once you are there tap on Erase content and settings. Next tap Erase iPhone.
Once your iPhone has reset itself just follow the prompts and start setting it up.

Connect to your WIFI

Next up connect to your WIFI. Make sure that your Android device is connected to the same WIFI.
Continue setting up your iPhone until you get to the apps and DATA screen.

android to iPhone 2019
Apps & data screen.


Tap move data from Android.
Before you hit continue, Go to your Android phone and download the Move to iOS app from the Google Play store.

Tap continue on your iPhone and Continue on your Android device. Agree and hit next. On your Android device type in the code that you see on your iPhone.
Your devices should now connect and move to a Transfer data screen. If you get the error message Could not communicate with the device. I have already done a video on how to fix this and I will put a link in the top of the video now.

Select the data you want to Transfer

Alright good job you are on the Transfer data screen just deselect anything you don’t want to transfer and press next.
Cool all your data is transferred now, tap continue setting up iPhone.
Go ahead and setup your iPhone.

Awesome the last step here is to install your free apps. To do this you will need your Apple id. Just tap use exsiting Apple ID and your iPhone will download all the free apps for you.

If you swipe across you should see all your apps start to appear.
Also guys don’t forget to check out my other videos like Fix could not communicate with the device error and do me a favour hit subscribe and smash the bell icon.

Transfer data Oppo to iPhone 2019

Gaming PC Settings – Nvidia Control Panel

iPhone Battery Drain – Is your iPhone letting you down?

Fix Could not communicate with the device Move to iOS

If you are getting the error Could not communicate with the device when using the Move to iOS app. This video can help. If you have a new iPhone like the iPhone 11 and you are transfering your data via the move to iOS app. You might get the Could not communicate the with device. here’s how you can fix it.

Could not communicate – Move to IOS

If you not familiar with the move to iOS app don’t worry I will have two new videos coming out shortly so keep checking this website, or subscribe on our YouTube page for updates. So here I will show you that I am trying to transfer data from Android to iPhone and I am getting the Could not communicate with the device error.

You will need to connect the Android phone to the iPhone manually. To do this go into the WIFI settings and find the iPhone WIFI. The iPhone WIFI will come up as iOS and then a random number, tap on that to connect to it.

Could not communicate
Connecting the Android phone to the iPhone WIFI

Enter the iPhone WIFI password

Next enter the WIFI name as the WIFI password. Make sure you use upper and lower case. When you are done double check you have entered it right and hit connect. On the next screen make sure you are connected to the iPhone WIFI and restart the Move to iOS apps on both phones.

Next up on your Android phone enter the code that is displayed on your iPhone.
There you go now the Could not communicate with the device error is gone and your phones have moved to the next step Data Transfer.

Simply untick and data you dont want to transfer and hit next.
Hit Done on your Android phone. And now just continue along with the Move to iOS prompts to setup your new iPhone. Thats it you have now got past the Could not communicate with the device error.

Also Guys dont to check out my other videos like iPhone battery drain and do me a favor hit the Subscribe button and smash the bell icon.

Gaming PC Settings – Nvidia Control Panel

iPhone Battery Drain – Is your iPhone letting you down?

Setup Bedtime on iPhone

iPhone Battery Drain – Is your iPhone letting you down?

If you having issues with yor iPhone it could caused by problems with your Battery.
iPhone battery drain Issues you might experience are:

  • Apps are slow to launch
  • Slow frame rates while scrolling
  • Backlight dimming
  • Lower speaker volume
  • Gradual frame rate reductions in some apps
  • Camera flash disabled
  • Apps refreshing in background may require reloading upon launch

If you are having these issues mentioned the next step is to check your battery health and you can do that by going into Settings, Battery, Battery Health.

iPhone battery drain
iPhone Battery Drain – Battery Health

The first thing you need to look at is the Maximum Capacity %. As you can see here on my older iPhone 7 the Maximum Capacity 75%. Well what does that mean?If you compare that with my iPhone 8 which has Maximum Capacity of 100%. It means that every time I charge my iPhone 7 I am only getting a 75% charge of the battery.

iPhone Battery Drain – Check your Maximum Capacity.

So guys go ahead and check what the Maximum Capacity % is on your iPhone right now what number is it set too? I would be interested in knowing. So if my brand new iPhone use to give me 10 hours of battery life on a full charge and I am missing 25% I only get 7.5 hours now instead of 10 hours I use to get.

What do the other messages mean?

Under Peak Performance you will get a series of other messages and they mean different things. The first one is Performance is normal which means just that its normal. Nothing to worry about. The second one is Performance management applied. This means your iPhone shutdown because it couldn’t handle the power needed to perform a function. This management should stop the iPhone from crashing in the future.

The Battery Health unknown message – means that the iPhone can’t talk to the battery for some reason. Could be due to a hardware fault. If you get this take your iPhone into Apple.

Performance management turned off – if you get this message you have turned the Performance management off and your iPhone has crashed. The iPhone will turn this feature back on to stop future shutdowns.

Battery health degraded – This is the error I was getting on my iPhone 7. This means the battery is not as good as it was and it will need replacing to improve the performance and battery life.

Important Battery Message –
This error only Applies to the iPhone X series. It means that the iPhone can’t verify if the battery is genuine. This might be helpful to check if you are buying the iPhone second hand. Otherwise you can take the iPhone to a Apple Authorized service provider.

Also guys don’t forget to check out my other videos like Low Power Mode on iPhone. Do me a favor and hit the subscribe button and smash the bell icon.

Setup Bedtime on iPhone

Apple Shutting Down iTunes

Setup Bedtime on iPhone

If you want a really nice way to wake up in the mornings you can setup Bedtime on your iPhone.
Bedtime has a slow rising volume alarms that don’t shock you to wake you up.

iPhone Bedtime Setup

To setup bedtime go to Clock and then tap on Bedtime.
Next tap on Set up and then set you Wake up time.
I am going to set my wakeup time for 6:30am. Then tap Next.
Go ahead and choose your alarm. The have some really good alarms let me play a few for you now.

iPhone setup
Setup iPhone Bedtime – Choose your alarm.

Once you have selected your alarm tap next. Set your bedtime, this will play the alarm when its time to go to bed. I am going to set mine for 11:15pm.
And then press next and choose your bedtime schedule days. I don’t want the alarm to wake me on the weekends, so I am going to remove Saturday and Sunday.

Tap next and you are done. Once your in the Bedtime screen if you want to make changes to your schedule tap on your alarm.
In your bedtime schedule you can use the slider wheel to edit your times.

How to turn off Bedtime?

If you want to turn off your bedtime schedule use the toggle switch at the top.
Go back out of bedtime schedule and go into options to see more options.
If you tap on bedtime reminder you can change the ammount of time that the iPhone will remind you.
If you want you can also turn off Track time in Bed and Do Not Disturb During Bedtime.
And lastly you can ajust your Wake Up sound volume. This controls how loud your alarm volume will be.
Tap Done and if you use the health app you can tap Show more in health.

Also guys down forget to check out my other videos like how to setup low power mode on iPhone, Do me a favor and hit the subscribe button and smash the bell icon.

Apple Shutting Down iTunes

Low Power Mode on iPhone

Backup Samsung to PC or Mac

Low Power Mode on iPhone

Enable Low Power Mode on your iPhone to extend battery life when you need it.

Hi Guys, have you ever been caught out where you didnt get a full charge on your iPhone and you are not near a charger but you need to get some more battery life out of your iPhone?
Or is the battery on your iPhone not lasting as long as you would like? This seems to always happen when your expecting an important phone call or text message? Low power mode can help!

You can buy a portable battery brick, but you have to charge that as well and you its just another thing to carry.
Or you do another option which is built into your iPhone automatically and its called low power mode.

Step 1 – Enable Low Power Mode on your iPhone

low power mode
You can buy power bricks that allow you to double or tripple your iPhone battery life.

To add low power mode to your Control Centre go into Settings > Control Centre > Customise Controls.

Scroll down until you see Low Power Mode.
Tap on the green plus icon beside Low Power. This will add it to your control centre.
And if you scroll back to the top you should see it there.

Go back out of settings and into your control centre. To access Control Centre just swipe up from the bottom . If you are using an iPhone X you will need to swipe down from top right conrner.

You should now see a new Low Power Mode icon in your control centre. Simply tap it to turn it on and tap it to turn it off.

To remove the Low Power icon from your Control Centre. Go back into Settings > Control Centre > Customise Controls. Tap the red minus icon and tap remove.
Then if you go back out and into your Control Centre, Low Power will be gone.
Another point to remember guys is Low Power will effect some features to make your iPhone last longer.

Also guys down forget to check out my other videos like Enable Windows Zoom on iPhone or iPad.

Backup Samsung to PC or Mac

Make your iPhone iPad speak each word you type

Enable Window Zoom on iPhone or iPad

Zoom in anywhere on your iPhone or iPad.

In this video we will show you how to enable Window zoom on your iPhone or iPad.
So have you ever needed to zoom in on your iPhone or iPad to see fine text? Have you also noticed that not all apps will allow you to use the pinch to zoom function? What you can do is turn on three finger zoom or window zoom.

How does it work Window Zoom work?

You can use 3 finger double tap to zoom in on any part of your screen. So if you wanted to zoom on your main screen you can just double tap with three fingers. Once you’re zoomed in you can use one finger to move the screen side to side. However if you want to move all around the screen just tap and drag with 3 fingers.You can zoom in on anything and if you want to get back out of zoom simply double tap three fingers.

Enable Windows Zoom
Moving the screen Zoomed in with three fingers.

Turn on Windows Zoom for iOS 13

Lets go through and enable Window Zoom on iOS13 first. Go into settings and then tap Accessibility and then tap Zoom.In your Zoom menu you simply toggle the Zoom switch on. Straight away it starts to zoom just double tap three fingers to zoom back out.

Turn on Windows Zoom for iOS 12

In iOS 12 its a little different. Go into Settings, go into General and into Accessibility and then Zoom. Once again toggle your Zoom button on. In iOS12 it comes up with a little Zoom window which you can drag around with one finger.

You can test it in Safari with some fine text. Simply tap three Fingers and drag the screen around.

Ok Guys, Don’t forget to check out my other videos.

Make your iPhone iPad speak each word you type

Clean Install MacOS Catalina on any Mac

Create macOS Catalina USB Installer Drive

Make your iPhone iPad speak each word you type

Your iPhone iPad can talk!

You probably didn’t know that your iPhone or iPad can speak words back to you as you type. Its pretty good its can actually do full sentences as well. It can even speak EMOJIS! LOL. So if you listen to the start of the video your get the idea of how powerful it can be. The iPhone voice does the video introduction for me.

Step 1 – iPhone iPad Speak – Turn it on

If you are using iOS 13 then you can find the speak words switch under Settings, Accessibility, Spoken Content, Toggle on Speak Selection. Then go down to Typing Feedback and toggle on the Speak words button.

iPhone iPad speak
You can even speak Emojis. 🙂

However if you are on iOS 12 you will find it a little bit different. Go into Settings, General and Accessibility. Then make sure your Speak Selection is toggled on at the top and in Typing Feedback make sure your Speak Words is turned on.

Step 2 – Turn it all off

So to turn off the Speak word function you can just reverse the steps mentions above. So that its guys go ahead and turn it on and have a bit of fun with it.

Ok Guys, Don’t forget to check out my other videos.

Clean Install MacOS Catalina on any Mac

Create macOS Catalina USB Installer Drive

Share files iPhone to Mac with AirDrop