How to get a Samsung Galaxy S phone out of black screen of death.

NOTE: If you have bricked the following models you can find the article on how to fix them here.
Samsung Galaxy Nexus, GT-I9250, GT-I9100G, GT-I9300 and S3 GT-I9300

This video will show you how to get a Samsung Galaxy S phone out of black screen of death. The black screen of death can display in two forms. One a as a black screen with a little mobile phone ! and computer on it and the other as just a black screen with no light or anything on it.

Samsung black screen of death

At any rate the way to tell if you phone is totally broken is to first of all make sure you have enough battery.
To do this remove the back cover of your phone and reseat the battery so that you are sure the phone is getting power and that the battery has not just gone flat for because the contacts are not touching correctly. Then charge your phone and leaving it charging for a few hours.

If that doesn’t work, the next step is to try removing the sim card and storage cards remove the battery and leave them out for about 5 seconds. Replace only the battery and charge it again. If you still have no luck here but you are sure the battery is charging there is a way to test that its still alive.

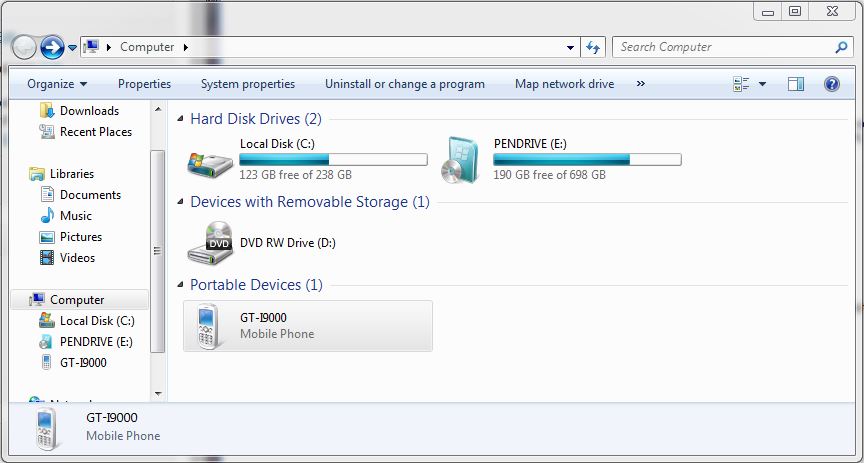
If you are using Windows, Go to the start menu and right click Computer and open Device Manager, and plug your phone out of the USB port and plug it back in. If the device manager makes a noise or moves as if its installing a driver the chances are the device is still working.
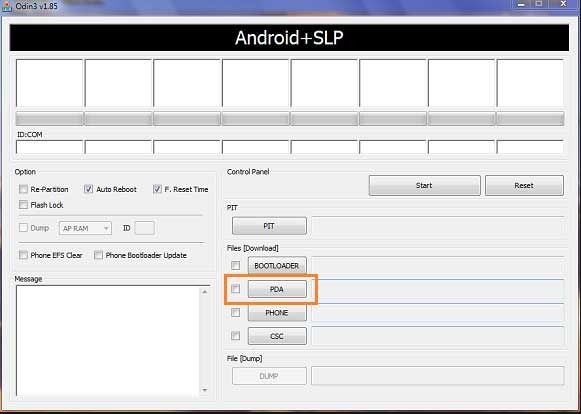
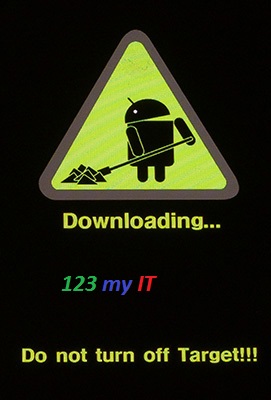
Try putting your phone into Download mode by holding down Power, Home and the Volume down buttons. Hold these buttons down until you see the following screen.

Samsung S Download Mode

Once you have it in download mode there is a good change you can reload the firmware. To do this you can following my video here.
If you want to know how to root the Samsung see the video here.
How to put a Samsung Galaxy S into download mode here.

How to root a Samsung Galaxy S phone.

This video will show you how to root a Samsung Galaxy S phone.

Step 1.Download and install the XXJVU firmware, the check what type of firmware you already have on your phone go to Settings and About Phone. If you want to know how to do this you can see the 123 my IT tutorial here.

Step 2.Download the CF-Root-XX_OXA_JVU_2.3.6-v4.3-CWM3RFS.zip from our downloads section here.

Step 3.Extract the CF-Root-XX_OXA_JVU_2.3.6-v4.3-CWM3RFS.zip and you will have the CF-Root-XX_OXA_JVU_2.3.6-v4.3-CWM3RFS.tar file.

Step 4.Download and run Odin software you can download it from our download page here.

Step 5. Turn off your mobile phone and wait 5 seconds for it to vibrate to make sure it is completely off.

Step 6.Put the Galaxy S in download mode by holding down the Volume Down plus Home Plus Power buttons all at the same time.

Step 7.In the Odin software select the PDA tab and then select the extracted CF-Root-XX_OXA_JVU_2.3.6-v4.3-CWM3RFS.tar file.

Odin Android Software

Step 8. Make sure you do not select the “Re-Partition” checkbox as this will brick your phone. Make sure that the “Auto Reboot” and “F. Reset Time” checkboxes are ticked.

Step 9.Click the start button in Odin to start the flash of the CF Root File.

Step 10.The phone should restart automatically when the CF Root file is installed. When Odin displays the Pass in green you can unplug the phone from the USB cable.

Step 11.Your phone should now be rooted ad you should see the CWM app and clockworkmod based recovery is installed.

Once this is done your Samsung Galaxy S should be rooted ! 🙂

Good Luck

How to upgrade the firmware 2.3.6 on a Samsung Galaxy S.

This video will show you how to upgrade the firmware 2.3.6 on a Samsung Galaxy S.

WARNING: Make sure you back up your Phone before proceeding!!!!
All the data on your phone will be deleted when you do this upgrade so please make sure you take the time to backup your data.
* Backup any photos and images that you have on the phone.
* Backup your contacts list, SMS and emails.
* Backup your music and video.
* Backup your APPS and phone settings
* Backup your bookmarks and stored pages.
* Backup all your data on your SD card.

Prepare your PC and Phone for the upgrade.
* Plug your Samsung phone into your Pc and make sure that the phone drivers install correctly. You should be able to browse to the phone in explorer.

Samsung Galaxy S in Windows Explorer

Step 1. Download the firmware and pit file from our download site here.
The firmware filename is sam_GTI9000_firmware.zip
Its quite a large file the size is 225.9 MB, so be prepared to take some time to download.
The file password is: 123myit.com

Step 2. Extract the downloaded sam_GTI9000_firmware.zip.
You should extract the following files.
* CODE_I9000XXJVU_CL851880_REV03_user_low_ship.tar.md5
* GT-I9000-CSC-MULTI-OXAJVU.tar.md5
* MODEM_I9000XXJVU_REV_00_CL1059471.tar.md5
* s1_odin_20100512.pit

Step 3. Download and extract the Odin3 v1.7.exe file from our downloads section here.

Step 4. Put your phone into “Download Mode” by holding down the Volume down button + the Home button + the Power button.

Step 5. Start the Odin3 v1.7.exe and connect your phone to the PC. The Odin application should say the message “Added!” If it doesn’t say added then you will have an issue with the drivers and your should reboot your PC with the phone still plugged in and repeat this step.

Step 6.Once Odin has started and you have your phone Added. Select the files that you extracted in step 2.
They should all be loaded in the following order.
* Select the “PDA Tab”, and select “CODE_I9000XXJVU_CL851880_REV03_user_low_ship.tar.md5”
* Select the “Phone Tab”, and select “MODEM_I9000XXJVU_REV_00_CL1092175.tar.md5”
* Select the “CSC Tab”, and select “GT-I9000-CSC-MULTI-OXAJVU.tar.md5”
* Select the “PIT Tab”, and select “s1_odin_20100512.pit”

Step 7.Make sure that you select the Re-Partition, Auto Reboot and F.Reset Time checkbox within Odin.
Step 8.Click the start button to kick off the flashing process.The phone will reboot when it finishes and Odin should give a green PASS message.
When the phone restarts you should be running the new Android, v2.3.6 XXJVU firmware.

How can I tell what version of Windows I am running, 32bit or 64-bit?

When installing Windows on your PC, you can install it as a 32-bit operating system or a 64-bit operating system. For most people it doesn’t make a difference which version you are using, however if you add a new piece of hardware or decide to upgrade an existing driver you will be asked which version of Windows you are running. For example a 64-bit driver wont install on a 32-bit operating system. Read on and I will explain how determine which operating system of Windows you are using.

No matter what OS you are using Windows XP, Vista, 7 or 8 if you want to check what version you are using you can simply go to Start button, Right click on Computer than properties. Windows 8 is a little bit different, you will need to go into your charms menu and type Computer in the search field and right click on Computer when the search finds computer. Click on properties.

You should now see the System Control Panel. This screen will show you information about your PC and Windows OS. If you have a look under System Type you will see information regarding whether or not you are using a 32-bit or 64-bit version of Windows. In Windows XP it won’t show up at all, instead it will only show 64-bit.

Windows 8 System Control Panel

In the screen shot above you can see the System Type is a 32-bit operating system, however its running on a 64-bit CPU.

How To Jailbreak your iPhone 4S running 6.1 Firmware with Windows 7 and evasi0n.

A step by step guide on how to jailbreak your iPhone 4S with Windows 7 and evasi0n. If you are looking for the apps that I used in this guide you can download from the downloads section here.

How To Jailbreak your iPhone 3G running 4.2.1 Firmware with Windows 7 and Redsn0w.

A step by step guide on how to Jailbreak your iPhone 3G using Windows 7 and Redsn0w. If you you dont have any luck doing the jailbreak you can always restore your iPhone from iTunes.
Download Redsn0w from our downloads page. https://www.123myit.com/downloads/

So I made this video to help others Jailbreak their iPhones. Because about one year ago I tried to jailbreak my iPhone unsuccessfully.
What is this jailbreak I speak of? Well if you think of the term jailbreak you imagine a prisoner escaping from jail. Well that is essentially what you are doing with your iPhone you are breaking it out of jail and relaxing all the restrictions that Apple has placed on the iPhone. If you want to learn more about what is the difference between jailbreak and unlock you can read my article on it here. Jail breaking allows you to install Apps and configure your iPhone that would otherwise be locked down by Apple’s default settings. A good example of a great Apo that will install on a jail broken iPhone is Veency and you can see my video here.

Before attempting any funny business with your iPhone or iOS device, you should always do a backup in iTunes and you can find the video on how to here. Once you have backed up your iPhone and you are happy that all your data is safe you are ready to Jailbreak it.

Step 1. Go into your setting menu, general and turn off Auto-lock and Passcode Lock. Make sure both these settings are off as they may interfere with the jailbreak.
Step 2. Scroll up and go into About, and make a note of the firmware version.
Step 3. Download redsn0w from our downloads section here. There is a Windows and Mac version that you can download.
Step 4. Install redsn0w and run the application. Plug in your iPhone to the USB port and make sure the driver for the iPhone installs correctly. If it doesn’t try restarting your PC or Mac with your iPhone plugged into the USB port. This will normally resolve driver issues, because the driver detects the iPhone and installs the driver on start up.
Step 5. Make sure you iPhone is turned off and still plugged in.
Step 6. Ok you need to now put your iPhone in DFU mode. To do this you need to Hold down the power button for 3 seconds. Without releasing the Power button, also hold down the Home (bottom center)button for 10 seconds. Without releasing the Home button, release the Power button, BUT KEEP holding the Home button for 15 seconds.
Step 7. In the redsn0w program it should say waiting for reboot. And on your iPhone will say downloading jailbreak data. Once redsn0w says done you can actually disconnect the USB cable from your iPhone and it will continue to install.
Step 8. The iPhone should reboot and once it does this you can login and scroll across to your Apps and you should see a brown Cydia App. If you have this then you have been successful in jail breaking your iPhone.

One last thing I should mention, the jailbreak process does not always go smoothly. The most annoying error is USB communication error. You can see my video on how to fix this error here.

Good luck guys and have fun.

Matt