This video will show you how to Transfer data from old phone to new phone Android.
Hi All, recently I upgraded my Android phone from the Samsung Galaxy S5 to the Samsung Galaxy S6 Edge and I am slowly working through a few issues that I found when setting up the new phone.
One of those issues was a problem with Gmail contacts getting mixed up with my person phone contacts. Find that video here. Delete Gmail contacts from Android.
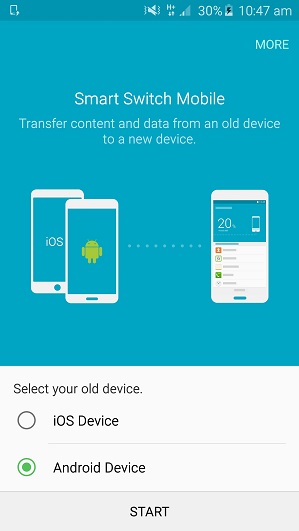
So how do you Transfer data from old phone to new phone on Android? Well in this video I use an application called Samsung Smart Switch, which is an app that is available on the Google Play website. It allows you to Transfer data from your old phone to your new phone without the need to plug into another computer.
And it also supports moving from IOS to Android and Android to IOS.
The process is pretty straight forward, simply download the Samsung Smart Switch app on both the old device and the new device. Start the Samsung Smart Switch app up on both devices and select the type of OS, so either IOS for Apple Devices devices or Android for Android devices. and then tap the Start button.
Next you will need to set the old device to sending and the new device to Receiving. The two phones should hopefully see each other by now and automatically connect to one another.
Select the data that you want to move from your old phone to your new phone by leaving the check boxes ticked. If there is any data that you don’t want to copy to your new phone, simply remove the tick from the checkbox.
Once done you should be good to go. Just remember that the time it takes to copy data across depends on the speed of your phones and how much data you wish to transfer. For me it was about 4GB and that would take around 40 mins.
This video will show you a first look and unboxing of the Apple iPhone 6 Plus mobile phone.
Hi All,
Recently I through it might be a good idea to purchase the iPhone 6 Plus to do a review and unboxing for everyone. Normally I am not such an Apple fan boy, however the part that sold me on the iPhone 6 plus was a few things.
* Greater battery life
* 5.5 inch LED-backlit widescreen Multi‑Touch display with IPS technology
* 1920-by-1080-pixel resolution at 401 ppi
Which is pretty awesome. How comfortable the phone is in your hand when talking on the phone remains to be seen.
Also it make you wonder if Apple plan to kill off the iPad mini with the size of this phone? If is the price difference between the iPad and iPhone will keep it safe.
Well of course the iPhone 6 plus is thinner over all, however the camera on the back of the phone does stick out. As for the phone size I do worry about my pocket getting smaller, I carry my phone in my left side pocket and one of the great things about the iPhone 4S was it fits well in small pockets.
The also has been allot said about the iPhone 6 Plus bending, when using the phone I did not notice any type of movement in the chassis of the phone. So if you are a normal user of the phone I wouldn’t worry about this.
This video will show you how to change the Sim & SD cards from iPhone to Samsung Galaxy. Recently I moved my data from an iPhone 4S to a Samsung Galaxy S5. Once this was done the next step would be to change the sim card over as well. This will give the Samsung Galaxy S5 phone, mobile cell network access.
This video will show the Samsung Galaxy S5 Firstlook Unboxing & Review on the model SM-G900F. In this video we will show you that the phone is dust and waterproof.
If you would like to check out a video review on the Samsung Galaxy Tab 3 click the link below.
Step 1. Make sure your Samsung device is rooted. Link above. Step 2. Download the Samsung Galaxy S Upgrade Ice Cream Sandwich Firmware from the downloads page here. Step 3. Plug in your device and make sure that the device driver is working ok. You can do this in Device Manager. Step 4. Open the Samsung device and view the files and go into the Android folder and copy the file you just downloaded into the Android folder. Step 5. Power off your Samsung device and put the phone in recovery mode by holding down the UP volume button + Power button + Home button. Step 6. In the menu select Wipe Data / factory reset, this will Wipe any data on your Samsung device so make sure you do a back up first. Step 7. Wipe cache partition and go into the advance and Wipe Dalvik cache. Step 8. Go back to the main menu then to go install zip from SD card. And choose zip from SD card.
Choose the Zip folder from the Android folder that copied to earlier and you are done.
The Android upgrade can take anywhere from 5 to 15 mins to complete. The Samsung Galaxy S model that I recorded the video on was a fair bit slower after the upgrade, but for some people they probably wont notice the difference and the upgrade Android has the benefit of the newer OS.
If you would like to see the Samsung Galaxy S specs you can find them here on the Samsung site.
If you have been using your Android device for a while you might have noticed that it started out with really good battery life but over time, the battery life doesn’t seem to be as good as it was. It could be that the battery is slowly dying and all of them do that, however it could be that you have loads of apps running in the back ground and all of your services on.
This guide will give you some helpful tips on how to save your battery life. A few small tips will have your Android device lasting for day!! Well maybe not that long. 😉
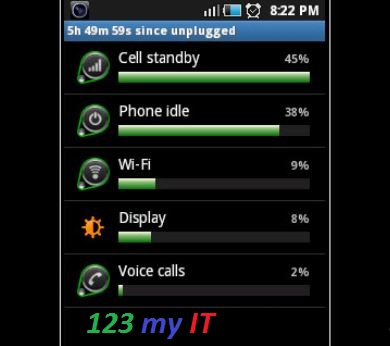
Step 1. Have your phone tell you what is using up the most power.
Go into Settings, About Phone, Battery Use. On my phone the app Whatsapp was using 66% of the battery. So turning off Whatsapp would help me get more battery life out of the phone.
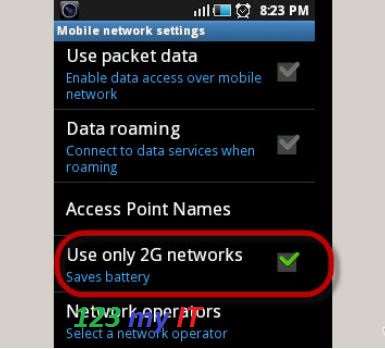
Step 2. Tell your Android device to use 2G only or use GSM over WCDMA.
Only do this if you don’t need access to 3G or 4G high speed data.
Go into Settings, Wireless and Network, Mobile networks and select your network mode.
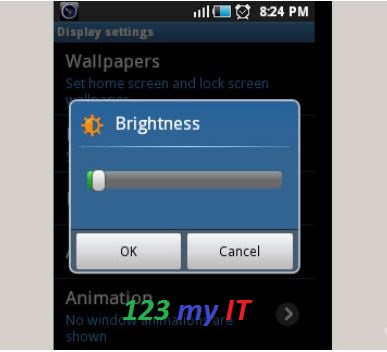
Step 3. Reduce your display brightness. Settings, Display, Brightness.
Slide brightness slider all the way to the left and it will help you save power when you are reading the phone. Most of the time people can still read the phone without needing the brightness up high.
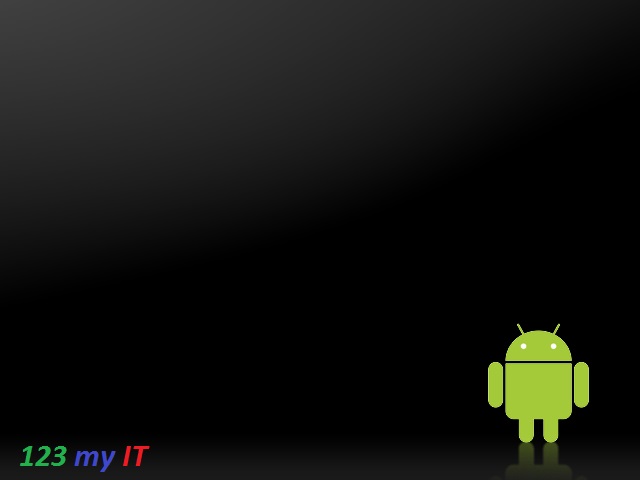
Step 4. Always try to use a black background or wallpaper. Settings, Display, Wallpaper.
Here is a sample below but you can find loads of black backgrounds on Google images.
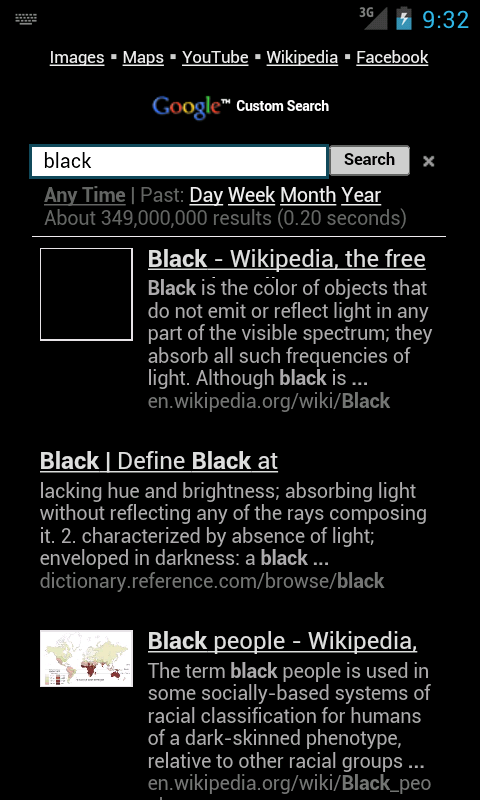
You can also set bGoog.com as your default home page. bGoog.com is a black background search engine webpage by Google and its built especially for mobile devices it allows you to search the web without using so much power on your phone. Awesome idea.
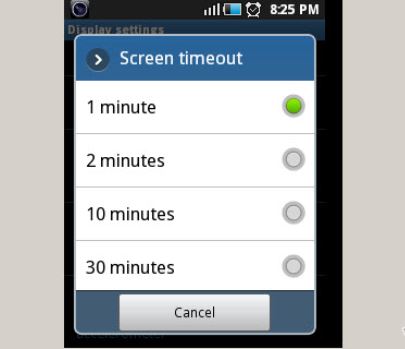
Step 5. Adjust your screen timeout to the shortest time Possible. Settings, Display and then Screen Timeout.
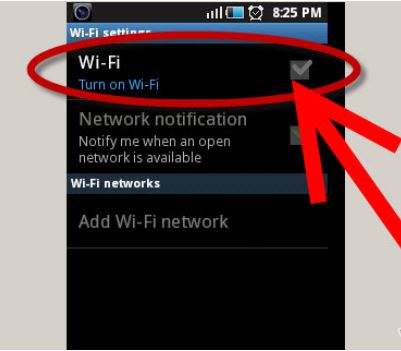
Step 6. Turn off your WIFI when you are not using it. Settings, Wireless and network, WIFI settings.
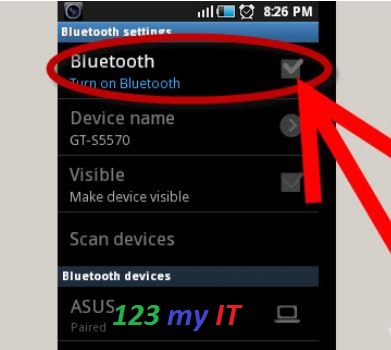
Step 7. Turn off your Bluetooth when you are not using it. Settings,Wireless and network, Bluetooth settings.
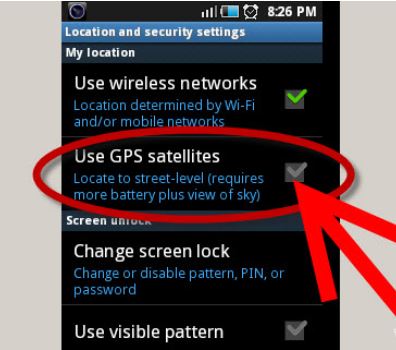
Step 8. Turn off your GPS. If your GPS is turns on it is constantly looking for satellites which takes up battery power. Settings, Location and Security, Use GPS Satellites.
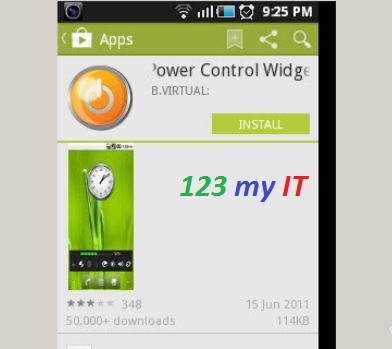
Step 9. Use Power apps and widgets. There are loads of free and paid apps that control all sorts of stuff.
The two that you should take a look at are:
* Power control Widget
* Power management
* Null BLack Wallpaper
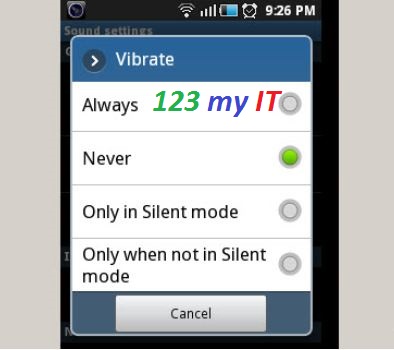
Step 10. Turn off phone vibration. Settings, Sound, Vibrate. And set vibrate to never. You have the following options Always, Never, Only in Silent mode and Only when not in Silent mode.
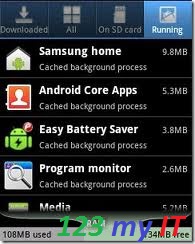
Step 11. Turn off all your applications when you don’t need them. Settings, Applications, Manage Applications. Press Running and then press and Stop any applications that you don’t need.
Step 12. Put your phone in standby mode when you are no longer using it.
Press the Power button on your device when you are finished using it as it will use less power if you get into this habit.
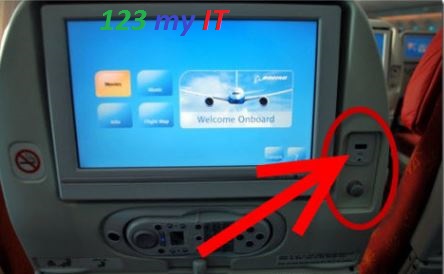
Step 13. Take your USB charger with your where ever you go as there are Free USB ports everywhere! Allot of Airlines these days have free USB ports so that you can charge your Android device while flying.
Step 14. A spare battery can be a lifesaver if you just so happen to run out of Power. Spare ones can be picked up from websites like ebay.