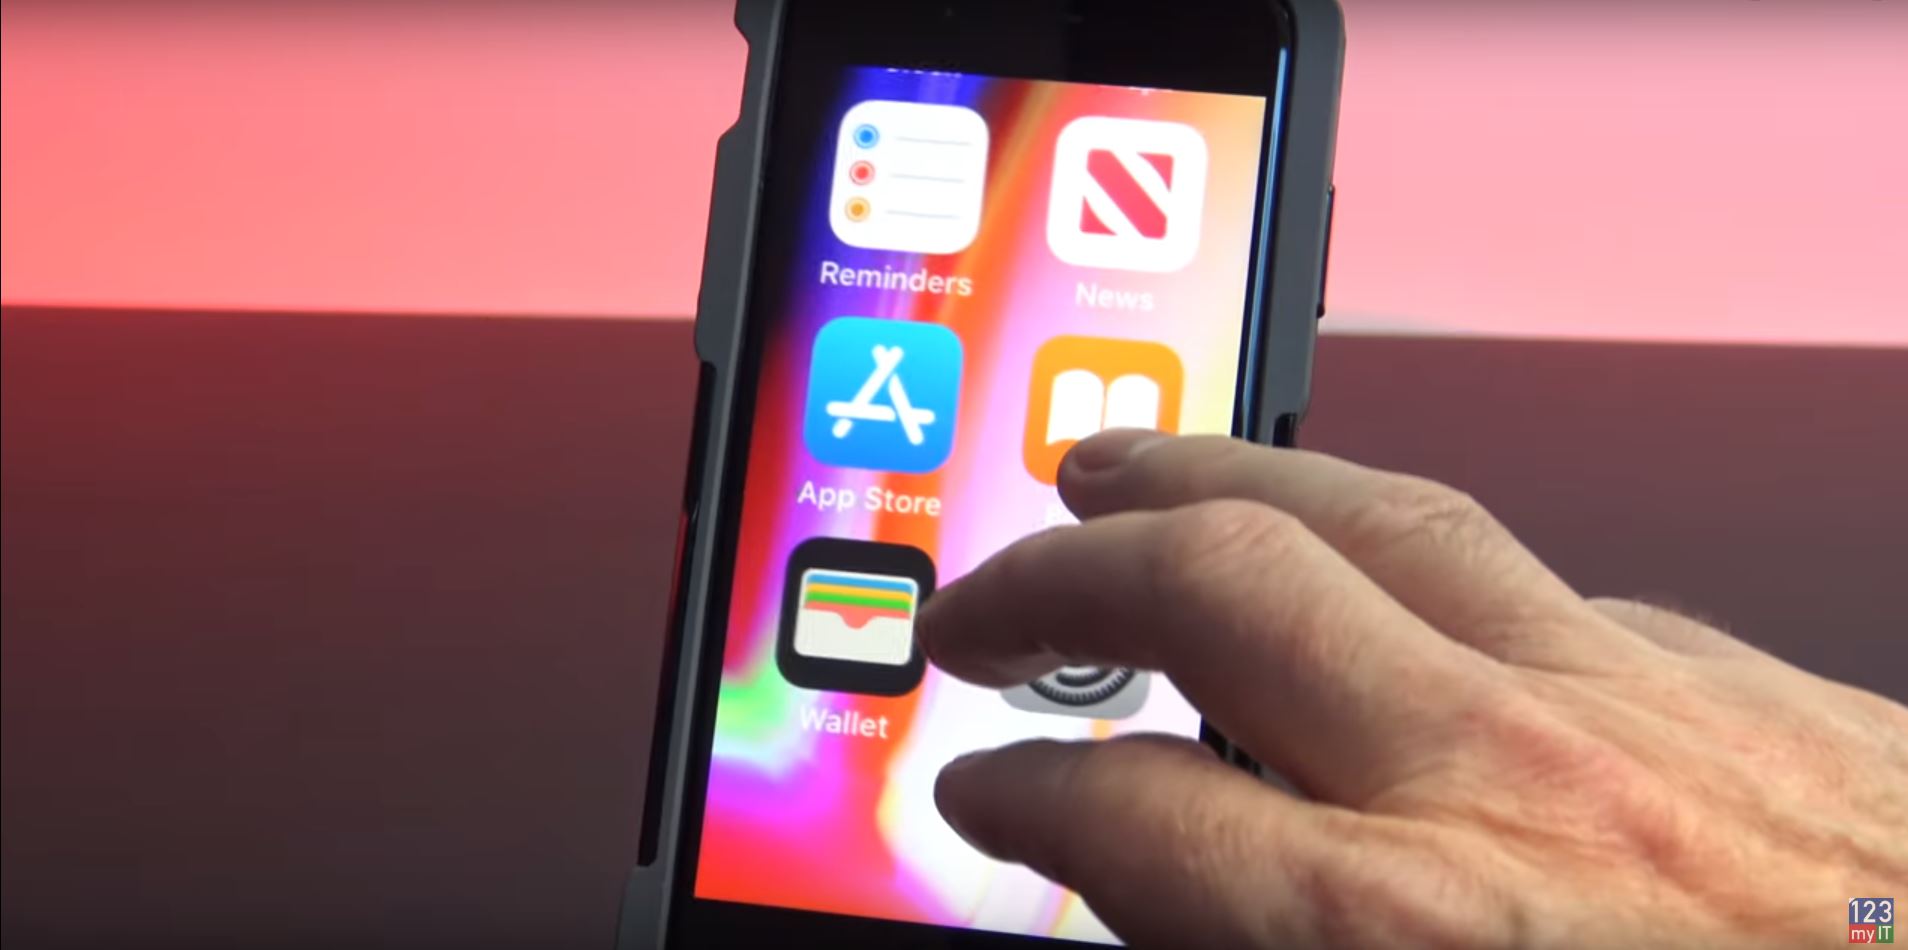
In this video we will show you how to enable Window zoom on your iPhone or iPad. So have you ever needed to zoom in on your iPhone or iPad to see fine text? Have you also noticed that not all apps will allow you to use the pinch to zoom function? What you can do is turn on three finger zoom or window zoom.
How does it work Window Zoom work?
You can use 3 finger double tap to zoom in on any part of your screen. So if you wanted to zoom on your main screen you can just double tap with three fingers. Once you’re zoomed in you can use one finger to move the screen side to side. However if you want to move all around the screen just tap and drag with 3 fingers.You can zoom in on anything and if you want to get back out of zoom simply double tap three fingers.
Moving the screen Zoomed in with three fingers.
Turn on Windows Zoom for iOS 13
Lets go through and enable Window Zoom on iOS13 first. Go into settings and then tap Accessibility and then tap Zoom.In your Zoom menu you simply toggle the Zoom switch on. Straight away it starts to zoom just double tap three fingers to zoom back out.
Turn on Windows Zoom for iOS 12
In iOS 12 its a little different. Go into Settings, go into General and into Accessibility and then Zoom. Once again toggle your Zoom button on. In iOS12 it comes up with a little Zoom window which you can drag around with one finger.
You can test it in Safari with some fine text. Simply tap three Fingers and drag the screen around.
Ok Guys, Don’t forget to check out my other videos.
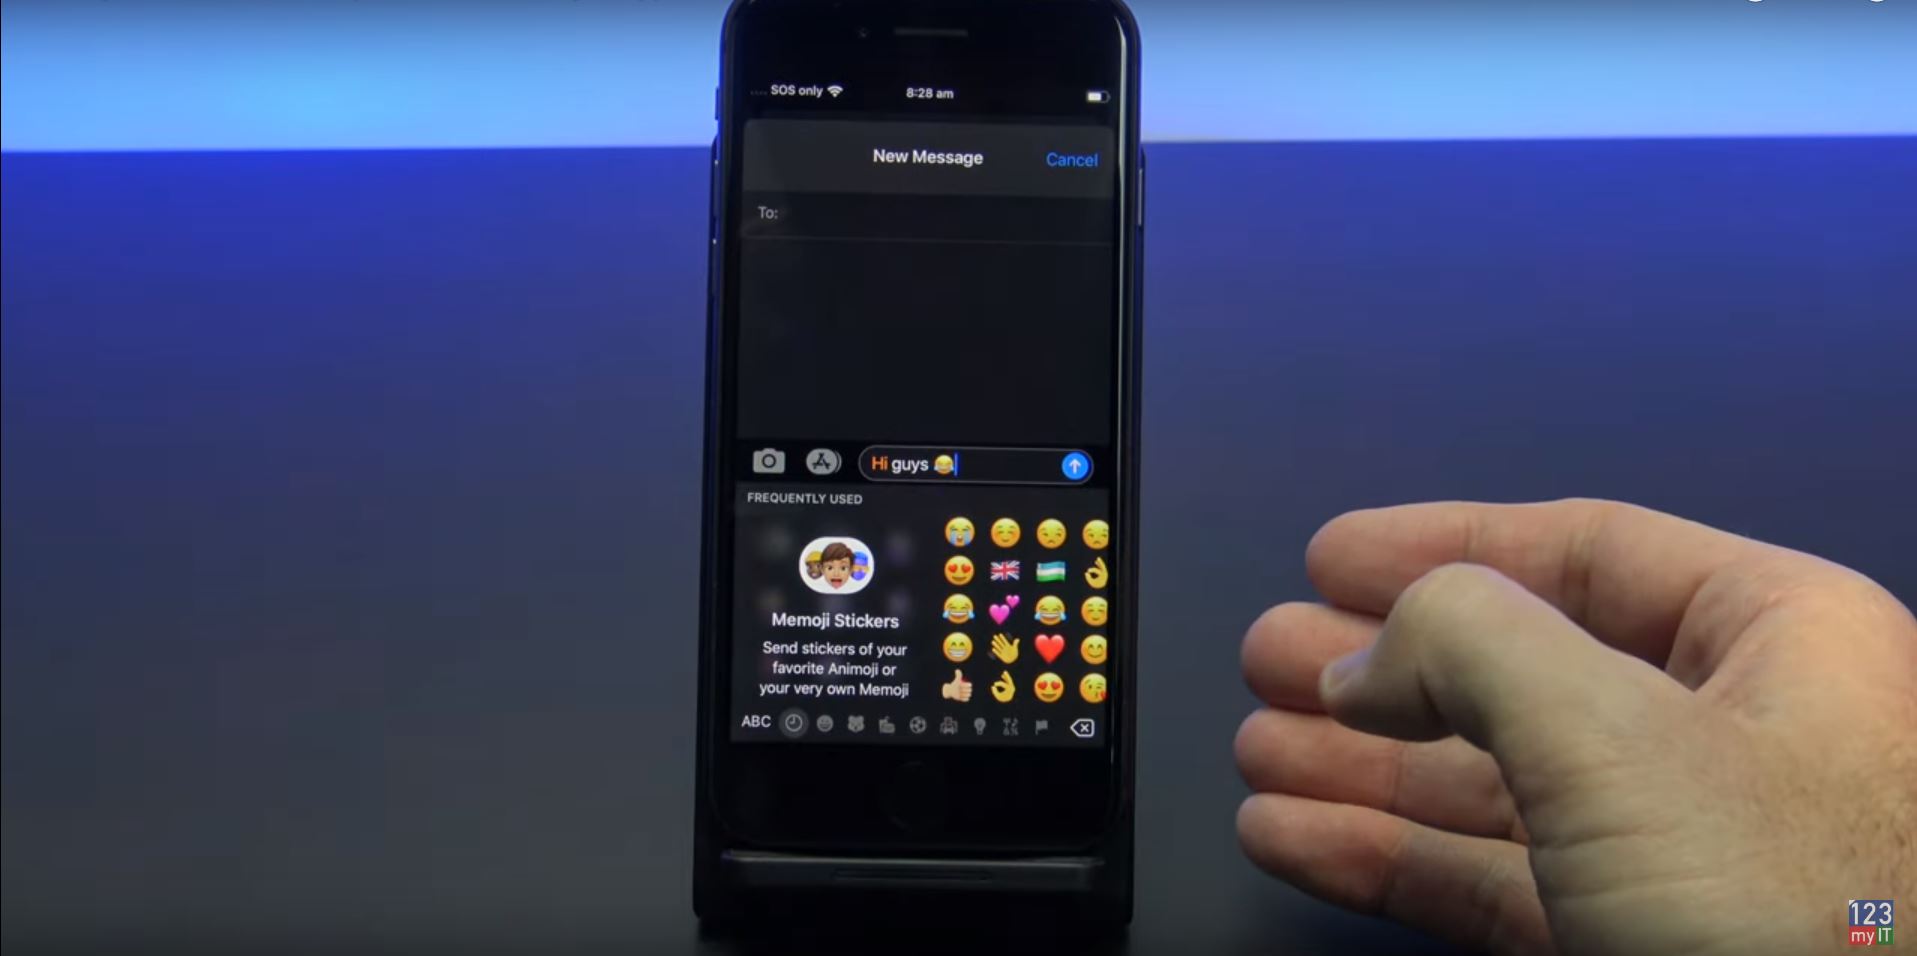
You probably didn’t know that your iPhone or iPad can speak words back to you as you type. Its pretty good its can actually do full sentences as well. It can even speak EMOJIS! LOL. So if you listen to the start of the video your get the idea of how powerful it can be. The iPhone voice does the video introduction for me.
Step 1 – iPhone iPad Speak – Turn it on
If you are using iOS 13 then you can find the speak words switch under Settings, Accessibility, Spoken Content, Toggle on Speak Selection. Then go down to Typing Feedback and toggle on the Speak words button.
You can even speak Emojis. 🙂
However if you are on iOS 12 you will find it a little bit different. Go into Settings, General and Accessibility. Then make sure your Speak Selection is toggled on at the top and in Typing Feedback make sure your Speak Words is turned on.
Step 2 – Turn it all off
So to turn off the Speak word function you can just reverse the steps mentions above. So that its guys go ahead and turn it on and have a bit of fun with it.
Ok Guys, Don’t forget to check out my other videos.
In the video we will show you how to do a clean install of MacOS Catalina on any Mac. In a previous video I showed you how to create a MacOS Catalina installer USB and I here is the link. Create MacOS Installer Drive.
Once you have followed that video and created your USB we can now show you how to do a clean install on any Mac.
One more thing to mention your USB can be USB type A or USB type C it doesn’t matter which one. If you want to buy one similar to what I am using here’s the link.
Go ahead and shutdown your Mac. Apple Menu > Shut Down and Select Shutdown again. Next plug in your MacOS Catalina USB. Press and hold your Alt Option Key on your Keyboard and press your power button to turn your Mac on.
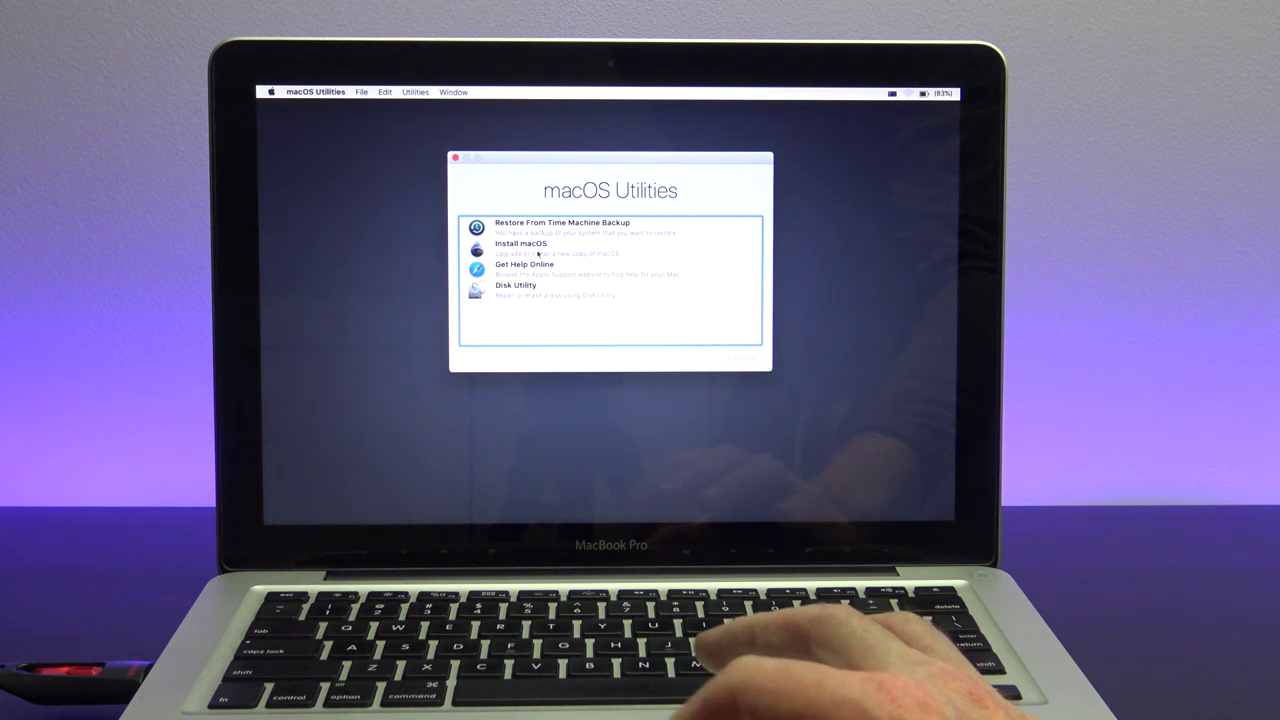
You should then see the Boot menu with Install macOS Catalina, use the arrow keys and select Mac OS Catalina drive. Press return on your keyboard.
It will eventually boot you into the macOS Utilities menu. If you want to Upgrade or Install a new copy of macOS, select the install macOS option. I want to show you a clean install so I am going to wipe the hard drive first. Click Disk Utility.
Disk Utility a program to help you format your hard disk before installing MacOS Catalina.
Step 2 – Disk Utility
When you are in Disk Utility, select your Internal Hard drive in the top left hand corner and press partition. Press partition again. Give your partition an Name in this case I will call it Mac HD. Under format you can select APFS or if you have an older drive Mac OS Extended (Journaled).Click Apply and click Partition. When you have done that go back up to Disk Utility menu and Quit Disk Utility.
Alright you have wiped your hard drive and now you are about to do a clean install of macOS. Select install macOS. Click continue. Agree to the terms. Select Mac HD and then click install.
So by now you Mac would have rebooted and you should get the Welcome screen where you select the country you are from. You have now done a clean install of macOS Catalina and you can just go through all the mac setup prompts, similar to when you first purchased your mac.
Ok Guys, Don’t forget to check out my other videos.
This video will show you how to create MacOS Catalina USB installer drive. This installer drive can be used to do a clean install of MacOS Catalina on any Mac.
Step 1 – Download MacOS Software
You will need to open up a Safari browser and navigate to beta.apple.com. Click on Sign in or join up if you haven’t already. Type in your Apple ID when prompted.
Next up you want to scroll down to where it says “Get Started” and Enroll your Mac. Then the next menu to look out for is the Download the MacOS Public Beta. You will be able to upgrade this version to full version when its released, some time in September 2019. Once downloaded open your beta file and run through the prompts.
Close the installer windows by going to the Apple menu and into the Install MacOS Beta and then quit Install MacOS.
Step 2 – Create MacOS Catalina drive
Go into your Finder menu, then click on Go. Then go down to Applications, find your Install MacOS Catalina app. Right click it and go to show package contents. Go into Contents and go into Resources folder. Then find the create install media file. Drag that Windows to the left side of the screen to give yourself some space.
Go into Finder and do a search for Terminal window. Move your Terminal window to the right so you can see both windows. In the Terminal window type sudo space. Then drag your create install media file into the Terminal window. It should look something like the picture below.
Using the Terminal to create the USB drive.
After that type in –Volume and then press space again. Next go back up to the Go menu then down to Go to folder. In the text box type /Volumes and click on Go.
Plug in your USB to the Mac. I use a SanDisk version but you can buy your own version here. 🔥 Do you want a USB drive like the one in the video? Click here. https://amzn.to/2NqJI5k
Step 3 – Create MacOS USB
Go back into your Volumes folder and you should see your SanDisk USB or whatever USB you are using should appear. Click and drag it into your Terminal window. press Return and the next step will wipe and data on the USB. Type Y and press Return again on your Keyboard. Double click on your USB drive and you should see the installer file. Your drive has been created and you are ready to do a clean install of MacOS Catalina.
Also guys if you want to see more of my videos like share files iPhone to Mac click the links now and help me out by hitting the Subscribe button and smashing the bell icon.
In this video we will show you how to share files iPhone to Mac with AirDrop. To share Files, Photos and Safari links with other devices nearby you can use Apple AirDrop you can wirelessly.
Step1 – Turn Bluetooth and Wi-Fi on. – Share files iPhone to Mac
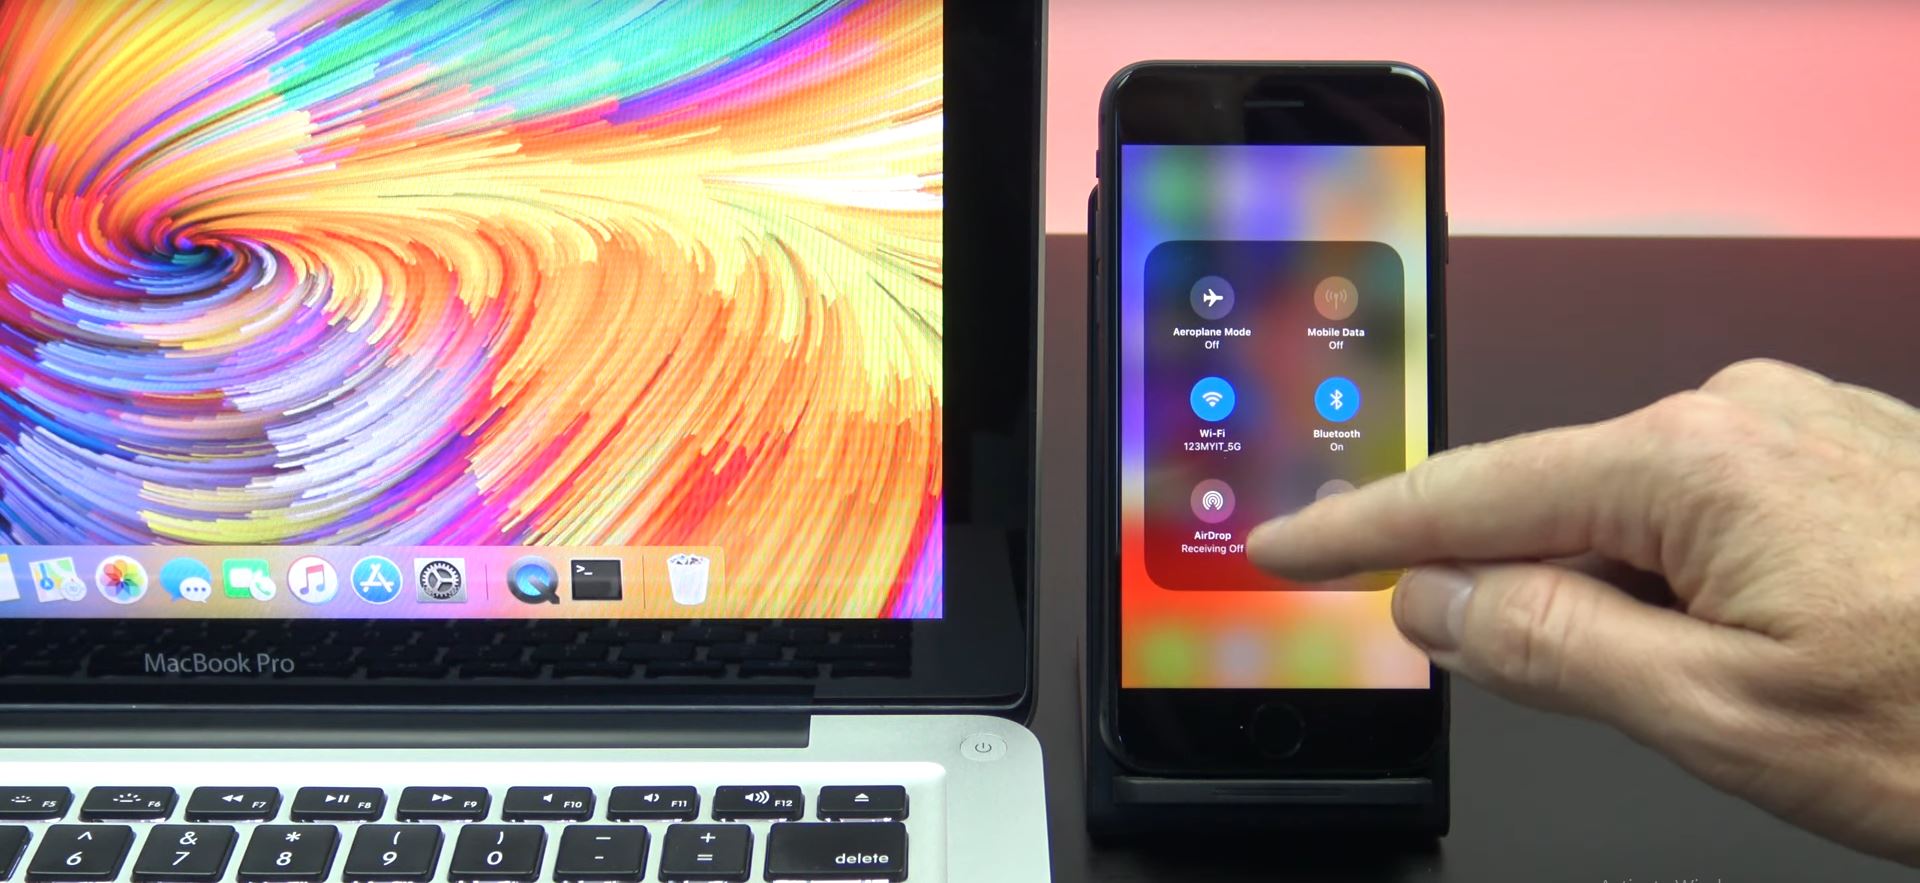
On your iPhone swipe up from the bottom to open Control Center. If you are using an iPhone 10, swipe down from the upper right hand corner of your screen and 3D tap in the middle of the network settings box.
Make sure your Wi-Fi and Bluetooth are turned on and if your AirDrop is off, turn it on. When you turn the AirDrop on you will have three options, so you should see Receiving off, Contactsonly and Everyone. Select everyone, but be careful leaving this option on in public as you might get Cyber Flashed. What is Cyber Flashing? check out this link here.
Check Bluetooth and Wifi are Turned off
In the Apple menu click on Go and then Scroll down to AirDrop. If your Bluetooth is turned off just go ahead and turn it back on. It is important to make sure your devices are connected to the same Wi-Fi network so that they can see each other. Can you see your iPhone and other devices in the AirDrop menu? If you can’t see them it is likely because you need to click the drop down menu and make sure Everyone is selected.
Step 2 – Transfer files.
Next up go to the file, photo or document you want to share and tap the Share icon. If you don’t see it tap the more icon to find it. Next tap your AirPlay icon. Simply tap the device you want to share with and then you should see a pop up on your iPhone or Mac, you can accept or decline the file.
Step 3 – Turn off AirPlay
To turn AirPlay off go back into your drop down menu and select no one. You can also go into the settings menu and turn blue tooth off. Also guys if you want to see more of my videos like Transfer data iPhone to Android click the links now and help me out by hitting the Subscribe button and smashing the bell icon.
Hi Guys Matt here in this video I will show you what I think are the must have iPhone Smart phone accessories.
iPhone being dropped from a car at 60 MPH. With Element Roll Cage Case.
In the picture above the driver is dropping an iPhone out of a car that is traveling at 65 Mph. Element Case make a case called Roll Cage because it has a protective cage on the back. The case that we use is the one in the video which is made for the iPhone 8 and 7. Element Case also make it for the iPhone X and XS. But the beauty of this case is, you can remove the cage from the back of the case and place it on the front to protect your iPhone.
Other features – Must have iPhone & Android Accessories
– Fast Tap side buttons – Meets Military grade drop test requirements
Best way to use the Roll cage case?
How could this case be helpful? I think if you were doing some heavy duty work or demanding sports like Skiing or skateboarding you could put the roll cage on your iPhone before hand that would protect your phone from any damage.
The second Element Case is called Rally, it has also been drop tested at 65 mph. The Rally case fits the Samsung s10e. However they also make it for the Samsung Galaxy 10 and 10 plus as well as the iPhone X and Xs. The features for the rally are the same except its got Table Top protection and Sure Grip.
To fit your Samsung phone into the case just slide it in bottom first and snap the sides into place. The other great thing about the Rally case is it allows wireless charging. So just pop it on a wireless charger and you are good to go. The Roll Cage case also charges on wireless charger as well. But you have to make sure the Cage is on the front of the phone.
Wireless chargers
While we are talking about chargers, the next must have is accessory is a wireless charger. And Tech Matte do a great standup and lay flat wireless chargers. Tech Matte design their wireless chargers in the US.
The standup change has a cool L shape. However if you prefer your phone to be laying down Tech Matte also do a flat fast wireless charger. Inside the box you get a fast wireless charging pad which allows your phone to lay flat rather than standing up. A bed side table or coffee stand might be a better place for the Tech Matte wireless charging pad. Where as the upright charging stand might be better suited for a study or work place office. the pad has a really nice felt type material on top which makes for a soft landing for your phone. This wireless charging pad comes with the a USB C cable
One of the great things about wireless chargers is they will work on both an iphone and an Andoird phone.
This means that you no longer need two different phone chargers to charge different phones you can use the one wireless charger and it will work on multiple phones.
Also guys if you want to know how to Stop Pop Up ads on Android click the links below.
Hi Guys welcome to 123myIT! In this video & article we will show you how to Stop Pop-Up Ads on your Android device. Helpful if you are getting Ads when browsing the internet.
Stop Pop-Up Ads.
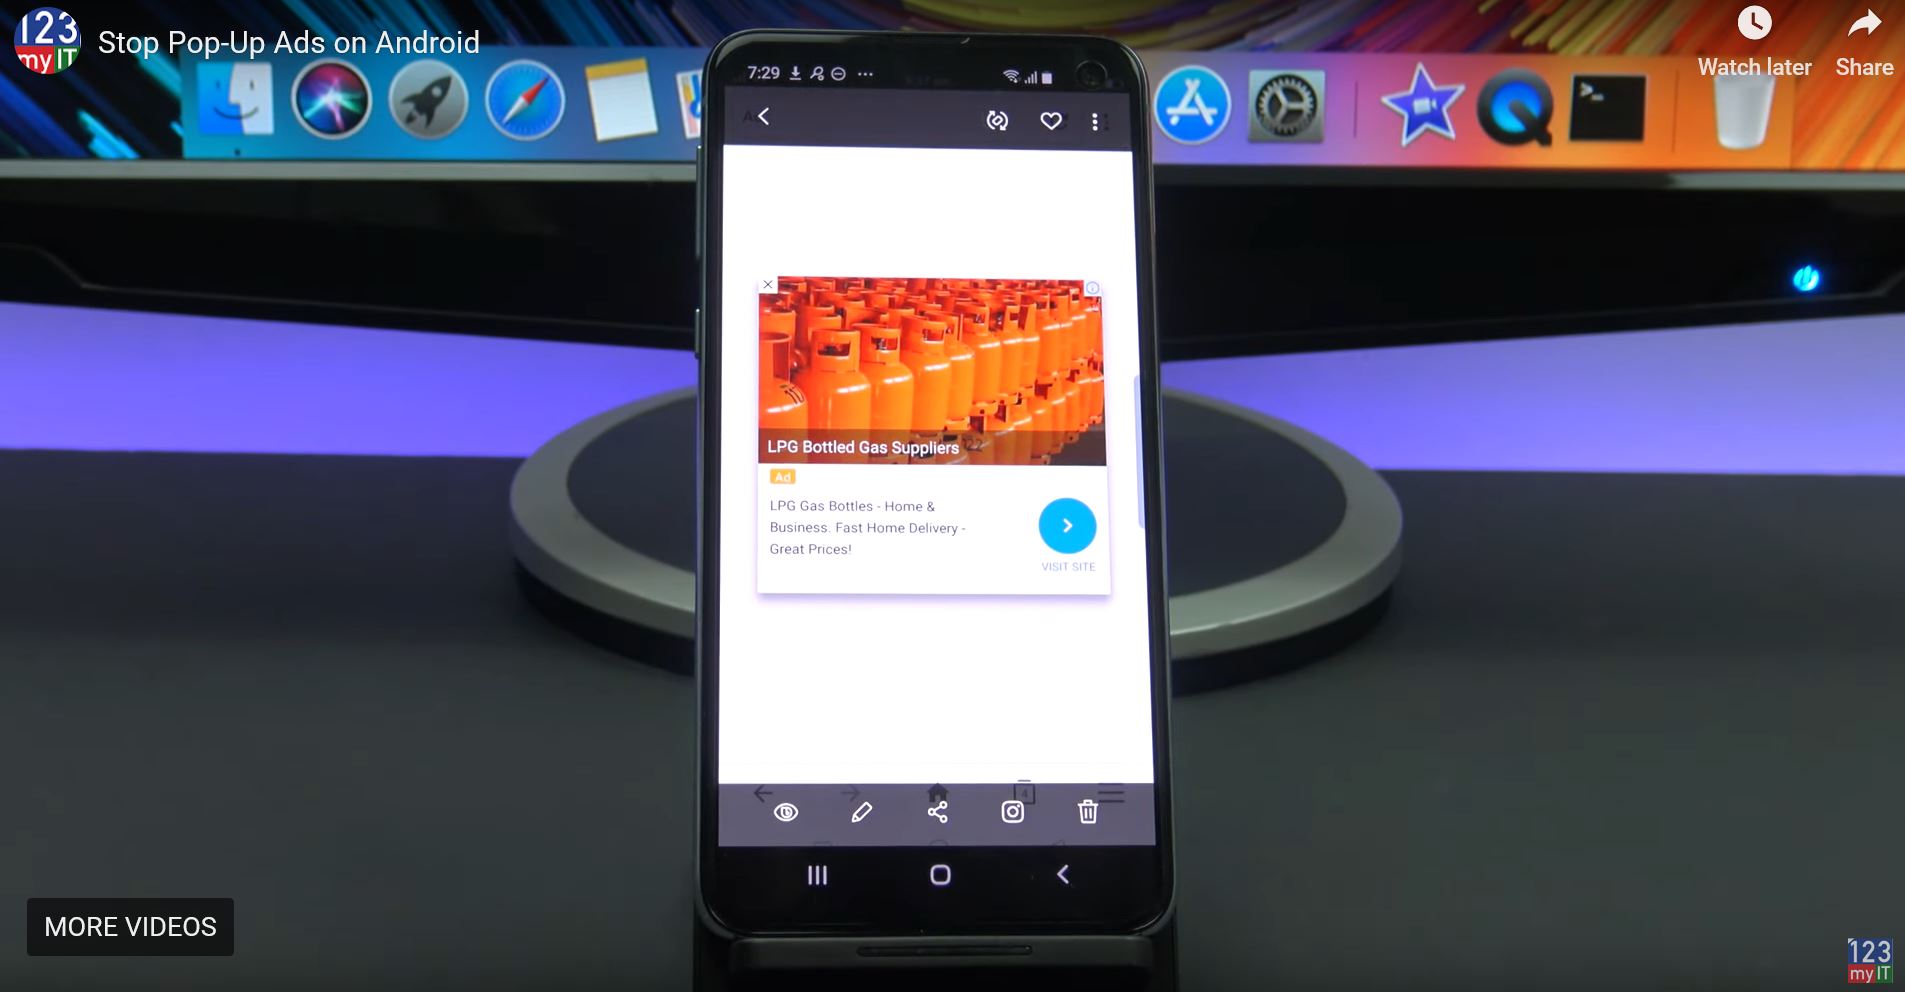
Ok guys so you have been browsing the web on your Android device and suddenly for no reason you are getting Pop-up Ads. Now I have turned on some of the Ads features on my Android phone and these are some of the Ads that started appearing.
Gas Bottle Android Ad Pop-Up
Gas bottles, Private offices for hire and Tarot Reading are the Ads that came up and this are not relevant to me at all. Something that is really annoying about these ads is, that I don’t need any of the stuff that comes up on the Ad.
Step 1 – Remove google ads on phone and browser.
Depending on which browser you use on your Android device it might be different. However I will show you the few options on the different Android devices I use. So go into the browser you use and into the settings of that browser.
Oppo phone default browser: Block ads – you can turn this off and on. In the video you can see here that it has already blocked so many ads. Scroll down to Block pop-ups. Go into Clear browsing data and you will see three different options. Clear saved passwords > Clear browsing history > Clear cookies and data.
I would clear the bottom two but you can clear all just be aware that it will forget all your passwords.
Stop Pop-Up Ads – Chrome Browser
If you use the Chrome browser go to the three dots and settings. Scroll down to Site settings > Pop-ups and redirects menu. Also you can go into the Ads menu and change that. If you then go back out and go into Privacy, scroll to the bottom and press Clear Browsing Data. Advanced, and you will have the options of what you want to clear for the Chrome browser as well.
Next go into the Settings menu on your Android device. Go down to your Google account. Press on Ads, you can then tap the opt out of Ads Personalisation. And next press on Ads by Google. This launches a FAQ on Google Ads. If you want to know more about them have a read through. However what we are after is if you want to scroll to where it says Google and advertising standards. So find your country and opt out. Here is the link if you need it. https://support.google.com/ads/answer/1660762?hl=en
Now once you have done this I would suggest restarting your Android device and testing it for a while. If it is the Google Ads then they should stop coming through. If you are still getting pop-ups then try the next steps.
Step 2 – Remove recently installed Apps.
It might be a recently installed app doing the pop-ups, so remove any recently installed apps one by one and test. Go into Settings > App Management, find the app you are after and press it. Then tap uninstall. Do a restart of the phone and test it again. If you are still getting popups then go to the next step.
Step 3 – Install Malwarebytes.
Malwarebytes is a program that can Identify and remove malware from your Android device. Go to the play.google.com site and download install it. Run the software update and scan your android device. Remove any Malware found and restart your Android device and test for popups. For more info on what Malware is go to WIKI here.
Step 4 – Backup Data and Reset Phone
If you go into Settings > Additional Settings and scroll down to Backup and Reset. Under that you can press Backup my data and then Backup my data now. Make sure that your data is backed up before you go to the next step. Next Factory data reset > Erase all content and settings. This should hopefully be the last resort if you cant get rid of the ads.
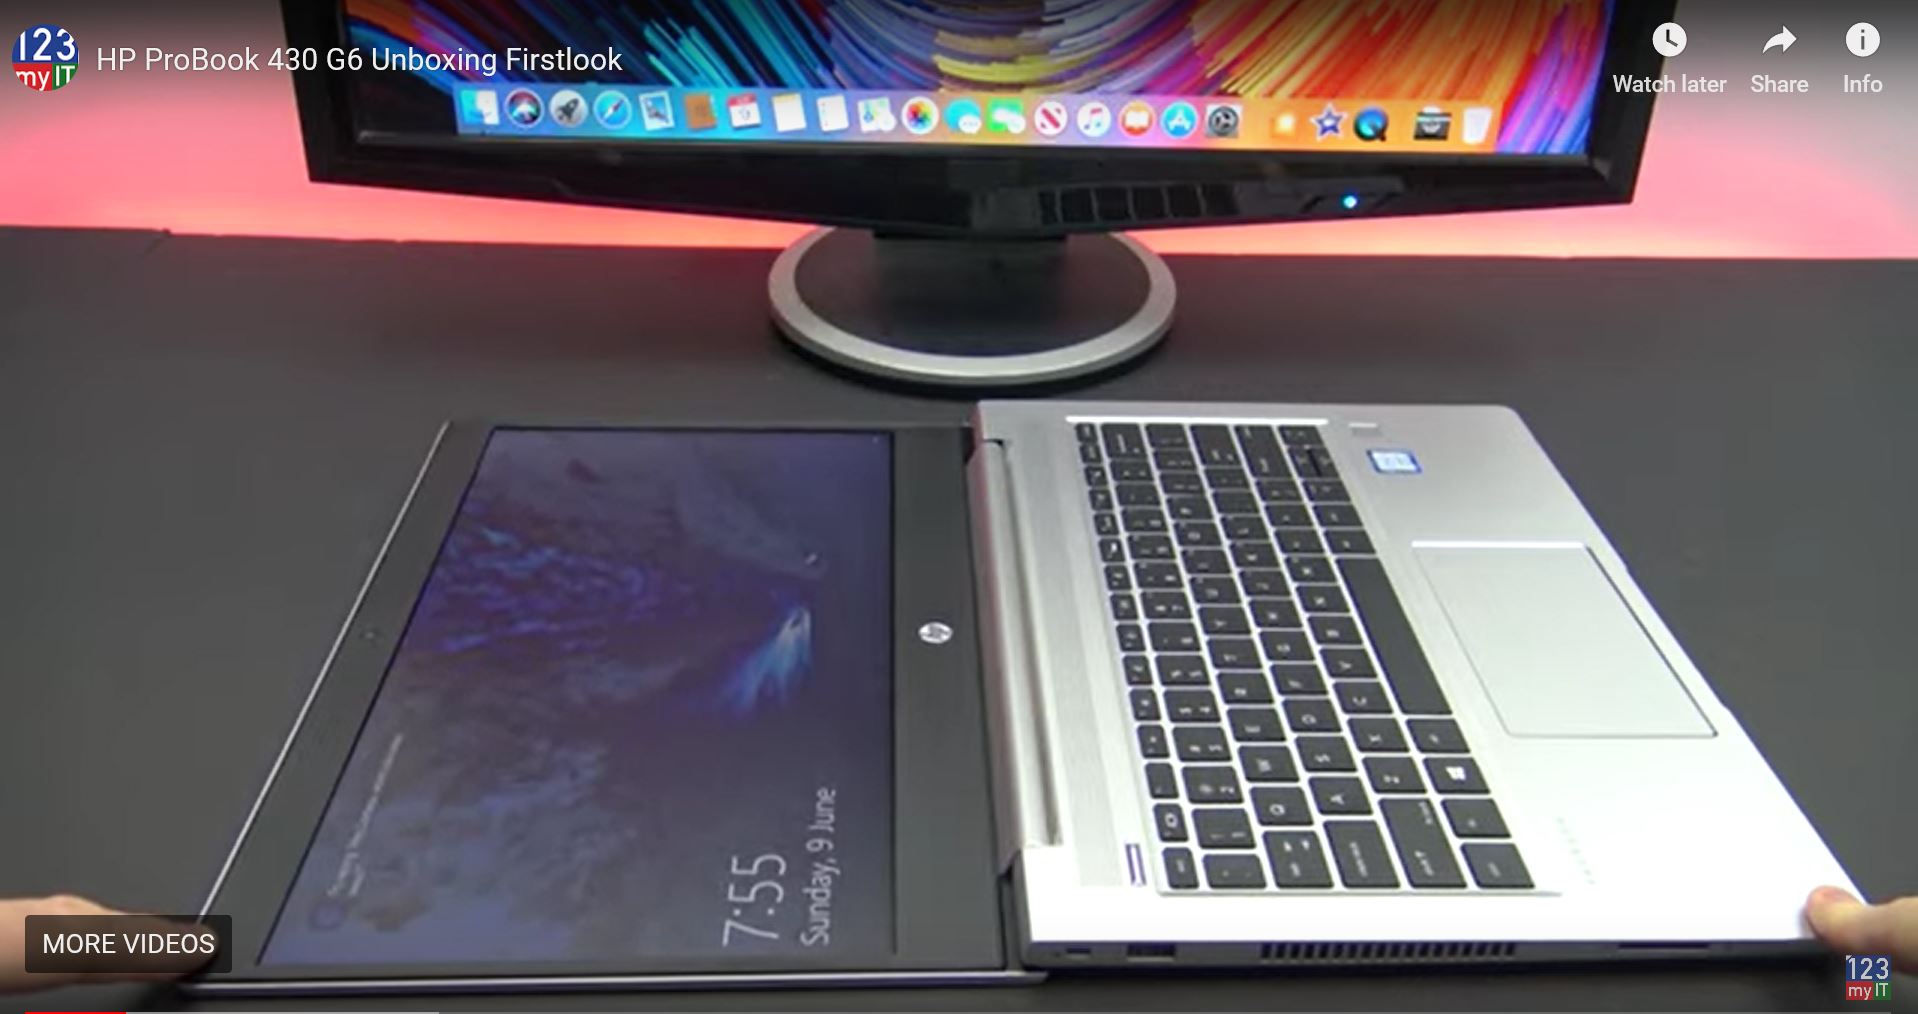
In this video we will show you a HP ProBook 430 G6 Unboxing.
The ProBook 430 G6 is currently the smallest model of this series and has a 13.3-inch display.
If you want a bigger display HP also sells 14-inch, 15.6-inch and 17.1-inch in the ProBook 400 range.
HP ProBook 430 G6 Specifications.
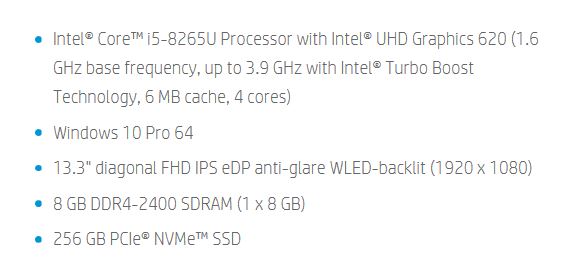
This probook comes with an Intel Core i5-8265U processor, 8 GB of RAM, a 256 GB SSD, and a Full HD display.
HP ProBook 430 G6 Specifications
The design of the previous ProBook the 430 G5 did not last long and I think this is a good thing. See the review of the G5 here. The G5 had a dark plastic Case, where as the G6 now has a really nice silver case. On our model both the palm rest and display cover are still made of smooth, silver plastic. The unit feels sturdy and does not bend when I apply pressure to it. The craftsmanship is also really good. HP have done a really good job with this laptop.
The G6 has a wide drop-down hinge that grips the display and allows the display to open to a 180° angle. We could also open the display cover with one hand, underlining how well balanced the hinges are.
Wide drop-down hinge that allows the display to open to a 180° angle.
The ProBook G6 is about 100 g (~3.5 oz) lighter than the ProBook G5, 1 mm (~0.04 in) thinner and more compact overall. Hence, G6 has much thinner display bezels. Which I really like.
Ports.
The good thing about buisness laptops is that they have a much wider variety of ports.
On the right side the G6 has a full-size HDMI and RJ45 Ethernet ports along with a USB type-A port and headphone jack. There is also a USB Type-C port. Unfortunately it’s not a Thunderbolt 3 port, but at least you can charge the ProBook with a Type-C cable if you need too, as it has USB Power Delivery (PD) support.
The Type-C port supports DisplayPort out too and you also have a AC power port which lights up to let you know the G6 is being charged.
On the left side you have a Kinsington lock, USB type-A port and an SD card reader. The SD card sits flush inside the laptop so you could use this to upgrade the storage of the laptop without opening the case.
You can expect the SD card reader to transfer at speeds of around 81 MB/s.
Also included is a fingerprint reader that supports Windows Hello. We tested the infrared camera and the fingerprint reader, which both worked perfectly. HP saves a smart card reader and a mechanical camera aperture for its more expensive EliteBook series though, which prevents the ProBook from being a complete security package.
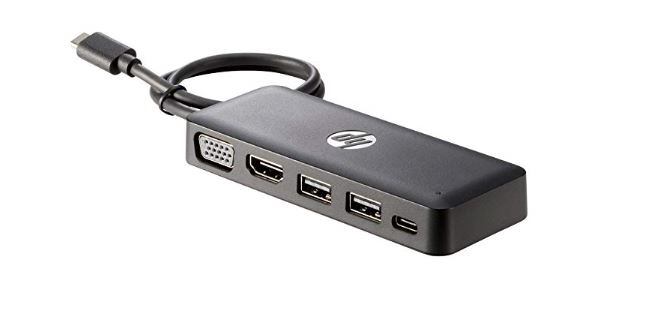
The ProBook 430 G6 comes with just a charger and a recovery DVD. The ProBook also lacks a dedicated docking port, so you must buy a USB Type-C docking station should you need one. You can use any third-party docking station though, which is positive, although HP sells compatible docking stations too.
The ProBook 430 G6 is easy to upgrade and you can do this by removing the bottom cover. Plastic clips hold the bottom case in place as well, so I would recommend being careful when prying it free.
You will see two SODIMM slots, of which one is unoccupied in our review unit.
The system supports 64 GB RAM so you could upgrade that, there is also an empty 2.5-inch drive bay if you want to add an HDD or SSD.
There is also an M.2 2280 slot, but you must first remove the boot drive, as you must with the Wi-Fi card should you wish to upgrade that too. The fan is also easy to clean should that become dusty over time. The keyboard looks tricky to remove though and is probably only interchangeable if you remove the motherboard.
HP Warranty.
You will only get 12 months warranty on the ProBook G6, However you can opt to buy extra cover.
Keyboard and Trackpad.
The G6s’ keyboard is now smaller and HP have removed a row of dedicated navigation keys, which sat to the right of the keyboard. The navigation keys have been merged with the right-most Function key and the arrow keys. The flat, black, keys have a two-stage backlight and feature off on and brighter.
The ProBook 430 G6’s TrackPad measures 11 x 6.5 cm, which is pretty large for a 13.3-inch laptop.
The TrackPad is made of relatively smooth plastic, on which it is easy to slide one’s fingers, but glass TrackPads feel better to the touch.
The TrackPad is fine overall and even its integrated mouse buttons work well. I find left click sometimes hard to find.
multi-touch gestures like scrolling or zooming and allow decent TrackPads to feel almost as responsive as touchscreens.
HP ProBook 430 G6 Display.
HP gives customers the choice between a 1366 x 768 display and a 1920 x 1080 one. However the viewing angel for the 1366 x 768 is not great. Also because of the dim display you might find it hard to use outdoors.
CPU
The Core i5-8265U is a quad-core processor that has a 15 W thermal design power (TDP) and a 1.6 GHz base clock speed. The CPU also supports Intel Turbo Boost for clock speeds up to 3.9 GHz on a single core. Please see our CPU benchmarks page for more information about the Core i5-8265U and how it performs against other CPUs.
GPU and Ram.
All ProBook 430 G6 models use the Intel UHD Graphics 620 for graphics. There is no dedicated option. The UHD Graphics 620 shares its memory with the CPU and benefits from running in dual channel mode, which is only enabled when the system is running with two RAM modules installed. Our review unit is only equipped with one RAM module, so it runs in single-channel mode, which restricts GPU performance. Hence, you could squeeze more performance from the UHD Graphics 620 if you added another stick of RAM, but it would still not be powerful enough for demanding tasks like CAD or video editing.
Like the CPU, the GPU is factory-throttled when running on battery. Activating Turbo Boost in the BIOS reverses this limit though.
You could add another ram module and this would put the graphics in dual channel mode. However it would still not be powerful enough for demanding tasks like CAD or video editing.
HP ProBook 430 G6 is Not a Gaming laptop.
The ProBook 430 G6 is not a gaming laptop in disguise. And this shows in the 3d Mark Score. The intel 620 graphics is powerful enough to play older games like BioShock Infinite at 720p, but current triple-A titles are out of the question.
you cant connect an external GPU either, which would have allowed for serious gaming. I would recommend looking at the 455 G6 which I reviewed recently heres the link.
Accross the top of the display we haev a 720p HD camera, a status indicator light and two mic pinholes. Our model didnt have an infrared sensor, however you will need this for face recination.
the g6 has an excellent 45watthour battery and when browseing the web can last for around 9 hours.
The hp probook 430 g6 is an execllec laptop choice for students and small buinesses. Its battery life, upgradeability, lightweight and sturdy desgin are really impressive but its lets down by the dim display.
Guys if you want to check out other HP probook reviews I have done click the links now.