Hi guys Matt from 123myIT here. In this video, we will show you everything you need to know about the HP EliteBook 830 G8.
HP Range of Laptops – HP EliteBook 830 G8
The EliteBook range is the premium level for HP’s Business laptops. Below the EliteBook you will have the ProBook and above the ZBook range.
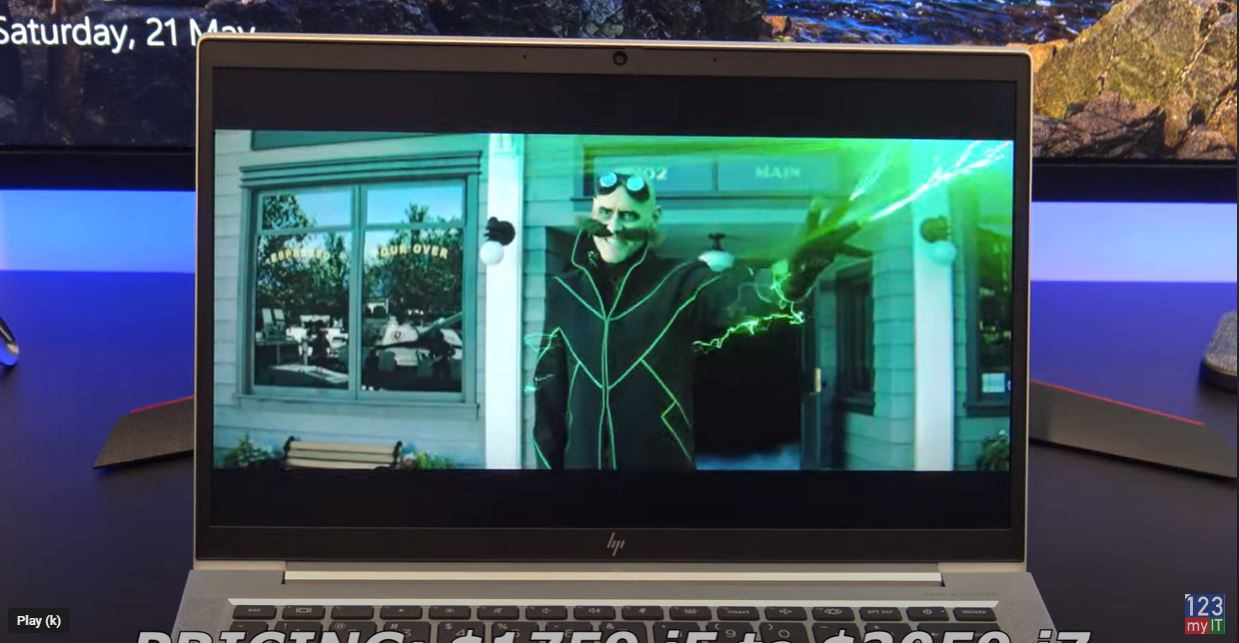
This is 13.3-inch business laptop comes with an Intel Core i5 11th Gen Processor which has an integrated Iris Xe Graphics. Along with 8GB of Ram and 256 GB of NVMe storage.
Pricing
Pricing for the 830 G8 starts at $1759 USD for the Intel i5 CPU and goes up to $2059 USD for the i7 CPU. On the HP website, you can customize and buy. If you are going to do this, then I recommend upgrading to an i7 CPU and changing the screen to a screen with better brightness. The default screen comes only with 250 nits of brightness. You can upgrade to a screen with 1000 nits of brightness, which means the screen will be brighter. However, you should be aware that a brighter screen would also take up more battery life.
In the Box
In the box, you will get the 830 G8 itself. Along with a 45 watt power adapter. After testing the 830 G8 I found it uses around 14 to 37 watts of power. In addition, you can expect to get around 12 hours of battery life 8 hours if you select the 1000 nits brightness screen I talked about earlier. Charging the battery will take just under one and a half hours.
The 830 G8 comes with a 13.3 inch FHD LED Anti-Glare Display. With a resolution of 1920×1080 and 250 nits of brightness. The display is a bit dim however, this laptop designed to be portable, so a less power hunger display means longer battery life.
Does it Game?
In terms of gaming, I was able to get FortNite to run ok on giving up about 35 to 50 Frames per second. This would be mostly due to the Intel quad core i5 11th gen CPU as the Intel Iris Xe GPU is not the best for gaming.
The 830 G8 also has a finger print scanner, which allows you to unlock Windows with a touch of the button, but you need to add it in the customise and buy section I mentioned earlier. Along the top, you will find an integrated HD 720p webcam with dual microphone and indicator light. One of the cool things about the 830 G8 design is you can close the camera off with a sliding button.
Ports
On the right side, you have the charging port, HDMI 1.4 port, two USB C ports and a SIM card slot. This SIM card slot is cool but you will two add this as an option when you buy. You also have an indicator light to show when the laptop is being charged. The USB C doubles as a display port so if you have a USB C to HDMI adapter you can plug in an external display.
On the left, you have a security lock, two USB 3 port, Audio Jack and SC card reader. Annoyingly there is no SD card reader.
Speakers
The 830 G8 comes with Bang & Olufsen dual stereo speakers and they are designed to point upwards towards your ears. The speakers sounds pretty good but missing a little bass.
The Trackpad is nice and wide. But I do find myself right clicking allot because to left click you need to press on the bottom left side of the Trackpad. For me it feels like the trackpad sits too far to the left.
Keyboard
The keyboard is excellent it is a delight to type on and the keys don’t bend or wobble when you press them. And it comes with two stage backlit keyboard as standard which is a nice touch.
The overall build feels like premium quality as it is made from aluminium and there is little to no flex on the laptop. In addition, it does not seem to leave fingerprints, which is great.
The display hinge folds all the way back 175 degrees; however, other laptops go all the way to 180 degrees, so 175 feels a bit awkward.
Can you upgrade it?
You can also upgrade the 830 G8 by removing the screws from the bottom cover. The system supports 64 GB of RAM so you can upgrade that along with a 1TB NV Me SSD. The WIFI card is already WIFI 6 so you will not need to upgrade that for a while.
Benchmarks
Here’s the Geekbench CPU score and the GPU score. Moreover, when comparing the scores with the EliteBook 840 G7 model from last year the 830 G8 is much faster. However, the ProBook 640 G8 seems to be faster than the EliteBook 830 G8.
While running the benchmark if we check what temperature the laptop gets too which is around 35 degrees. You can see the heat does not show up around the palm rests. This is good design it means you palms won’t get uncomfortable when typing.
Worth it?
The EliteBook is a great portable business laptop. This means that typing and battery life will be really good. But this is not a gaming laptop. If you are looking for a gaming laptop you should look for a laptop with the GeForce MX or Radeon RX GPU configured.
Don’t forget to check out my other videos such as How to Transfer Data iPhone to Android with a cable. And do me a favour if you know anyone who might like this video please share it with them, hit the subscribe button and smash the bell icon.
Hi Guys Matt from 123myit here. In this video, we will show you how to Transfer data from iPhone to Android with a cable. This transfer is super easy and does not require that you use an iCloud account, which is great. The other good thing is its very comprehensive, meaning you get all your data such as SMS messages, Apps, Photos and Videos. It is also good if you just want a straight backup of your phone.
We are transferring from iPhone to Android and as mentioned, we will be using a lighting to USB C cable, which came with the iPhone. On your Android phone go into settings and down to accounts and backup. Then tap on bring data from old device. If you phone is not connected to WIFI go ahead and connect it. Once connected if you swipe down from the top you will see the application smart switch downloading. Wait for it to finish downloading and it should install.
Download the smart Switch App
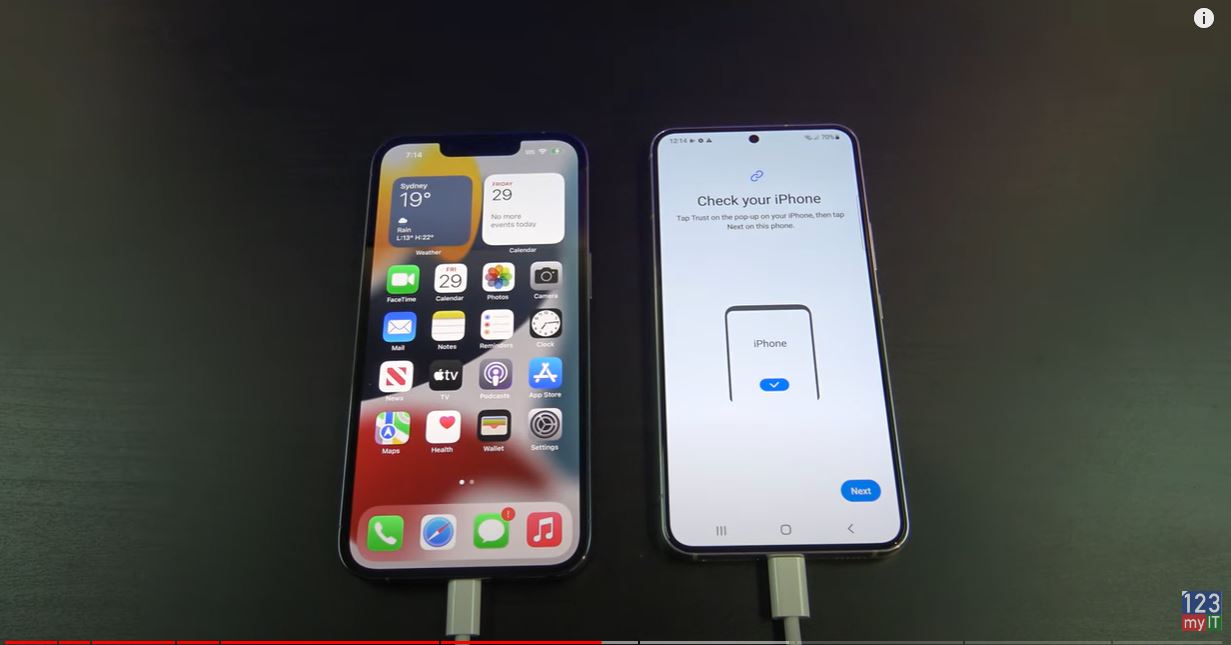
When its finished downloading go back to the smart switch screen and tap continue and allow. Tap on receive data because you want to receive data from iPhone. Then tap iPhone and plug your cable into your Android and iPhone. You Android phone will detect your iPhone and then you can tap Trust on your iPhone.
Choose your data
Cool swipe up and you can choose what data you want to copy across to your new phone. This is also good to make a backup of you old phone data if you want.
Now is a good time to unselect anything you don’t want to copy across. If I go into Settings I don’t want to copy across my Bluetooth settings to I will take the tick out of that. When you have selected everything, you need tap on Transfer to start the copy.
Enter your Google Account Details
You will be prompted to add in your Google account. This is if you want to Transfer Apps from iPhone to Android. Sign in if you want that otherwise you can hit cancel and download them later.
Awesome you are done now, how easy was that. Swipe down from the top to check the progress of the data and after a few mins check, your data has copied across ok.
Other Transfer video
People if this method didn’t work for you check out my other Transfer data video which shows how to Transfer data via wifi instead of cable. There is two free ways to Transfer data in that video so it will help with all sorts of android models.
Also, guys don’t forget to check out my other videos such How to Transfer data from iPhone to Android in 2022. And do me a favour if you know anyone who might need this video please share it will them, hit the subscribe button and smash the bell icon.
Hi Guys and Matt from 123myit here. In this video, I want to show you all the settings I use for my personal Android phone. When I setup my phone, I try to focus on three things. I want it to be as private as possible. I want it to have good battery life and I want it to be quite with no interruptions.
Aims in Android Settings
*Privacy
*Good Battery Life
*Silent, No interruptions
Start with a Reset
So I will go ahead and reset my phone so you can see every setting I set my phone up with from start to finish. Cool the phone is reset and I will start setting it up. The first setting you will get is the sending of diagnostics data to Samsung and affiliates. Make sure you don’t select this by mistake. It sends diagnostic data to Samsung and affiliates about how you use your phone. Tap on details if you want to know more. This will use up your battery and your cellular data as well as making your phone less private. So just select end user Agreement and privacy policy and tap Agree.
Ok Permissions for Samsung apps and services. Since Android Settigns12 was released, Google made it more secure requiring Apps to ask for permission before they can be used. These are all the Samsung apps asking for permission. I go ahead and turn these all off. Don’t worry when you start the app for the first time it will ask for these permissions anyway. But what you are doing is denying blanket access for all Samsung apps, which is a good step for privacy. So turn them off and tap agree.
Go ahead and setup your wifi.
Copy Apps and Data – Android Settings
Copy apps and data. If you want to follow one of my other Transfer videos I will put a link in the description. But for this video I don’t need to copy anything. I will add in the Google account later so skip for now.
Google Services, ok so the same apps permissions questions. But this time its for Google Apps and not Samsung. Same deal turning this off will help battery life, cellular data and privacy.
Fingerprint
Ok fingerprint you want to set this up and I also setup face recognition which is then backed up by a swipe. Do this to keep your data safe if you lose, your phone.
Review additional apps. If you need any of these apps leave them ticked. If you don’t just turn them off. Alright cool so the first thing to do its change my wallpaper. Leaving wallpaper black is good for however for the video I will change this back to the blue and white background.
Next thing to do is to get rid of any apps that I am not using from the home screens. I will get rid of the galaxy store and I like to keep all the Google apps in one neat group so they can stay.
Timeout Screen Dimming
So the next thing I want to change is the annoying screen time out. So if you are looking at something for too long it will dim the screen to save battery life. The default is 30 seconds so I will change that to 1 mins and if I find that annoying I will adjust it again. Now is a good time to go through all the display settings anyway.
Starting from the top I like Dark mode as I find it easier on the eyes and it saves battery life. However for this video I will leave it on the light settings. And below that you have dark mode settings which means you can set a time when you want it to come on. At night might be better.
Quick Settings Android Settings
Below that you have the brightness slider bar. Don’t worry about this for now I will show you how I add that to the Quick Settings menu a bit later. Adaptive brightness I leave on. The next settings I change is the Motion Smoothness. I set this too standard and that will save battery life. However if you play games leave it on Adaptive and you will get smoother gameplay at 120 Hz refresh rate screen. Eye comfort is limiting blue light which is meant to be better for your eyes and help you sleep. So you should probably leave this on. You can add that to the quick settings as well.
Turn off Edge Panels
Screen time out is the setting we came here for. Thirty seconds is too quick for me and I find it annoying, so I will set it to one min. The shorter time this is the better the battery life. So don’t put it on 10 mins because it will drain battery life pretty quickly. I turn off Edge panels as well. I don’t use edge on the Samsung. Accidental touch protection on. Touch sensitivity off and show changing information I leave on.
Lets go back to the home screen and keep working on the icons. I remove the weather App. I generally just look out the window for weather conditions. If I need a forecast I can press the Google assistant mic and ask. If I go back and I am not on the home screen and I can access the Google assistant from holding down the home button. I find both of those Google Assistant button very handy, I use both so I will keep both.
Google Play Store Apps
The next thing I will do is installed the Apps I want to use, and I will do that through the google play store. After you log in you will get a backup to Google drive prompt. Do that if you want to back up your data. For me I leave this off. Alright go ahead and download your Apps.
Duckduckgo is a really cool browser and I will show you why I use it. Ok once its downloaded I move it to my main menu bar down the bottom of the phone. Ok when you open it up it will tell you what its doing. The internet can be kinda creepy. Not to worry! Searching and Browsing privately is easier than you think. Tap lets do it. Next Try visiting one of your favourite sites. I will block Trackers so they can’t spy on you and ill also upgrade the security of your connection if possible. Very Cool!
Burn Button – Android Settings
What’s really cool about this browser is it has a burn button at the top. If you press on that at the bottom it says. Personal data can build up in your browser, yuck. Use the Fire button to burn it all away. Give it a try now.
If I tap up the top and search for a news website in Australia called Sydney morning herald. And then Duckduckgo says. Your Duckduckgo searches are anonymous and I never store your search history ever! So again, your phone is more private. This is great! If you tap Phew and then I tap on that news website. The Duckduckgo says: Google was trying to you here. I blocked them! You can check your URL bar to see who is trying to track you when you visit a new site. Very cool! Tap high five.
Clearing Cookies
Ok so now I am on the News website. In your browser you have these things called Cookies and they are used to track you. So for example on this news website it will give you five free to read articles and then after that it will try to get you to subscribe. Watch ill show you. So if I got in and out of an article eventually it will stop me from reading full articles. Best Android Settings.
So if I go to burn and I clear all my tabs and data I will be able to go back to the website and read full free articles again. And you can bookmark the website so its easy to browse to again after you use the burn button.
Lock Screen
Cool we can quickly test our lock screen. Works fine with the fingerprint we setup. Awesome. On the second screen I keep all my apps. This is for privacy as I don’t want people to see what apps I use on my home screen. So, I will remove and apps I don’t use and download all the apps I do use. Cool I’ve removed my apps now and I will add the apps I use. Because iam right-handed I stack the apps to the right side. If you are left-handed, you can stack them to the left. This is to make them easier to reach. There ya go nice an easy to reach.
Keyboard Settings
The next annoying thing to sort out is the keyboard settings. So once you have downloaded your Apps the first things you will want to do is send a message to someone right. IF you go into messages and tap the cog icon in the top of the keyboard it will take you directly to the Keyboard settings. I do not know about you guys, but I am sure everyone has a family member or a friend who sends you a text message and you can never understand it because predictive text has changed a word and auto replace has added the word before they check what they are sending. In the end, everyone is confused. My setup, I leave Predictive text on, Suggest emoji’s on, Suggest stickers off. In addition, auto replace off. But test with a friend or family member so you get it right for you.
Setup Quick settings
The next thing to setup is the Quick Settings menu. Now I just did a video on Notifications so I won’t go over that again. However if you want to see the video on notifications I will put a link in the description. Ok so the quick settings menu just allows you to set functions on your phone quickly by swiping down from the top of your phone. In addition, you can change the buttons in here by swiping down again. Now if you remember earlier I showed you the brightness bar. I am going to move that bar into the Quick Settings menu. So go back up th top tap on the three dots and then edit buttons. This allows you to arrange the buttons you use most in the Quick Settings menu.
All you need to do is tap and hold the buttons and move them into order. The buttons I use are WIFI button, Mobile data button, and sound button, and Torch, GPS and Battery saver button. When you are finished organising your buttons tap on done. Let us move the brightness bar into that menu by tapping the 3 dots and tapping quick panel layout. Go into brightness control and tap show always and then and in device control menu and show when quick panel expanded. Then the Quick settings menu will be set. Let us take a look. Swipe down from the top and everything including the brightness bar is displaying nicely.
Battery Saving Android Settings
Lets change some more battery saving settings. Go into Settings and Connections and I turn off WIFI calling. Here is an example of how WIFI calling works. I went to a beach house that was remote and did not have good 4G 5G cellular services. However, the house I stayed in had a wifi connection. I turned this on and was able to use the WIFI calling settings to make a phone call. If you do not need this service just turn it off and you will save battery life. I do not use Bluetooth so I just have this off unless I need it.
I do not use my phone for credit card payments. So this is off. If we go down to mobile networks. This will be called cellular networks in the US. In addition, go into network mode. So this Samsung phone support 5G. However, my cellular plan I am on does not. So I set this to 4G, 3G, 2G auto connect. This will save you battery life. Ok go back out and go into more connection settings and make sure nearby scanning is turned off.
Annoying Bixby Side Key
The last settings I change is the Bixby side key. You can find it under Settings, Advanced features and Side Key. I’ve already done a video for this one if you want to watch that I will put a link in the description.
Guys don’t forget to check out my other videos such as take control of your Notifications on Android Settings. And do me a favour if you know anyone who might like this video please share it will them, hit the subscribe button and smash the bell icon.
Hi Guys and Matt from 123myit here. In this video we will show you how to Take control of your notifications on Android. Guys, I wanted to do a video which will hopefully help you take control of your notifications and stop them from being annoying and distracting. Notifications on Android
Lets get started.
Quick Settings – Take Control of Your Notifications on Android
The first thing I want to show you is Quick settings by swiping down from the top. You will see a list of your latest notifications in here. This will show you a cut down version of the notification. To see more of the notification, you can tap on the little arrow. And the notification will expand. If you want to go directly into the notification, simply tap on it and it will take you directly to the service or message. Swipe down again to go back to Quick Settings.
Back in Quick Settings and down the bottom you will see two buttons notification settings and clear. If you tap on notification, settings that will take you directly to you guessed it the notification menu in the settings of your Android. And if we go back into the Quick Settings and tap on the clear button that will remove any of the latest notifications from the Quick Settings menu.
Notifications
You can find that from the Home screen by going into Settings and notifications. Cool so in here we can control how our notifications are delivered. Will your notifications keep buzzing your phone and distracting you. Or can you fine tune them to only notify you on the important contacts and messages.
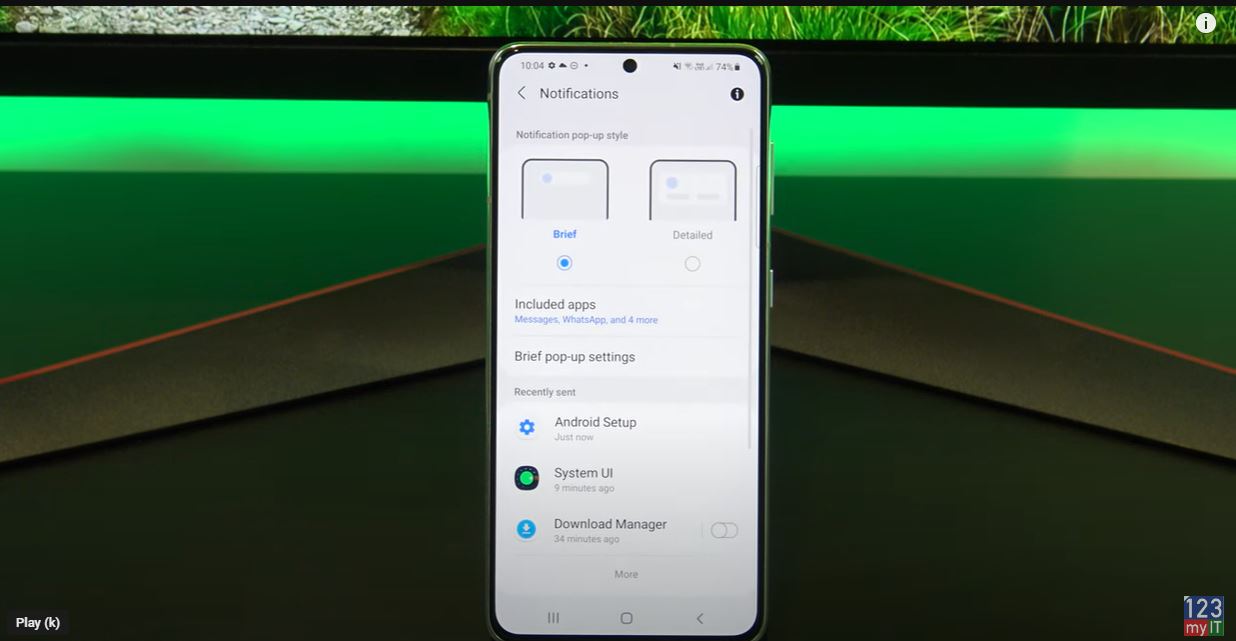
In the top of notifications, you have Brief and Detailed. Here’s an example of what Brief looks like. Here’s an example of what Detailed looks like. Detailed can be annoying if you are reading a website because it takes up more screen real estate and will pop up over some of the words.
Pop-Up Notifications
If you tap included apps this will show you a list of apps that can display pop up notifications on your Android device. Allot of these will be on by default. You should go through here and only select the Apps that you want popup notifications from. A good example of this would be messages. When some one sends you a text message you will get a notification. If we got back out of there and go into Brief popup settings. And we tap on Edge lighting style. In here you can choose an Effect, Colour and duration for when you get a popup notification. It gives you a little example at the top of the screen.
Cool so if we go back out of there you have another option to show when screen is off. I usually turn this off for privacy. But if you want it to show when the screen is off leave this turned on. Under Brief popup notification you will have recently sent which shows you a list of apps that sent you a popup notification most recently. You can tap on more to get the complete list.
Do Not Disturb
Under that you have do not disturb. This is handy if you want keep you phone from disturbing you for a set period. Maybe when sleeping or studying. You can turn on the do not disturb button at the top and set your times. Toggle on the Sleeping button, the default do not disturb is 10 pm to 7am if you tap add schedule you can select whats days you want this. And below that you can set exceptions.
Messages and Conversations
Tap on Calls messages and conversations. This allows you to take calls messages and conversations from people in your contacts lists only. Therefore, it wont allow a person to call a second time within 15 mins unless you turn on the Repeat callers button. Remember this is only in the do not disturb time frame that you have set. If you go back and go into Alarms and sounds. When do not disturb is on, sounds and vibrations will be muted, so this allows you to turn them off if you want during the do not disturb time frame.
Alarms stay on
As you can see here the alarm is still turned on. This means your alarm will still wake you up even if you have the do not disturb turned on. If we go back, it will be the same thing for Apps you can set an app to still send you a notification even if do not disturb is turned on. The last settings are Hide notifications, this will allow you to hide notifications when the screen is off as well as when it is on.
Hide Badges
You can also hide the badges on your icons. But the things to remember critical notifications about phone activity will always show up. So, badges are the little numbers beside your apps to notify you how many messages you have. See here I will turn them off.
The last setting here is Advanced settings.
Guys don’t forget to check out my other videos such as Transfer data Android to Android in 2022. And do me a favour if you know anyone who might like this video please share it will them, hit the subscribe button and smash the bell icon.
Hi Guys Matt from 123myit here. In this video, we will show you two free ways to transfer your data from Android to iPhone 2022. There are two ways to transfer your data from Android to iPhone. The first way I will show you is recommended by Apple and way requires you to reset your iPhone. If you don’t want to reset your iPhone then fast forward to the 5:54 min mark and I will show you how to Transfer your data without resetting your iPhone.
What can you Transfer – Android to iPhone 2022
This video will help you transfer your message history, contacts, calendar, Google Account, camera roll, photos and videos. Display & Accessibility Settings and other files. Finally, If you want to copy music and books you will need to do that manually. I have already done a video how to do this and I will put a link in the description below.
The phones that we are using today are Samsung S22 and the iPhone 12 Pro.
The first step is to reset your iPhone.
Reset your iPhone
Go into settings > General and scroll down to transfer or reset iPhone. Once you are there tap on Erase all Content and settings. Next Tap Continue. This will delete all media and data so do a backup first if you need too. iCloud does an automatic backup. I am going to skip this.
Once your iPhone has reset itself. Just follow the prompts and start setting it up again.
Setup WIFI
Next up connect to your WIFI and make sure your Android device is connected to the same WIFI.
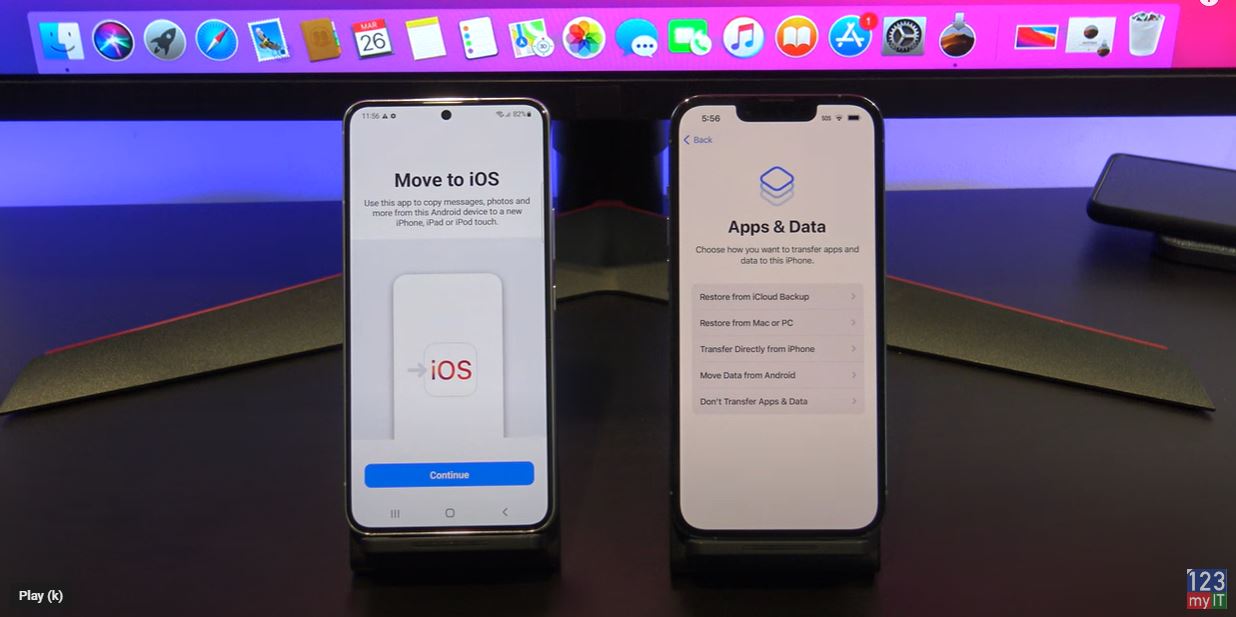
Continue setting up your iPhone until you get to the Apps and data screen. Once you’re on the Apps and data screen. Go to your Android phone and download the move to iOS app from the Google play store. Play.google.com
Go ahead and tap install and when that’s done tap Continue and skip. When its finished download tap on Open, continue and agree to the terms. Tap on Don’t send data and then allow.
On your iPhone tap Move data from Android. Then tap continue, and then enter in your code.
Could not connect error – Android to iPhone 2022
If you are getting the could not connect error message, make sure you turn on location services on your Android phone. You will find it under settings and location. It’s important to turn that on.
Ok great you are on the transfer data screen just select anything you want to transfer, and press Continue. Also, here’s a Pro tip. If your transfer is taking too long stop the transfer and delete and photos and videos you don’t want from your Android phone. This will free up space and make the transfer faster.
New Features
There is also a new feature in the 2022 version, down the bottom you can Add file which is really cool.
Cool your data is transferred now. Tap done on your Android phone, and you can close the app. On your iPhone tap, continue setting up iPhone. And then go ahead and set up your iPhone.
While you are doing that guys do me a favour and press the like button, it shows everyone that this is a legit video. Thanks very much!
Install your free Apps
Awesome the last step here is to install your free apps. To do this you will need your Apple iD. Just tap add apps and then enter in your apple id. If you don’t have an apple id you can create one by going to the website applied.apple.com.
Your iPhone will start to download all your free apps for you. If you get the Apple iD Verification just tap settings and then enter in your Two Factor Authentication. This will pop up as a message on one of your other Apple devices if you have it or as an SMS on your phone.
Go to the App Store and download your Apps.
If you swipe across you should see all your apps start to appear. If you didn’t get the prompt to Add Apps, then don’t worry, just go to the App store and download the Apps you need. You can also check if your if your photos messages and video copied across.
The second part of this video is if you don’t want to reset your iPhone. We will move the data with an App called, Copy my data. Open up the App store on you iPhone and download the copy my data app. Tap open and then tap OK to allow the app access to your data.
Copy my data
Go to the google play store on Android phone and download Copy my data. I’ve already downloaded it so I will tap open. In the copy my data app you will be asked to allow access just to go ahead and allow. And do the same on your Android device. Tap on To or from another device over Wi-Fi. If the Apps don’t fine each other just quit the apps and reopen them again.
Go ahead and deselect anything you don’t want to copy across. Tap next on your Android device.
Awesome all your data is copied across now. If you have a SIM card you can move it across now too.
The last step is to tap finish and close your apps and then check if your photos and apps copied across. Cool there they are.
Also guys don’t forget to check out my other videos such as Transfer data iPhone to Android in 2022. And do me a favor, If you know anyone that might like this video, please share it with them hit the subscribe button and smash the bell icon.
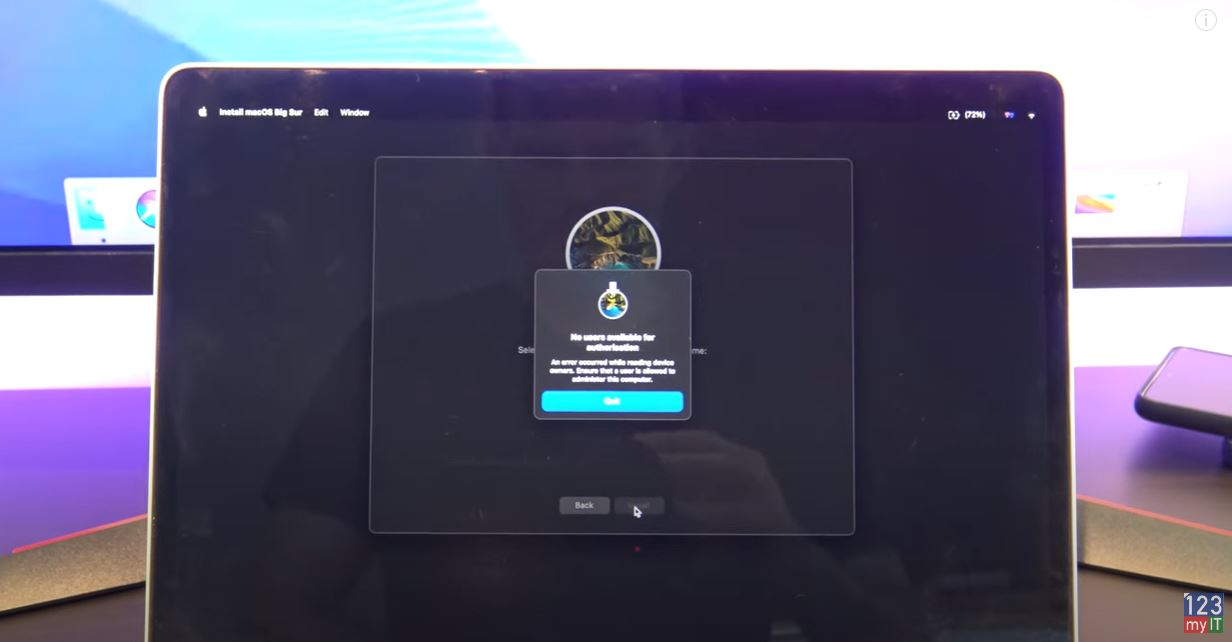
Hi Guys Matt from 123myit here Welcome to the channel. I was trying to reinstall Mac OS big Sur and getting the following error No users available for authorisation. In this video, we will show you get past the error No users available for authorisation on an M1 Mac. So people if you followed my other video how to reset an M1 Mac, I show you how to reset an M1 Mac for resale so it doesn’t have any of your personal data left on it. I will put a link to that video in the description. When reset process you might hit a road block error, which says No users available for authorisation. These are the steps to get around that.
Let us get started.
Disk Utility
Hit Quit and then go back into Disk Utility. In the Disk Utility sidebar select, the volume called Data or it could be called Macintosh HD data and then select the Volume minus sign.
When it pops up for delete. Go ahead and click delete. Moreover, when it finished quit out of Disk Utility.
Activate your Mac
After you quit it should come up and say your Mac is activated. If it does not make sure you have connected the Mac to your WIFI. Next Click on Exit to Recovery Utilities. Then go in and Try to reinstall your version of MacOS again. In my case its Big Bur.
Support the Channel
In addition, guys don’t forget to check out my other videos such as Apple MacBook Pro 14 inch Unboxing. Do me a favour if you know anyone who might need this video please share it will them, hit the subscribe button and smash the bell icon.
Hi Guys Matt from 123myit here. In this video, we will show you two free ways to Transfer data from iPhone to Android 2022. The first way is the Official way to transfer data from iPhone to Android and we will use the iCloud app to do this. If you don’t want to use iCloud, then head to the 4:10 min mark and I will show you the second way to Transfer your Data without iCloud. Following this video you will be able to Transfer Contacts, Data from iPhone apps, Images, Videos and Documents.
Lets get started.
iPhone settings – iPhone to Android 2022
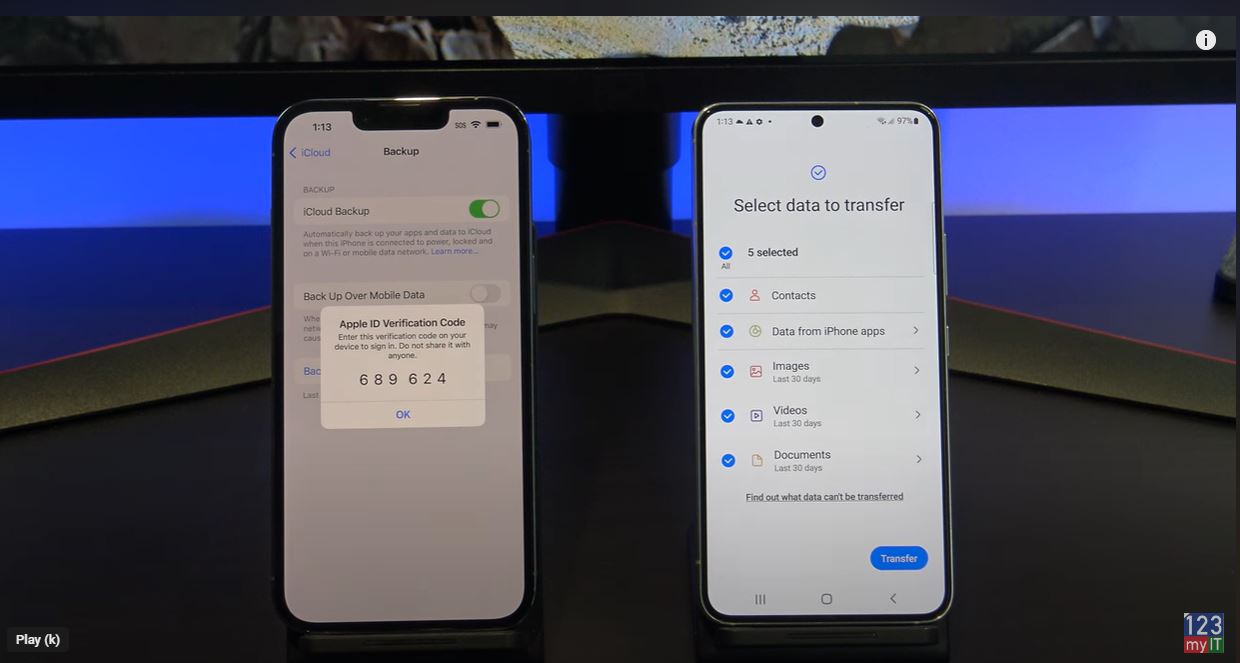
On your iPhone go into settings scroll to the top and sign into your iCloud with your Apple ID. After signing in, if you have two factor authentication turned on you will need to type in your verification code. Once you enter your verification code it will start to sign you into iCloud. You may also get prompted for your Passcode enter that as well.
Cool once you are logged into your iCloud account tap on iCloud and scroll down till you see iCloud backup. This is where you would tap backup now to backup you iPhone. However, before you do this let’s go back and select what we want to backup. Remember you will be coping this data to your Android device so only select what you want to move to your Android device.
Turn off find my iPhone
When your finished before you hit backup now you want to make sure you turn off find my iPhone. This is helpful if you want to sell your iPhone afterwards. Go into the find my iPhone menu and just turn it off. You will need to enter your Apple ID to do this.
You also want to turn off iMessages. Go back out into Settings and then scroll down to Messages. At the top just turn off iMessage.
Alright now you can go back into iCloud backup and start the backup. While that’s backing up, go over to your Android device and go into Settings and scroll down to accounts and backup. It might be in a different menu depending on what model of Android device you have. Tap on Bring data from old device and if you get prompted to update go ahead and do the update.
Receive Data iPhone to Android 2022
Tap agree and allow. Tap on receive data and tap on iPhone/ iPad. You can transfer from Android and Windows phones also. Tap on Get data from iCloud instead. And then enter in your Apple ID details. Next you will get a prompt on your iPhone to allow the Android device to connect to your iCloud account. Just Tap Allow. And then enter your verification code on your Android device.
Awesome, just go ahead and deselect anything you dont want to Transfer to your Android device. Make sure you tap the arrow and select all otherwise it will only copy the last 30 days of photos. When you are done tap Transfer. If you go to the Home screen and you want to see how the Transfer is going swipe down from the top and tap the Smart Switch notification.
Check your iMessage
Your data is copied across now, tap next and there will be a warning about iMessage which we already did.
The second Free way to Transfer your data is by using an App called Copy My Data. You can find it on the App store and the Play store. Once you have downloaded it open it up on both phones. Tap allows to give access. Tap next and on your iPhone select your Android device. Next, tap the Copy data to selected device. And then enter the PIN number on your Android device.
Deselect anything you don’t want. I just want to transfer contacts and photos.
Awesome your data has been Transferred now. Tap finish and check that your photos have been copied across. And there they are. Also guys don’t forget to check out my other videos such How to Transfer data from Android to Android in 2022. And do me a favour if you know anyone who might need this video please share it will them, hit the subscribe button and smash the bell icon.
Hi Guys Matt from 123myit here. In this video, we will show you how to Transfer data from Android to Android in 2022. Ok Guys If you are transferring data from any Android device to Samsung then you will be able to transfer Calls, Contacts, Messages, Apps, Home Screen, Settings, Photos, Videos, Music and Documents. IF you are transferring from Samsung to other devices, you will be able to transfer Contacts, Calendar, Photos and Videos.
Tips before you start – Android to Android 2022
Guys I want to give you a few Tips before you Start.
Turn off any security feature such as passcodes etc. As they might interrupt the transfer process.
Delete any unwanted video and pictures. This is to save Transfer time and space on your new phone
If you have a Sim card you can transfer the Sim at any time.
Smart Switch
Today we are going to transfer data from Samsung S21 to a Samsung S22 phone and we are going to use an app called Smart Switch. Smart switch will work with most Android phones. However, if it doesnt fast forward to the 5:07 mins mark and I will show a different app to use if Smart switch does not work for you. Android to Android 2022.
Most Samsung phones will have the smart switch app already installed under Settings > Accounts and backup. But if you can’t find it on your device you can download it from the Google play store.
Join the Same WIFI
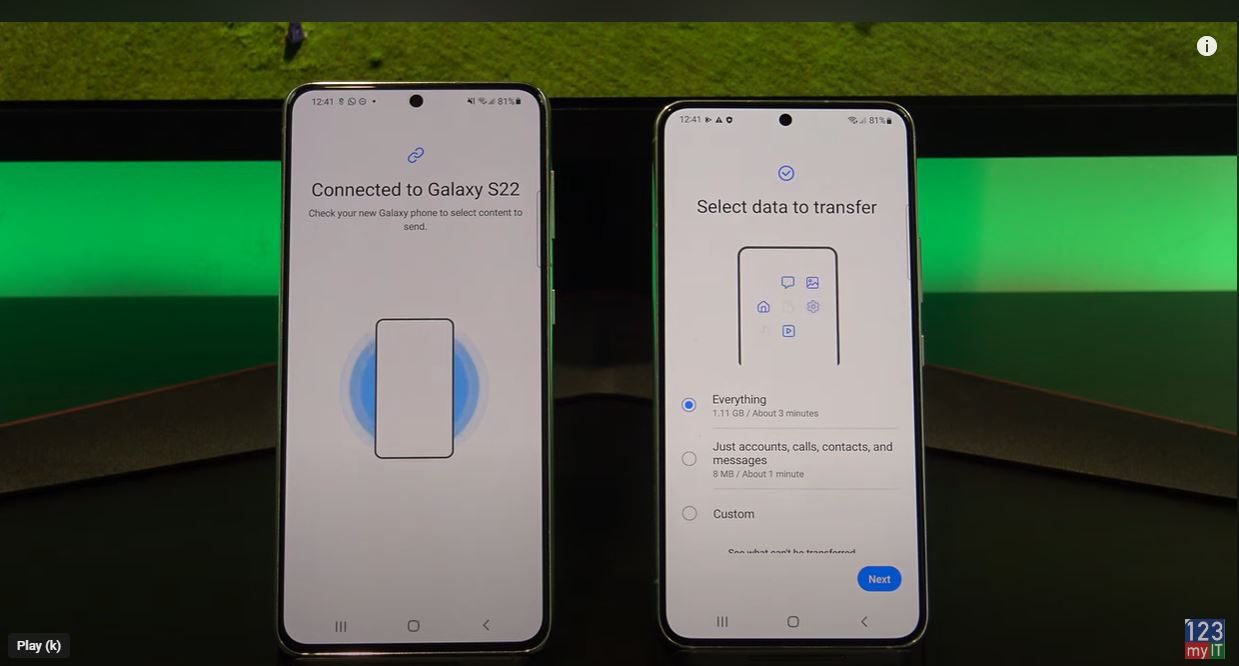
Tap agree and then join your phone to the same WIFI as your old phone. Tap on send data from the phone you want to Transfer the data from. Make sure both phones are on the same Wi-Fi and tap wireless. Ok Smart Switch will start to download. To check its progress swipe down from the top.
Ok while that is downloading go back to your old phone and tap send data. Now that its downloaded go back to the SmartSwitch app and tap continue and allow. Next, tap receive data and then tap Android and then Wireless. Tap connect on your old phone and its you get the error could not connect don’t worry. Just hit connect again on both phones. It should come up straight away the second time around. Tap Allow on your old Android phone and it should start the Transfer process.
Select your data
Your Android phones should then work out what data it can copy across. Go ahead and choose what you want to transfer across and deselect anything you do not want to copy across. Tap on Custom and then next. Swipe up and select everything you want to copy to your new Android phone.
Sweet so your data will start to copy across now. If you check your time and its staking ages you might have too many large video files and slow Wireless. Let me know how long you needed to wait in the comments section below.
Check your data
Let us go back to the home screen and we will check if our data copied across. Ok lets check the gallery for our videos and photos. Ok cool so its given use the results of what it has copied. You can tap on View more, next and Done.
Let us check the gallery again. Cool there is our videos and photos.
Awesome, there’s our photos in the gallery all your stuff is copied across now.
Transfer back the other way
Alright, Let us transfer back the other way now. We are going to use an app called Copy my Data. You can download it from the Google play Store. I have already downloaded it so I will just open the app. Make sure you have it downloaded on both Android phones. Tap next on both devices. Tap to or from another device over WIFI. Select your device then select copy data from selected devices. Because we are Transferring data back the other way. Add in the pin number. Then tap next. Deselect any of your data you do not want to copy across. IF you get prompted tap allow on your other device. Congratulation you have just copied your data between two Android devices.
Finish
Finish on both phones and check if you data transferred across ok. If you have a sim card, you can also move it now.
Once your data has copied across you can go ahead and delete the Copy my Data app.
Guys don’t forget to check out my other videos such Samsung Galaxy S22 unboxing. And do me a favour if you know anyone who might need this video please share it will them, hit the subscribe button and smash the bell icon.