Take Control of Your Notifications on Android

Hi Guys and Matt from 123myit here. In this video we will show you how to Take control of your notifications on Android. Guys, I wanted to do a video which will hopefully help you take control of your notifications and stop them from being annoying and distracting. Notifications on Android

Lets get started.

Quick Settings – Take Control of Your Notifications on Android

The first thing I want to show you is Quick settings by swiping down from the top. You will see a list of your latest notifications in here. This will show you a cut down version of the notification. To see more of the notification, you can tap on the little arrow. And the notification will expand. If you want to go directly into the notification, simply tap on it and it will take you directly to the service or message. Swipe down again to go back to Quick Settings.

Back in Quick Settings and down the bottom you will see two buttons notification settings and clear. If you tap on notification, settings that will take you directly to you guessed it the notification menu in the settings of your Android. And if we go back into the Quick Settings and tap on the clear button that will remove any of the latest notifications from the Quick Settings menu.

Notifications

You can find that from the Home screen by going into Settings and notifications. Cool so in here we can control how our notifications are delivered. Will your notifications keep buzzing your phone and distracting you. Or can you fine tune them to only notify you on the important contacts and messages.

Notifications on Android

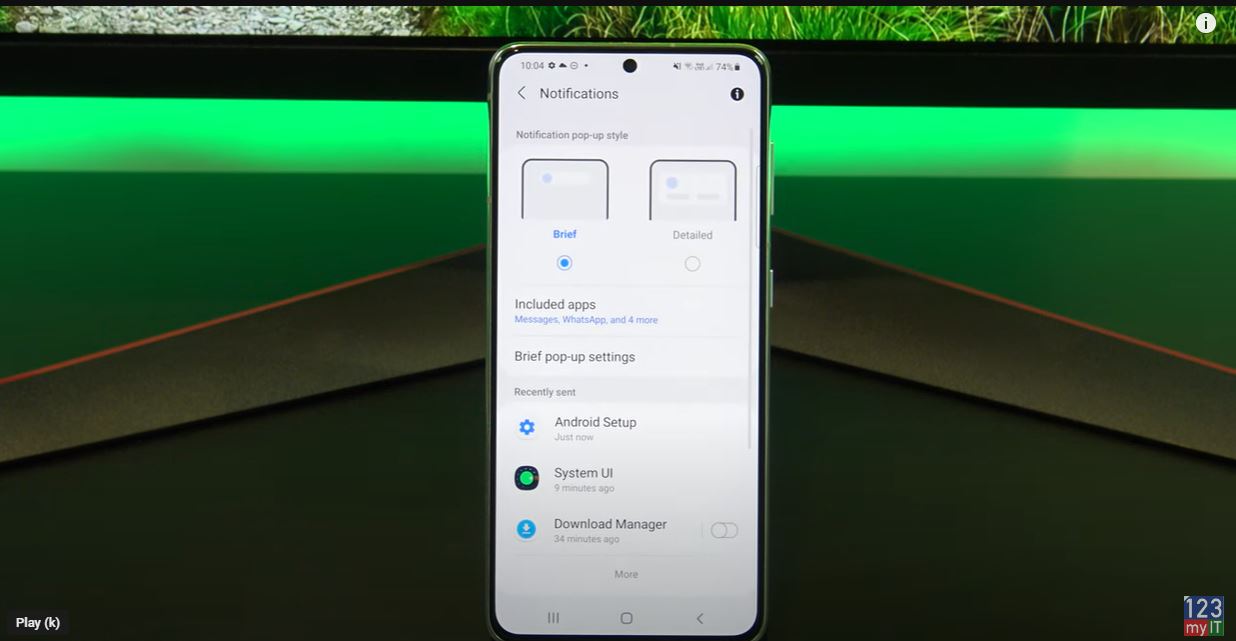
In the top of notifications, you have Brief and Detailed. Here’s an example of what Brief looks like. Here’s an example of what Detailed looks like. Detailed can be annoying if you are reading a website because it takes up more screen real estate and will pop up over some of the words.

Pop-Up Notifications

If you tap included apps this will show you a list of apps that can display pop up notifications on your Android device. Allot of these will be on by default. You should go through here and only select the Apps that you want popup notifications from. A good example of this would be messages. When some one sends you a text message you will get a notification. If we got back out of there and go into Brief popup settings. And we tap on Edge lighting style. In here you can choose an Effect, Colour and duration for when you get a popup notification.  It gives you a little example at the top of the screen.

Cool so if we go back out of there you have another option to show when screen is off. I usually turn this off for privacy. But if you want it to show when the screen is off leave this turned on. Under Brief popup notification you will have recently sent which shows you a list of apps that sent you a popup notification most recently. You can tap on more to get the complete list.
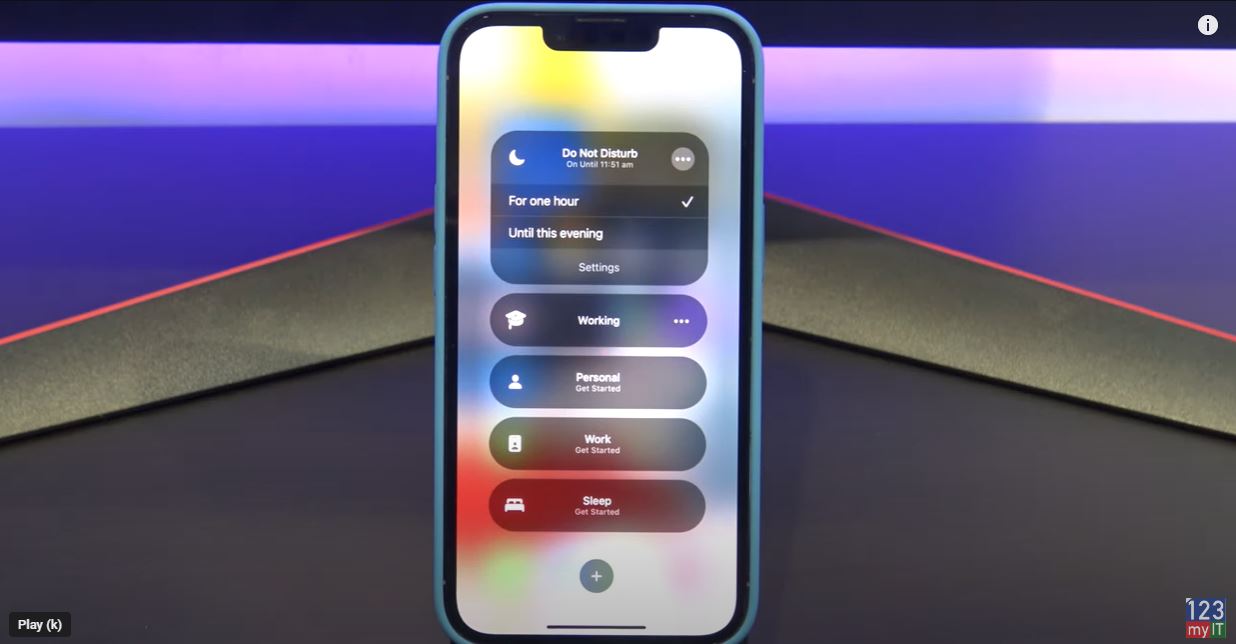
Do Not Disturb

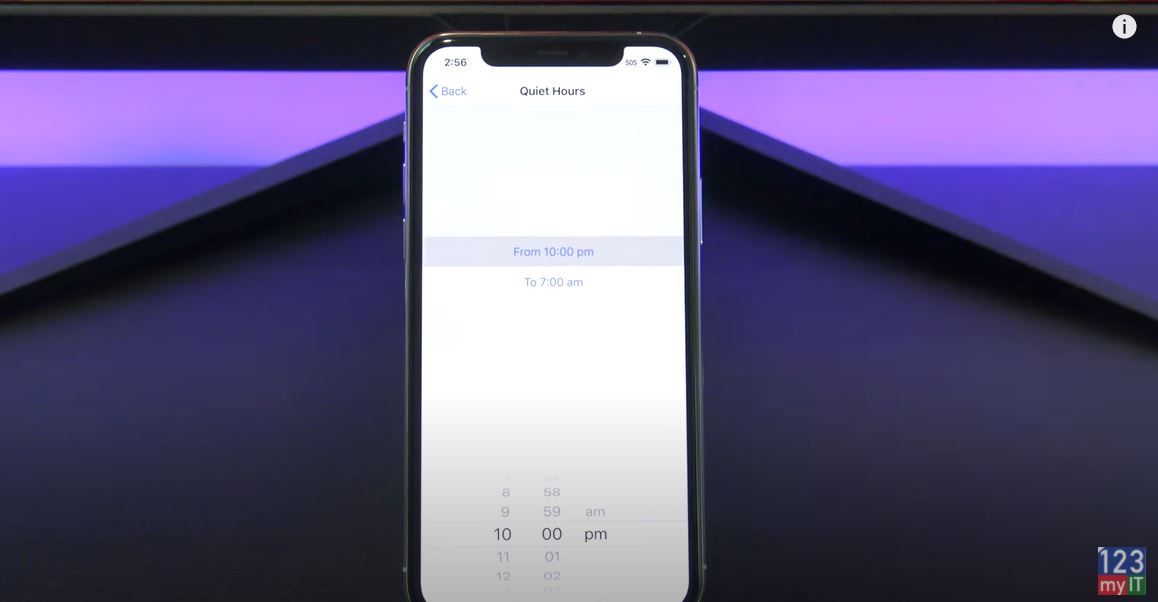
Under that you have do not disturb. This is handy if you want keep you phone from disturbing you for a set period. Maybe when sleeping or studying. You can turn on the do not disturb button at the top and set your times. Toggle on the Sleeping button, the default do not disturb is 10 pm to 7am if you tap add schedule you can select whats days you want this. And below that you can set exceptions.

Messages and Conversations

Tap on Calls messages and conversations. This allows you to take calls messages and conversations from people in your contacts lists only. Therefore, it wont allow a person to call a second time within 15 mins unless you turn on the Repeat callers button. Remember this is only in the do not disturb time frame that you have set. If you go back and go into Alarms and sounds. When do not disturb is on, sounds and vibrations will be muted, so this allows you to turn them off if you want during the do not disturb time frame.

Alarms stay on

As you can see here the alarm is still turned on. This means your alarm will still wake you up even if you have the do not disturb turned on. If we go back, it will be the same thing for Apps you can set an app to still send you a notification even if do not disturb is turned on. The last settings are Hide notifications, this will allow you to hide notifications when the screen is off as well as when it is on.

Hide Badges

You can also hide the badges on your icons. But the things to remember critical notifications about phone activity will always show up. So, badges are the little numbers beside your apps to notify you how many messages you have. See here I will turn them off.

The last setting here is Advanced settings.   

Guys don’t forget to check out my other videos such as Transfer data Android to Android in 2022. And do me a favour if you know anyone who might like this video please share it will them, hit the subscribe button and smash the bell icon.

Transfer Data Android to iPhone 2022

Using Focus on iPhone iPad and iPod touch

Hi Guys and Matt from 123myit here. In this video I will show you how to use focus on iPhone or iPad. Focus allows you to filter notifications based on what you are doing. You will find focus in control centre by swiping down from the top right and tapping on focus.

Do not disturb – Focus on iPhone

In here you will find the default focus which is do not disturb. Do not disturb silences all notifications by default. So, if you are really busy and don’t want to be interrupted you could set this and your phone won’t send any notifications. You can also tap the three dots and turn it on for 1 hour or until this evening. Alright if you close it and just go back out I will show you where it displays that Do Not Disturb is turned on.

focus on iphone ipad

Ok if you look in the top left corner you should see the do not disturb icon which tells you that the do not disturb is not turned on. Cool ok, let go back in an setup our own personalised do not disturb.

If you want to find the focus menu if is located under Settings and Focus. Focus on iPhone.

Focuses

To setup your own focus tap the plus icon down the bottom. Then you will have a list of pre set focuses. Up the top you have driving and fitness. Driving silences notifications, but will turn on automatically when connected to carplay or Bluetooth. Also if you have friends on iPhones, it will send them a reply that you are driving. Which is handy.  Gaming is a good one too. So if you want playing games on your iPhone and don’t want notifications interrupting the game then you can turn this on. And the last two down the bottom are mindfulness and Reading. Lets go a head and setup our own custom Focus.

Study Focus

Iam going to call mine Study. Because I want my phone to be quite when I study. Next you can select a colour and an icon for study. Tap Next. Now choose the people you want notifications from while you are studying. Notifications from other people wont appear until you turn the focus off.

That’s for notifications what about phone calls? If we tap on Calls From and then can choose calls from Everyone, No one Favourites or all contacts. When you are finished tap allow. If you don’t want to hear from anyone tap Allow none.

Allow notifications on Apps

Next you can select which Apps you want to allow notifications from so tap the plus and I am going to select Find My, Books and Messages. You can also turn on Time sensitive apps to send you notifications. Tap allow and your Focus is setup tap done to continue.

Alright before we personalised the focus I will show you what it looks like if you turn it on. Ok to personalise your Focus under the Options menu you have Focus Status. When Focus Status is turned on Apps like Messages will let people know that you have your Focus turned on.

Hide notifications on home screen

If you want to hide notification badges you can tap Home Screen. And in custom pages you can select which home screen page you want to show while in the focus. Under the lock screen menu you can dim lock screen in your focus and or show silenced notifications there.

One of the cool features is the Add Schedule or Automation. This allows you to choose to start your focus as a specific time, in a specific location or when you launch an app. So lets say I want to turn on the Study focus when I go to the Library. I would tap Smart activation to turn it on and then tap on Add Schedule or Automation. You want to tap on location and then type Library at the top. This will show you a list of Libraries near you. If this does not come up check under Settings, Privacy, Location Services and System Services.

Library Focus – focus on iPhone

Cool I found the library I am after. So what this will do is Whenever I go to the Library it will turn on my Study Focus automatically. You can use the little slider bar to make the circle bigger or smaller. Lets say I go to a nearby café afterwards. Really cool. So this would be useful if you had a work or school focus setup or a church or mosque something like that. If you scroll down you can also delete the Focus if you no longer need it.

Awesome so our Study focus is setup and ready to use. Guys don’t forget to check out my other videos such as how to find Purchase History on iPhone and iPad. And do me a favour if you know anyone who might like this video, please share it will them, hit the subscribe button and smash the bell icon.

Take Control of Your Notifications iPhone iPad iOS

Schedule Do Not Disturb on your iPhone iPad or iPod Touch

Hi Guys and welcome to 123myit, in this video we will show you, how to schedule Do Not Disturb on your iPhone, iPad, or iPod touch. So let’s say you have to do some study or you just want to concentrate on something without interruptions. Scheduling Do Not Disturb will silence calls and notifications during a period that suits you.

Setting Up – Schedule Do Not Disturb

Let us take a look. Go into Settings and tap on Do Not Disturb. Go ahead and toggle on the scheduled button. Tap on the Times and you can use the dial to change the Start and End times. I am going to change mine to 9am to 10am. So this means I won’t receive any calls or notifications from my phone during this time. Just tap back when you are done.

Schedule Do Not Disturb
Schedule Do Not Disturb – Quite hours

Next, up just tap always so you don’t get alerts while you are using your device.

If you need to see your alerts and the Do Not Disturb is on you can still check them in the Notifications centre. Nope no notifications for me! Time to Study now I guess.

Thanks for taking the time to look at this video. Please feel free to leave some feedback on any of the articles on 123myIT. We are here to help you where we can with your IT related issues.

Also guys don’t forget to check out my other videos such as iPhone 11 Pro vs Samsung S20+ Battery Test. And do me a favour hit the subscribe button and smash the bell icon.

Optimize Windows 10 for Gaming & Performance 2020

Setup Windows Hello Fingerprint