Turn on Voice Control on iPhone, iPad and iPod Touch

Voice Control the most over looked feature of the iPhone.

Hi Guys and welcome to 123, in this video I will show you how to Turn on Voice Control on iPhone, iPad and iPod Touch. Voice Control allows you to control your iOS devices using just your voice. This is helpful if you have your hand full or have limited mobility.

To turn on voice control go into Settings > Accessibility and Voice control.

Voice Control iPhone
Set Up Voice Control

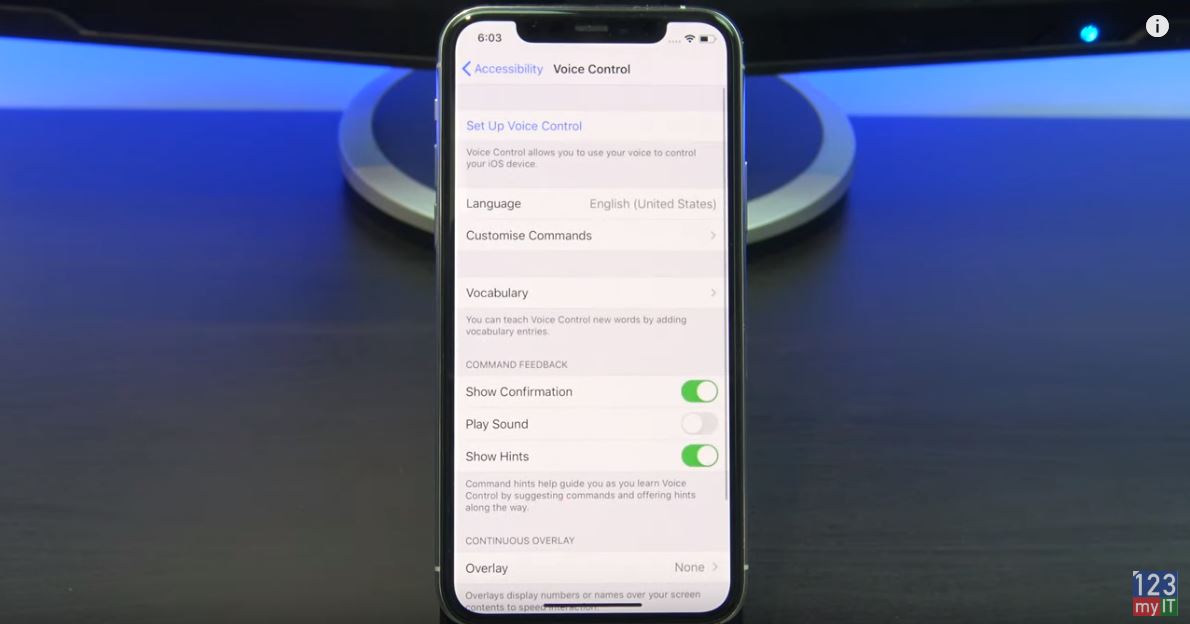
Next, Tap on Set Up Voice Control. Voice control might need a small download when setting up, but after that, It doesn’t need an internet connection. Tap continue. In addition, it gives you a short list of commands. So we will go through these in a second. First, I want to show you how you can turn Voice Commands off and on using Siri.

Try some Commands

Ok let try some commands. When Voice Control is turned on you will see a blue microphone in the top left of the screen.

If you want to go to the home screen, say Go Home. Swipe Left to swipe left. If you get stuck for commands simply say. If you want to check out control centre, say Open Control Centre.

Awesome if you want to see other commands you can use just say, Show Commands.  Ok lets take some pictures.  Open camera. If you want to know, the names of the settings to use say Show names. In addition, to take a picture just say, Tap Take Picture.

Moreover, if you want to Zoom in just say Show Names to find the Name. Then Tap Zoom. If you want to lock your screen just say Lock Screen.

Some other commands are, Take screen shot.  Turn on Smart invert colours.

Also guys don’t forget to check out my other video such as 10 iPhone settings you need to turn off straight away. And do me a favour hit the subscribe button and smash the bell icon.

Forgotten Passcode on iPad, iPhone, or iPod Touch 2019

Gaming PC Setup – Turn Off Turbo Boost to Fix Lag

Transfer Data Old iPhone to New iPhone

How to change the lock screen timeout on a Mac

This video will show you how to change the lock screen timeout on a Mac.


So you have setup a password on your Mac, but the annoying thing is the screen times out too fast. You can change the amount of time the Mac takes for the lock screen timeout.

Why does the Screen Timeout on a Mac?

Sleep mode is designed to save battery life and will start after a very short time. When you wake your Mac up from a lock screen timeout you will be prompted for your password.
the good news is you can tell your Mac how long you want this time out to be.

The picture below is of the Security and Privacy settings in your Mac settings.
Security and Privacy

Step 1 – Security and Privacy

If you want to change your time out you will need to go into System Preferences and then Security and Privacy. To change the settings in here you will need the Admin password and this will prompt when you click the Pad Lock icon. Next up enter you Admin password. So where it says Require password immediately, click the drop down menu. And then select a time that’s suitable. Remember you want to try and find a nice balance between annoying and helpful time outs. Also remember that having a time out set for too long will have an effect on your Battery life.

Step 2 – Turn lock screen off

To turn your lock screen off, simply reverse the steps taken above. You will be able to test the time out settings by going to Apple menu and sleep. I hope this helps.

Ok Guys, Don’t forget to check out my other videos.

Clean Install MacOS Catalina on any Mac

Create macOS Catalina USB Installer Drive

Share files iPhone to Mac with AirDrop