Top 5 Android Settings to Turn Off in 2022

Hi Guys and Matt from 123myit here. In this video, we will show you my top 5 Android settings that you should turn off in 2022. Guys I’m going to show you some Android settings that you should turn off straight away. These settings are designed to take the load off your phones CPU which will speed your phone up or save the battery life. It will also help you increase the privacy on your phone. Let’s get started.

I am using a Samsung Phone, but if you are using a different phone, it might look a bit different the settings will be the same.

Turn off device scanning – Android Settings to Turn Off

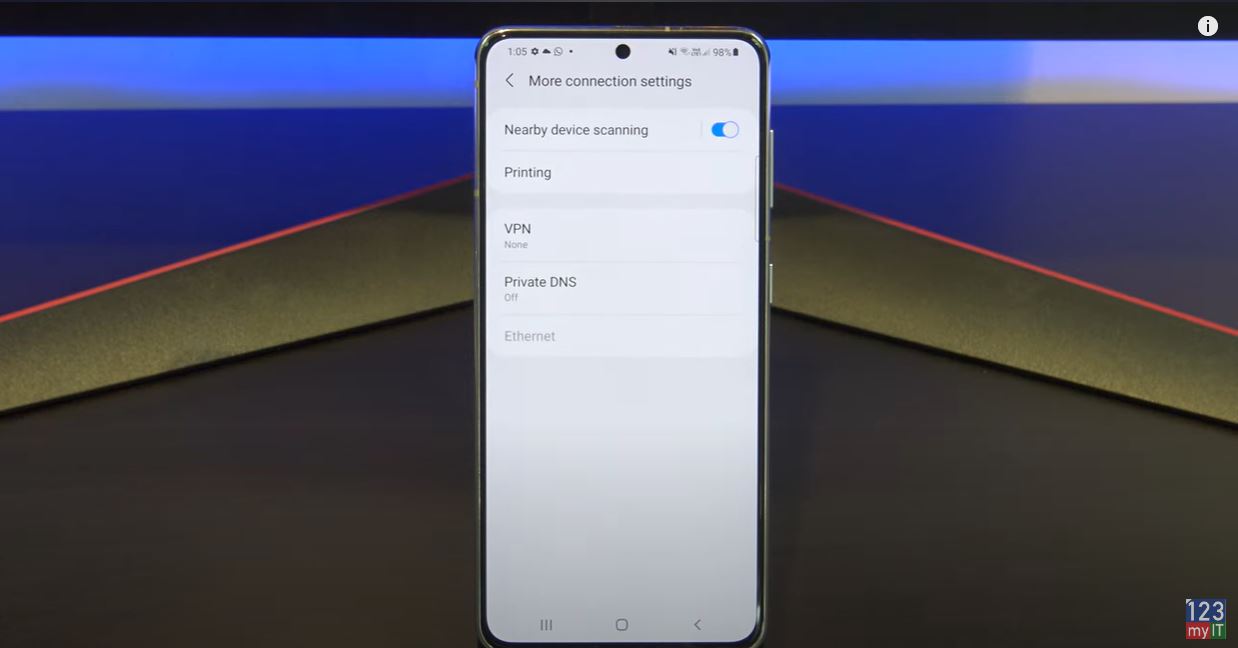
The first thing to turn off is nearby device scanning. And you can find it under Settings > Connections > More Connection Settings. This sets your phone to scan for nearby devices. This is constantly running so if you turn it off it will save battery power.

Android Settings to Turn Off

Next, you can turn off usage and diagnostic’s settings. This is information that is being sent to Google or Developers when you not using your phone and it chews up battery life. To find it go to Settings, Google and Tap the 3 dots in the top right and tap Usage and Diagnostics. Then just toggle the button off. Saves your battery life and cellular data. It’s a Win win.

Ads Personalization

Next setting is turning off Ads Personalization. You can find it under settings, Google, Ads. This is a funny one, have you ever been talking about something and then all of a sudden and ad for that starts popping up on your phone? This data is collected and sent to ads networks so they can send you more relevant ads. It’s too creepy in my opinion. To turn it off you actually need to turn this one on to opt out.

Improve accuracy

Next, we will talk about Turning off Improve accuracy with WIFI and Bluetooth scanning. You will find it under Settings, Location and tap Improve accuracy. If you turn these two settings off, you will save a ton of battery life. And toggle the WIFI and Bluetooth buttons off. Great your phone will not be constantly scanning, and your GPS will still work no problems there.

The next one is Google location history. You will find it under Settings, location and Google Location History, this lists all of the locations you have been. It’s similar to iPhones significant locations where is saves a long list all the places you have been. It’s a bit weird in a tracking sense. So just, turn it off at the bottom. Done.

Guys don’t forget to check out my other videos such as how to forward calls on Android in 2022. And do me a favour if you know anyone who might like this video, please share it will them, hit the subscribe button and smash the bell icon.

Using Focus on iPhone iPad and iPod touch

Everything Huawei P40 Pro in 3 Minutes

Hi guys and welcome to 123myIT. In this video, we will show you everything you need to know about the Huawei P40 Pro in three minutes. Huawei released three different versions of the P40, there the P40, P40 Pro and P40 Pro Plus. Pricing for the base P40 model starts around $700 USD and it comes in five different colours, Silver, Gold, Blue, Black and White.

The Box

On the outside of the box you will see that the phone is co engineered with Leica and down the bottom you will see explore it with App Gallery. So Huawei is advertising their own app store in the absence of the Google stores.

Deeps Blue Sea Colour – Huawei P40 Pro

Huawei P40 Pro
Huawei P40 Pro

First up in the box you will find the P40 Pro,the colour that we have is called Deep Blue Sea. Next you get the documentation, Quick start guide, SIM card eject tool and Warranty information. Along with a clear protective case. Other accessories are Earpods with USB C connector. USB C cable and a forty watt USB C Super charger adapter. Forty watts should charge the battery from empty to 80% in thirty minutes. Not to forget that the P40 Pro supports 27 watt fast wireless charging and the P40 Pro Plus supports 40 watt fast wireless charging. To put that in perspective the wireless charger on my desk only supports 10 watts max. So 40 watts wireless charging is incredible. Both models are IP68 dust and water resistant.

OLED Screen

The P40 Pro has a 6.5-inch OLED Capacitive touchscreen. It has a 1200 by 2640-pixel resolution at 441 pixels per inch. If you compare it with the iPhone 11 Pro on the left, you can see the P40 Pro has allot more screen real-estate on its 6.5-inch OLED display. Comparing the Samsung Pro Plus model has a slightly larger 6.7-inch display.

FingerPrint ID & Face Recognition

The P40 Pro comes with fingerprint ID and Face Recognition. And you can set these up at the start. There are two options side unlock by default or direct unlock which is my favourite. Slide unlock means you will need to slide the screen to get to the Home screen. Direct unlock will take you to home screen without the need to slide.

Camera

On the front top of the P40 Pro we have a 32 megapixel camera which has a F2.2 aperture. On the back of the P40 Pro you have the colour Deep Sea Blue and four cameras, all of the P40 models have a 50 megapixel Zoom lens standard. Which offers better low light performance. However the P40 Pro also features a 40 megapixel Ultra Wide lens and a 12 megapixel 5 times optical zoom. It also has a time of flight sensor, which give depth information for better portrait photos.

Here’s a side by side comparison of the back of the iPhone 11 Pro and Huawei P40 Pro.

Out of the box the P40 Pro will take amazing photos. Here are some comparisons between the iPhone 11 Pro and The Huawei P40 Pro. Can you spot the difference?

Around the Phone – Huawei P40 Pro

The right side you have Sleep Wake power button and Volume up and down button. On the left you have the Ring Silent and Volume up and down buttons. On the top you have microphone pin holes. Around the bottom you have the sim card slot, microphone, USB C slot and stereo speakers.

The P40 Pro has a Kirin 990 processor which seemed to work well for the games and movies that I tested. And a fast processor is important when playing games and videos or when generally moving around the iPhone.

Battery on the P40 Pro  is a 4200 mAh and you can expect about 13 hours between charges.

Guys, don’t forget to check out my other videos such as how to record your screen on a Mac. Also do me a favour if you know anyone who might like this video please share it will them, hit the subscribe button and smash the bell icon.

Transfer Data Android to Android 2020

Hi Guys and welcome to 123myit. In this video, we will show you how to Transfer data from Android to Android in 2020. Ok Guys If you are transferring data from any Android device to Samsung then you will be able to transfer Calls, Contacts, Messages, Calendar, Apps, Photos, Videos, Music and Documents. IF you transferred from Samsung to other devices, you will be able to transfer Contacts, Calendar, Photos and Videos.

Getting Started – Transfer Data Android

First up we are going to transfer data from my Oppo Phone to my Samsung phone and we are going to use an app called Smart Switch. Most Samsung phones will have the smart switch app already installed under Settings > Accounts and backup. But if you cant find it on your device you can download it from the Google play store.

I already have it installed so I am going to tap open and do the same on your other Android device. Tap agree and then allow. This will give the phone access to your files so it can transfer the data. Tap lets go and then tap Wireless. Make sure both devices are on the same WIFI network. Tap receive data, Tap from Android and then tap Wireless.

android to android
Get Connected Moving your data on Android

If all is going well you should see a pop up to allow access on your other phone. Just tap accept or allow. Your devices should then work out what data it can copy across. Alright choose what to bring, just deselect anything you don’t want to copy across. If you scroll down you should also get an SD card option.

Select what you want to Transfer

I am going to deselect everything and only copy across my Calls and Contacts. Once you are done tap transfer. Awesome all your stuff is copied across now. Alright lets go back the other way now. We are going to use an app called Copy my Data. You can download it from the Google play Store. I have already downloaded it so I will just start the app. Download and start the app on your other device. Tap next on both devices. Tap to or from another device over WIFI. Select your device then select copy data to selected devices. Add in the pin number. Then tap next. Deselect any of your data you don’t want to copy across. I just want my calendar and then tap next. Just tap allow on your other device. Congratulation you have just copied your data between two Android devices.

Also guys don’t forget to check out my other videos such Change Bixby side button on Samsung. And do me a favour if you know anyone who might need this video please share it will them, hit the subscribe button and smash the bell icon.

Make your Phone Number Private on Android in 2020

Copy Data iPhone to Android with iCloud 2020