
Hi Guys Matt from123myit here, in this video I will show you how to an unboxing and first look at the LG UltraGear Gaming Monitor.
The Specs -LG 27GL850-B Gaming
The LG 27GL850-B is a 27-inch 1440p QHD Gaming monitor with a 1 ms response time. It has a refresh rate of 144Hz and its also Gsync and Free sync compatible by using Adaptive Sync. The 27GL850-B is a great buy at the moment retails for around $350 usd and $550 Aussie at the time of this video. If you are interested, I will put a link in the description below.
Other features include black stabilizer and HDR10 support. Let’s take a look what you get inside the box.
Inside the box
First up inside the box you have the base of the monitor stand. It has a black plastic cover with red highlights. Inside the LG UltraGear black box, you get a power plug. So, an Australian New Zealand power plug, but if you are in the US, you would get a US power plug. The power supply is not built into the monitor, and it comes as a separate power brick much like you see with laptop designs. I tested the power draw with HDR Effect turned on which is a bright setting, and the monitor uses about 26 watts of power. When I changed it to Reader it used 13 watts.
Power usage
The worst part when the monitor was turned off totally it still was using 1 to 2 watts while not in use.
Next in the box you have a little cable tidy, Display Port, USB 3.0 and HDMI cable. Also, in the box you have a driver CD, quick start guides and warranty information.
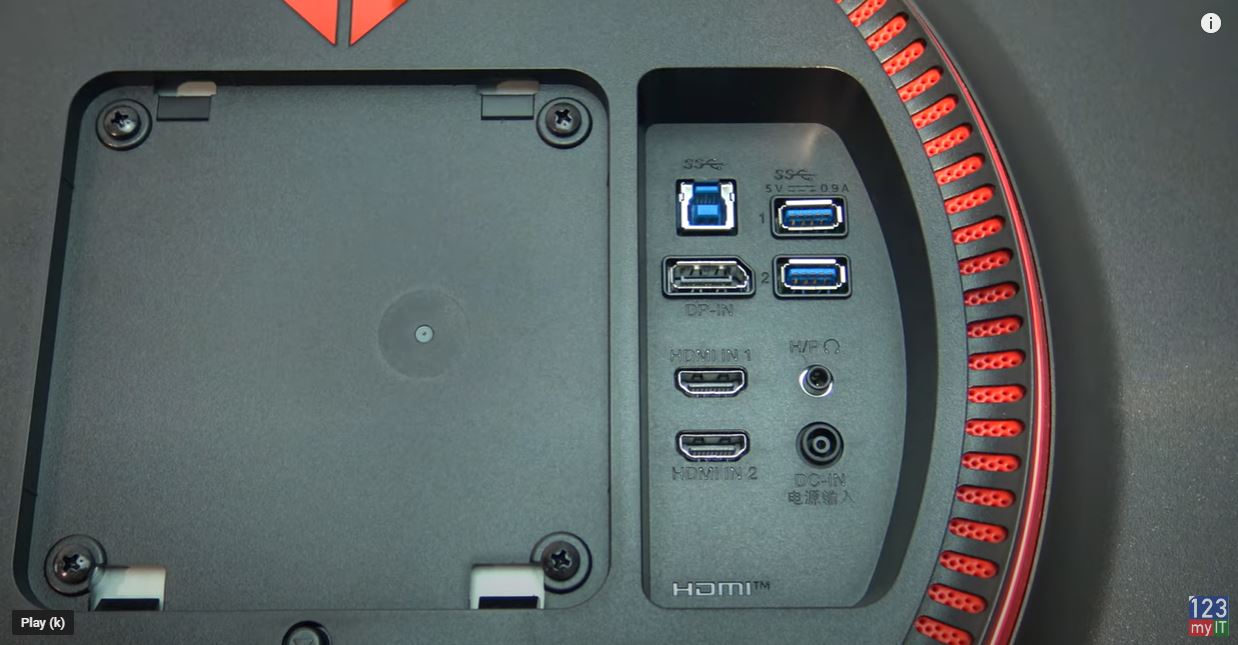
Next up is the arm that connects to the monitor to the base. Taking the monitor out of the box it’s an IPS display so blacks should look darker and colours will be brighter than a TN display. On the back you will see two HDMI and USB down ports. Along with one display and USB up ports. And if you have a VESA stand you can also attach your own.
The Stand
While the stand is solid there is some wobble, but it’s not a deal breaker. You can adjust the height and swivel as well as put it in portrait mode. Here it is beside the Aorus KD25F, which is a TN panel. Can you make out the deeper blacks and brighter colours?
Remembering that its a Nano IPS panel with a resolution of 2560 x 1440 and 350 nits of brightness.
FreeSync and G Sync
To start the OSD there is a little joystick under the logo. The thing I really like about this is it tells you the refresh rate straight away. Sweet so its running at 144Hz and you can see Adaptive Sync is on. In Game Mode it has some modes already to go which is nice. For best results in games, I set this to FPS with and went into the Game Adjust menu and turned Adaptive Sync off. The reason for this is when Adaptive Sync is turned on the Frame Rate in PUBG dropped making it terrible to play.
Adaptive Sync
If you can’t get Adaptive Sync to turn off, go into the NVidia control panel and take the tick out of Enable G-Sync. I am assuming it will be the same thing for AMD graphics cards. Once you have that turned off, go down to Response Time and make sure it is set to fast not faster. This is because the Faster setting only works with allot of errors and it looks bloody terrible.
Try it an test a game. Don’t take my word for it try it yourself. Next up to add a cross hair, go down to the Cross Hair menu and select the cross hair you want to use. I always go for the red one works best for me. Alright go in and check your display settings and make sure your 27GL850 is set to 144Hz.
On the Back
On the back the monitor has a USB hub which I really like as it allows you to plug in extra devices for your desktop. I use a desktop mic so when I turn my monitor off it also turns the mic off which is handy.
Testing how well games play
Alright let’s fire up PUBG and do some testing. So, with Adaptive Sync turned on I was getting around 71 to 74 frames per second. And with it turned off the frames improved all the way up to 110 frames per second. So, you can see why some BenQ monitors don’t even include Gsync FreeSync as it might not always be suitable.
Also, guys don’t forget to check out my other video such as How to Arrange your iPhone icons the Easy Way!. And do me a favour hit the subscribe button and smash the bell icon.