How to join a Zoom Meeting PC & Mac

Hi guys and welcome to 123myIT. In this video, we will show you how to join a Zoom meeting.

If you have been asked to join an online Zoom meeting but have no idea how to do that, do not freak out. This video will show you how to do it.

Guys this video will show you how to Join a Zoom meeting, but I will also be doing a video after this one which shows you how to create a Zoom meeting. So please hit that subscribe button.

Setup Zoom on PC and a Mac

I will show you how to do it on Windows first then Mac later in the video. Ok Let’s get started. Open up a web browser and type in Zoom.US.

That will take you to the official zoom website and you should see the Join a meeting link on the top of the web page. If you click on that it will take you to a Join a Meeting page, where is asks you for a meeting ID. Below that you also have an option of joining a meeting from H.323/SIP room. Don’t worry if this doesn’t make much sense to you just pointing this out so you know where to go if you need to connect to this type of meeting.

Ok let us check the meeting invite details that were emailed to us. So if you have been invited to a meeting you will normally have some meeting details sent to you via email. Here I have a copy of that invite which says 123myit is inviting you to a scheduled Zoom Meeting. Topic My meeting and a link which you can use to join a meeting. Go ahead and copy that link and paste it in your browser.

Meeting ID details

Press Enter on your keyboard and the meeting will start. You can also copy and paste the meeting ID directly into the web page or if you have the Zoom app installed you can copy the meeting ID into the Zoom app. And below that you can change your display name. When using the Zoom app you might be prompted for a password copy and paste that to join the meeting.

You might be prompted to download the Zoom app or if you already have it installed you will be prompted to Open Zoom meetings.  You should then see a popup, which says Please wait for the host to start this meeting. As you can see the meeting starts at 12pm but the time now is 11:15am. So we are a bit early. While we are waiting click test Computer Audio. In here you can test to see if your speakers and microphone are working. If you have different speakers and microphones you can change which one you want to use in these settings. For example you might have desktop speaker or headphone.

Join a zoom meeting
Zoom settings important to setup before you start.

Video Settings

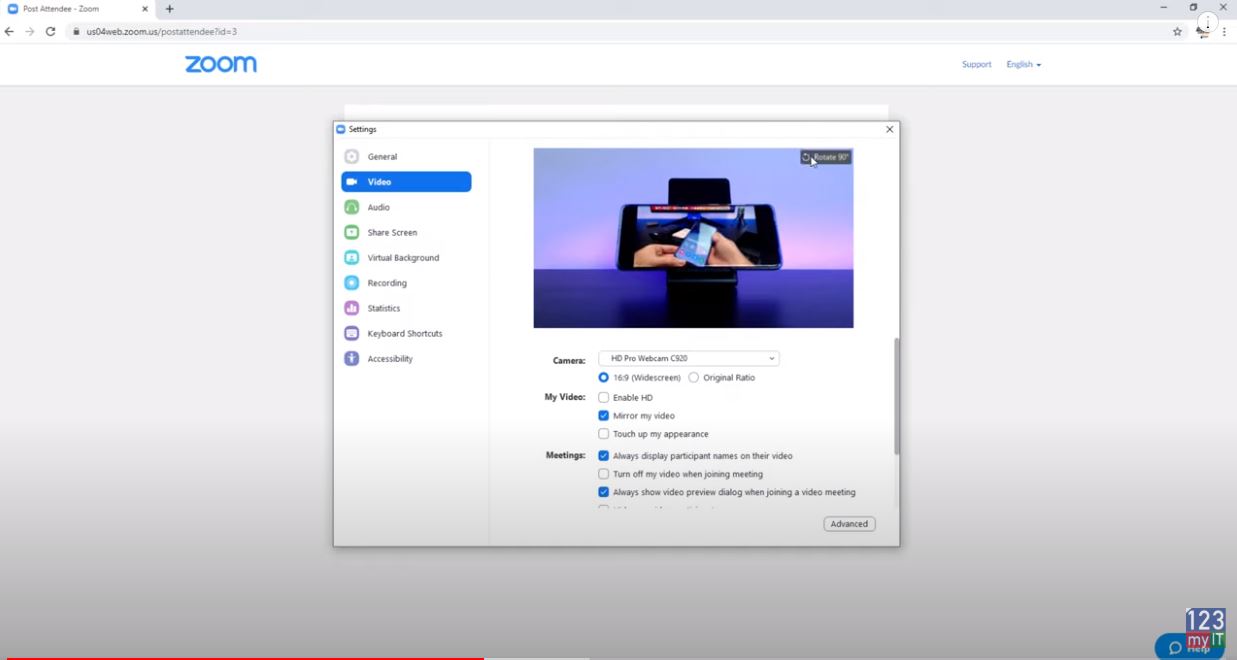
If you click on Video you can change you video settings around. So here my webcam is just pointing at my Samsung phone playing a video. If you want you can rotate your video. Under camera if you have more than one camera you can select a different one. Below that you can change the ratio from Widescreen to Original. Enable HD just allows you to up the resolution so that your camera looks less pixelated. Mirror my video flips the video around. This is important if you are reading a book or something and you want to turn the text around the right way for your views to see it. Touch up my appearance makes the video look better.

Virtual Background

Ok click on Virtual background. This allows you to virtually add a background behind you. So if I select the 123myIT logo I can add it behind me. If we untick mirror the logo faces the right way. Note that its not picking up the phone very well. We can fix this by using a green screen. I don’t have a green screen cloth but I can change the LEDs in the background to green. Watch this.

There you go you can see the phone now. Its not perfect but work pretty well on my hand!

Ok the meeting has started. Just select join with computer Audio. The first thing that I recommend doing is turning off your Audio and video in the bottom left until you are ready. Otherwise, you might interrupt the Host if he or she has started speaking. Next up select participants and chat in the bottom, this will allow you to see who is in the meeting and display the group chat if you have a question. 

Webcam

If your not camera shy you can show your video by pressing the Start video button in the bottom left hand corner along with the Unmute button to start speaking. If someone else is speaking its good practice to mute yourself until you want to talk again. Along the bottom you also have a thumbs up and clap reaction which displays on your video. You also have buttons to share your screen and record.

In the top you have gallery view and speaker view buttons. It just changes the view so you can see more participants if you need too.

If you want to make sure you leave a meeting, click the leave meeting button in the bottom right of the screen.

Join a Zoom Meeting on a Mac

Joining a meeting on the Mac is pretty much the same. Go to Zoom.us in the web browser. Click Join a meeting. Copy and paste your meeting id. If its your first time joining a meeting click download and run Zoom app. Press continue and enter your password to install. Paste your meeting ID and change your name if you want and click join. Copy and paste your password.

Congratulation you have joined a Zoom meeting. All the options will be the same as the first part of this video.

Also guys don’t forget to check out my other videos such as Install Windows 10 on a Mac 2020. And do me a favour if you know anyone who might need this video please share it will them, hit the subscribe button and smash the bell icon.

Copy Music from Android to iPhone, iPad & iPod

How to Clean & Disinfect your iPhone & Case

Gaming PC Settings – Nvidia Control Panel

Use the Nvidia control panel to increase performance of your games.

Nvidia Control Panel – What can it fix?

If you are having issues with your Gaming Pc such as Low Frame rates
Game lag or Game Stuttering, then this video should help. By following this video and optimizing the Nvidia control panel you can do the following.

  • Increase your Frames rates.
  • Fix Game Stuttering
  • Increase power
  • Optimise Nvidia GPU
  • Best colour settings and brightness for games
  • Smooth out your gameplay

As mentioned this video is for Nvidia GPU, If you have an AMD GPU I plan to do video for AMD as well so make sure you hit the subscribe button.

Nvidia Control Panel – Config

Alright first step is to open your Nvidia control panel. You can do this by right clicking the Desktop and selecting Nvidia control panel.
If you cant find it there try looking in the bottom right hand corner of your screen near the time. If you still cant find it, check what GPU you have installed by right clicking the start button and selecting Device Manager.
Under Display adapters you can check what Nvidia GPU you have and download the driver for it.

Download your GPU drivers – Nvidia.com

Head over to nvidia.com and download your driver or you can download the GeForce Experience software and I will leave links to those pages in the description below.

In the Nvidia control panel go to Adjust image settings with preview. Click on use 3D image settings and click Apply.
Next up click on Manage 3D settings and make sure you are on the Global Settings Tab. These settings will apply globally you can change these at any time or click restore if you want to set settings back to defaults.

  • Set Ambient Occlusion to Off
  • Anisotropic filtering to Off
  • Antialiasing to Off
  • Leave Gamma correction On
  • Antialiasing – Mode Off

Antialiasing on or off?

Don’t worry you can still turn Antialiasing on in Game. Also if the options aren’t the same as this video just change the options that are the same.

  • CUDA -GPUS Should be set to all.
  • DSR Factors should be off.
  • With Maximum pre rendered frames set this to 1, if you have an older pc you can try setting this to 2 or 3. But if you have a newer PC set this to 1.Multi-Frame Sampled AA set to Off. Open GL set to Auto.
  • Power Management Mode set this to Prefer Maximum Performance.
  • Preferred Refresh rate set it to Highest Available.
  • Shader Cache set to On.
  • Turn on – Texture Filtering – Anisotropic
  • Texture Filtering – Negative LOD Bias set to Allow
  • Texture Filtering – Quality set to High Performance
  • Threaded Optimisation you can set to Auto, however if you play games like PUBG, FORTNIGHT and Battlefield which are quite demanding. You can set this to On.
  • Triple buffering set to Off
  • Vertical sync to Off
  • Last setting Virtual Reality pre-rendered frames set this to the same value as Maximum pre rendered frames.

Once you are done make sure you click Apply. Once you have set this go ahead and click Apply.
Next up go back to the left hand side and click on Adjust desktop colour settings.
Select the Use Nvidia Settings on the right.
Click Apply then click Yes.

PRO TIP!

Heres a little secret. If you play first person shooters you have just made the colours much better than the default ones by selecting Use Nvidia settings. Also if you scroll down to the Digital vibrance slider its default settings is 50%. If you slide this upto 80% suddenly the dark areas of your game will become much brighter. This will allow you to see your emimenes in game before they see you. This really helped me allot in PUBG.

nvidia control panel
PRO TIP: Use Nvidia settings to control brightness and colour – this helps when spotting enemies.

Best image and colour settings

Click Apply and then go to the Adjust video colour settings.
Next up select the with the Nvidia settings. Click onthe Advanced tab.
In the Dynamic range drop down menu select Full. Next click Apply this should allow you to see better colours when watching videos.

Next go to the Adjust video image settings.
In here you can also use the Nvidia settings and change these however you like. These last two settings only change video and image settings outside of Games and they wont effect Gaming performance.

Another point to mention is, if you update your Nvidia driver, make sure you come back to this video and check that the driver update hasnt reset your Nvidia control panel settings back to defaults. And lastly I get asked allot of questions about customising Windows 10 and AMD settings I will do a few more videos on this topic so do me a favor. Hit the subscribe button and smash the bell icon.

iPhone Battery Drain – Is your iPhone letting you down?

Setup Bedtime on iPhone

Apple Shutting Down iTunes

Backup Samsung to PC or Mac

Step by step guild on Backing up your Samsung device.

In this video and article we will show you how to do a backup and restore of your Samsung device to PC.

Have you ever thought about what might happen to your pictures and videos on your Samsung device if you lose or break it? You don’t need to take the risk you can do a backup and restore with the following steps. Also if you are getting pop up ads on your device and want to clean it these steps will help. If you have a Mac You can also backup your Samsung device to a Mac.

Backup Samsung via Smart Switch app

To do the backup we are going to use an application called smart switch. You can find the direct link to the Smart Switch website here.
In the download section scroll down to where it says smart switch and click that link.
That will take you to the Samsung US website. And you can download Smart Switch for Mobile, Mac and Windows.

Backup Samsung
Plug your Samsung into your computer to start the Backup

Click the Windows link and download Smart Switch to your desktop.
Once its downloaded install the Smart Switch app. You will need to agree to the terms and conditions. Plug your Samsung USB into your computer. Tap Allow access on your Samsung Device.

Encrypt your data that you are Backing up

If you want to encrypt the data that you store on your Computer with a password go to more and preferences. Then select the checkbox Encrypt backup data. Next up just click on Backup and it will ask you for a password for your backup. You will need to enter the password on your Samsung device. So go a head and Enter a security code on your Samsung device and then confirm it.
Once its finished doing the back up it will give you a list of items that’s have been backed up successfully and a list of items that it didn’t backup.

Click ok and if you want to know what location your files have been backup in simply go back to More and Preferences. It will be under the Backup folder location.

Wiping the Samsung Device

In the video I am going to reset the Samsung device back to factory defaults. So it will wipe any data on the device and I will restore the data from the backup we just created.
I will do this under settings > General Management > Reset > Factory Reset data. However once the Samsung device has been wiped so just go ahead and set it up like a new phone again.

Plug your Samsung back into your computer with the USB and press restore. You will need to tap allow on you Samsung device again. Press Restore now.
And then you will need to enter the password you setup earlier when you created the backup.

Once your data has finished copying you can disconnect your USB cable. Go ahead and double check all our files have been restored and there they are.

Ok Guys, Don’t forget to check out my other videos.

Enable Window Zoom on iPhone or iPad

Make your iPhone iPad speak each word you type

Clean Install MacOS Catalina on any Mac

How to install WhatsApp Messenger on a PC

Hi All,
I have a friend who told me about “WhatsApp” Messenger and how she was using it when she was over seas. So I thought I would take a look at it and see what the ever popular App is all about.
Its a messenger App like the rest but it replaces phone SMS by using the phone’s 3G/EDGE or PC’s internet connection to send chat messages. This allows you not to pay for SMS in your phone carriers bill.
And you have a free Wifi, then essentially you can chat completely free. WhatsApp is currently the No. 1 paid social networking app on the iTunes App Store and currently number 13 on Google’s Play free App store. Whatsapp currently has over 200 Million monthly active users and is a cross platform app which is also available on Blackberry and Windows phones.

Features Include
* MULTIMEDIA: Send Video, Images and Voice notes to your friends and contacts.
* GROUP CHAT: Group conversations which supports up to 30 people!!!
* NO INTERNATIONAL CHARGES: No charges with international email and messages as long as your friends have the app installed you can avoid SMS costs.
* SAY NO TO USERNAMES AND PASSWORDS: Whatsapp uses the contacts already in your phone.
* OFFLINE MESSAGES: Messages sent while a contact is offline still goes through when they come back online.
They do have fine print which also states “When roaming, additional carrier data charges may apply, contact your carrier for more info. 🙂 sneaky

Whatsapp Messenger Chat

In the video above to install Whatsapp on a PC, you need to run BlueStacks software. The direct links can be found under the downloads section on this page click here.

Good luck and have fun with it 🙂
Matt