How to do a clean install of OS X Mavericks from USB

This video and article will show you how to do a clean install of OS X Mavericks from USB.

Step 1. Create a OS X Mavericks USB drive. You can do that by following the 123myIT video guide here.

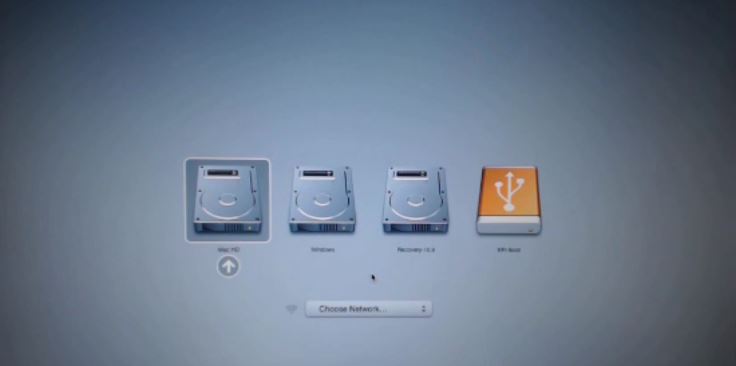
Step 2. Once installed, plug the USB into the side of your computer restart the Mac and hold down the ALT or Option key on the keyboard of your Mac.

Step 3. Use the arrow keys on your Mac keyboard to navigate to the USB drive that you have plugged into your computer. Once highlighted press Enter or Return.

Mac Preboot Menu

Step 4. That will bring up the OS X Utilities menu. At this stage you can opt to format the hard drive with Disk Utilities. Make sure you backup your data before you do this as you will lose any data on the drive when you format it. If you want to know how to do a backup with Time Machine click here.

Step 5. Go back to Install OS X and follow the prompts. You will be asked to agree to Apple terms and conditions and you will also need to select the hard drive you want to do a clean install of OS X Mavericks on.

Step 6. This process should take around 30 mins depending on the speed of your Mac. The Mac will reboot a few times while this is happening.

Once the Mac restarts one last time and then you are done you will have to setup your Mac as if it was brand new from the Mac store. You will need to setup the country location, Wifi and there is also an option to transfer some files between your Mac and other computers. Then setup your Computer account.

For more information on OS X Mavericks you can check out the Apple official website here.

SATA VS SSD Benchmark Which is better?

This video will show you the performance difference between SATA VS SSD hard drives. These drives have both been put through 3DMARK, PCMARK and Windows Experience Index benchmarks.

Hi All
I wanted to do some benchmark testing with the new Asus G750JX laptop I purchased recently. So I ran the three benchmarks 3DMARK, PCMARK and Windows Experience Index on both the SATA and SSD drives and then was able to compare the scores. The only variable was the SATA and SSD drive.

Here are the results.
3DMARK SATA vs SSD
108246 vs 108956 The SSD was better by 710 points
14844 vs 14892 The SSD was better by 48 points

PCMARK SATA vs SSD
4459 vs 4938 The SSD was better by 479 points

Asus G750 Gaming Laptop Unboxing Review and Benchmark

This video will show you an Unboxing, Review and Benchmark of the Asus G750JX-TB71 Gaming Laptop.

Hi All
Recently I upgraded my laptop from the Asus G75VM-RS72 to the Asus G750JX-TB71. The main reason for this is because I am a gaming fan and I like to have a decent gaming pc. However because I am limited on space in my house at the moment I don’t have any room for a study. So the trade off is a high end gaming laptop. After using the Republic Of Gamers laptop for about a year now I think its actually a better solution and here’s why.

First of all the laptop takes up less space and uses much less power than a desktop box.
Secondly its very portable. I can move to any part of my tiny house and occasionally I take it around to a mates place for a night of gaming. In the last year it has been mostly Guild Wars 2. However I am hanging out for Elder Scrolls online. 🙂

What I really like about the ROG laptops is decent gaming performance plus the design of the laptops are very good. The air flow and cooling vents makes for a quite and cooler laptop. The non slip rubber type black plastic allows the user to rest the laptop in your lap without the danger of it slipping off.
The laptop doesn’t have ugly flashy lights like the Alienware or the MSI range of laptops. So maybe it is suited to the more mature gamer such as myself.

All this has sold me on the Asus over the Dell XPS range. And while I still like Dell, the performance and design of the Asus has won me over for now at least.

Now that I have all of that out of the way, I will add the links for the benchmark software that I have used in the video above to this post below. Feel free to download and compare the results of your own laptop to this video.

You can find the Benchmark downloads on the Downloads section of the 123myIT website here.
CPU-Z 1.67.
GPU-Z ASUS with ROG skin 0.7.4.
hwmonitor 1.24.
PC Mark 8.
3D Mark 8.

How to activate Windows 8 with command prompt a step by step guide.

This video has been removed for the time being. Check back later for an update.

This video will show you how to activate Windows 8 with command prompt a step by step guide.