Hi Guys Matt from 123myit. In this video, we will show you how to enable TPM PTT on your Gigabyte motherboard. Guys if you are trying to install Windows 11 and you are getting the error The PC must support TPM 2.0 then this video will help. TPM stands for Trusted Platform Module and it can prevent malicious attacks on your hardware. And is required to be turned on to run Windows 11.
Heres the error to look out for – tpm 2.0 error gigabyte
Go ahead and restart your computer and you need to log into your computer bios. To do this when your computer starts up you need tap the delete button on your keyboard. For my Gigabyte motherboard the button is Delete, however if can be different on different motherboard. If its HP it could be F10. Other models it could be Esc, F1 or F2 keys.
Once you are logged into your Bios go to the Peripherals tab up the top. Then to Intel Platform Trust Technology PTT. And then set it to Enabled. That is that all you need to just make sure you save it by going to Save & Exit. tpm 2.0 error gigabyte.
Awesome, this time when you go to install Windows 11, you should get past that error and get the ready to install screen.
Guys don’t forget to check out my other videos such as how to download Windows 11. And do me a favour if you know anyone who might need this video please share it will them, hit the subscribe button and smash the bell icon.
Hi Guys and welcome to 123, in this video I will show you how to turn off Turbo Boost in the bios.Ok guys about 2 years ago I made a video on how I fixed CPU Game Lag by turning off Turbo boost on a laptop with software. And you can find that video here.
A few of you guys are still having issues, mostly on laptops where your CPU heats up and it start to throttle down to stop itself from over heating.
What you can do is turn off Turbo Boost and this will reduce heat of your CPU, stop the CPU from throtling back and then this should stop your Game from lagging.
On my ASUS laptop the software helped me and allot, but some users couldnt use the software because their CPU wasnt supported. This video should help resolve that issue. Lets get started.
CPU Check – turn off turbo boost
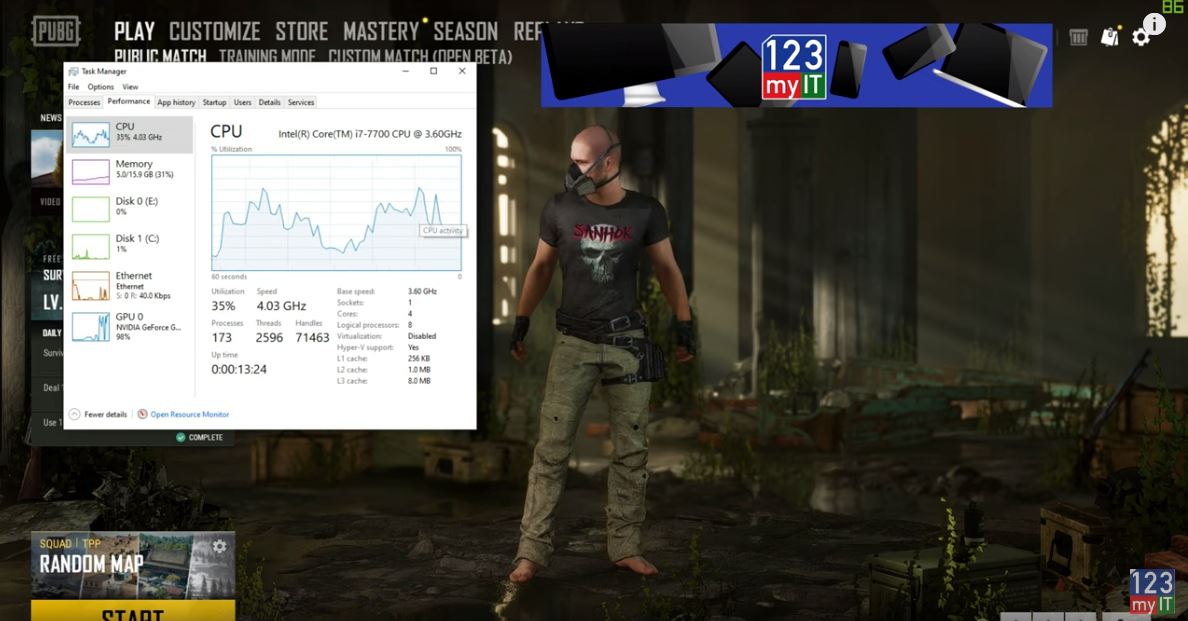
Ok so the first thing to do is check your CPU. We can do this by right clicking the Taskbar and going to Task manager. Once in there if you click on More Details and click the performance tab. Click and highlight CPU and take note of your CPU speed and base speed. As you can see my base speed is 3.6GHz and my actual speed is 4.00GHz. This means I am getting Turbo Boosted from 3.6GHz to 4GHz. So turning this off should drop my speed back to 3.6GHz.
Check your CPU performance first so you can check the bios change.
I know what you are thinking, hey but wont that reduce the computer speed. Kind of yes, but it will reduce heat and may fix your lag. Plus you can turn this back on at anytime. Before I show you how to turn it off, let start up your game that you are having problems with and check what your CPU is doing. In my case its PUBG.
Alright start your game up and press Alt Tab to show your Task Manager and you should see some more activity on your CPU now. For me you can see that it doesnt really go past halfway and actually most of the work is being done by the NVidia GPU which is sitting on 98%. This is a good sign that Turning off Turbo Boost shouldnt effect the game play.
Enter Bios
Ok Restart your PC and tap your bios key to get into bios. For my ASUS mother board the bios button is Delete. However on different brands it could be Escape, F1 or F2 or something different. On some motherboards its F10 if you cant work it out check the manufactures website.
Once you are in your bios it should look something like this. You will need to find your CPU menu. For me its in advanced mode.
Click the Advanced tab and then click the CPU Configuration menu.
Scroll down to and find CPU power management control. You can see that Turbo Mode is Enabled. Just set this to disabled and press F10 to save changes. These steps should be simular for other brands of motherboards.
Test your settings change
Awesome you have made it this far restart windows and go back into Task Manager. Excellent you can see that the CPU speed has dropped down from 4GHz to 3.4GHz. This means that the bios change worked. Start your game back up and test and see if you are still getting the throttling game lag. If this doesnt help you can just go back into the bios and turn Speed boost back on.
Also guys don’t forget to check out my other Gaming PC Setup videos like Nvidia Control Panel. And do me a favor hit the Subscribe button and smash the bell icon.
123myIT’s video on How to Mod Sapphire RX 570 4GB Elpida Bios!
I use MSI Afterburner to adjust the clocks of the cards until they become stable. Stability is very important for mining cryptocurrencies as this allows your rig to keep mining when it might otherwise go offline. Because you are squeezing every inch of power out of your GPU by over clocking the GPU and undervolting it to save on power consumption.
AfterBurner Settings I use to get rig stable.
Power limit: -6 or -4
CoreClock: 1150
Mem Clock: 1970 or 1980 or 1990 or keep going up by 10 till its stable.
You can download the modded bios from the 123myIT Downloads section here. There is two different versions. 256 size version and the 512 size version. The Sapphire cards for some reason have two different type of bios sizes. Both should work fine, but you use these bios at your own risk. This bios was created by people on the Anorak.Tech website.
This video will show you how to update Asus laptop bios using a program called Winflash. Recently I did a video which highlighted an issue with the Asus GL702 Strix gaming laptop.
In game lag which would lag the game out every time turbo boost was used. I went and posted this fix on the Republic of Gamers forums and about a week later Asus released a bios fix. They also deleted my current post so thanks for that Asus.
However at least I highlighted an issue and they were able to fix the problem with a bios update.
Link below. https://www.123myit.com/2017/05/asus-strix-gl702v-game-lag-fixed/
If you go to the downloads part of the 123myit.com website. And scroll down to the bios link, I have added the BIOS upgrade for the GL702 system I have also added the winflash program.
You can use these two programs to upgrade the BIOS on your laptop. You can actually just download the winflash program and click on get bios from the web and it should go out and choose the correct bios for your model of laptop. If this doesn’t work I suggest doing a Google search for your correct model of laptop and then downloading the correct BIOS version for your laptop. Once this is done you will need to restart your laptop.