Hi Guys welcome to 123myIT! In this video, we will show you how to copy music from Android to iPhone, iPad and even iPod touch.
Guys this is the official way that Apple recommends to transfer you Music from Android to iPhone. However, you will need a computer to copy the music to first. Therefore, it can be a PC or a Mac.
If you need to transfer all your other files such as Contacts, Photos, Videos and Messages. I have already done a video for this and will put a link here.
Getting Started
The first step is to connect your Android device to your computer and find your music. On most devices, you can find these files in Music. On a Mac, you will need to install Android File Transfer, you can find the link on the 123myit.com website under downloads. Once you are on the Downloads page just scroll down to where it says, Android File Transfer. Then click on Download now and install the Android File Transfer software. Drag it across into your Applications folder. Once installed. Click on Go and Applications and open the Android File Transfer software. You might need to tap Allow on your Android device to give the computer access to your music folder. Close your windows and tap on the Android Transfer Software at the bottom of the screen.
Awesome you should now see the complete list of folders on your Android device. Find your music folder and drag it to the Computer desktop.
Unplug your Android
Once your music is copied, you can unplug your Android device you are finished with it now. Next, Plug in your iPhone iPad or iPod. Open up your Apple Music or iTunes. Then drag your Music folder from the Desktop into your Music or iTunes. Once that is done minimise your Music or iTunes app and the click on Go and Computer. Click on your iPhone and click on Pair if you have not done this already. Next click on the Music tab and put a tick in Sync music, then you can select Entire music library or you can do selected Albums. Once you are finished just click Apply, then go back into your iPhone and click Sync.
Cool, unplug your iPhone and check if your music copied across.
Using a PC to store and copy the Music.
Copying the Music on PC
The process is the same on PC but you will need to download iTunes. Open up the Android device in Windows explorer and copy the music folder to your Computer Desktop. To download iTunes you can Google it or I have put a direct link on the 123myit.com website under Downloads. Just scroll down to where is says iTunes download.
Once installed you can open it up and remove your Android device. Plug in your iPhone and tap Trust. Drag your Music folder from the Desktop into your iTunes app. In iTunes click on your iPhone then select Music and again you will have the options to choose Entire music library or Selected Playlists. Once done click Apply then click Sync. Go ahead, remove your iPhone now, and check the Music has copied across.
Guys don’t forget to check out my other videos such as how to clean and disinfect your iPhone. In addition, if you liked this video can you do me a favour and share it with someone who might need to know how to transfer his or her music. Don’t forget to hit the subscribe button and smash the bell icon.
Hi Guys and welcome to 123myit. In this video, we will show you how to transfer data from Android to iPhone in 2020. This video is the official way Apple recommends to transfer your data from Android to iPhone. We will help you transfer contacts, message history, camera photos and videos. Web bookmarks, mail accounts, calendars and free apps.
The first step is to reset your iPhone. If you don’t want to reset your iPhone then you will need to transfer the data manually.
Erase your iPhone – android to iphone 2020
Go into settings > General and scroll down to reset. Once you are there tap on Erase Content and settings. Next Tap Erase iPhone. This will delete all media and data so do a backup first if you need too.
Once your iPhone has reset itself. Just follow the prompts and start setting it up again.
Next up connect to your WIFI and make sure your Android device is connected to the same WIFI.
Download the App – Move to iOS
Continue setting up your iPhone until you get to the Apps and data screen. Once you’re on the Apps and data screen. Tap move data from Android. Before you hit continue, go to your Android phone and download the move to iOS app from the Google play store. Play.google.com
I have already downloaded it therefore, I am going to press open. Tap continue, agree and then next.
Could not communicate error?
Tap continue on your iPhone and on your Android device type in the code that you see on your iPhone. If you get the error message could not communicate with the device. I have already done a video on how to fix this. Link here.
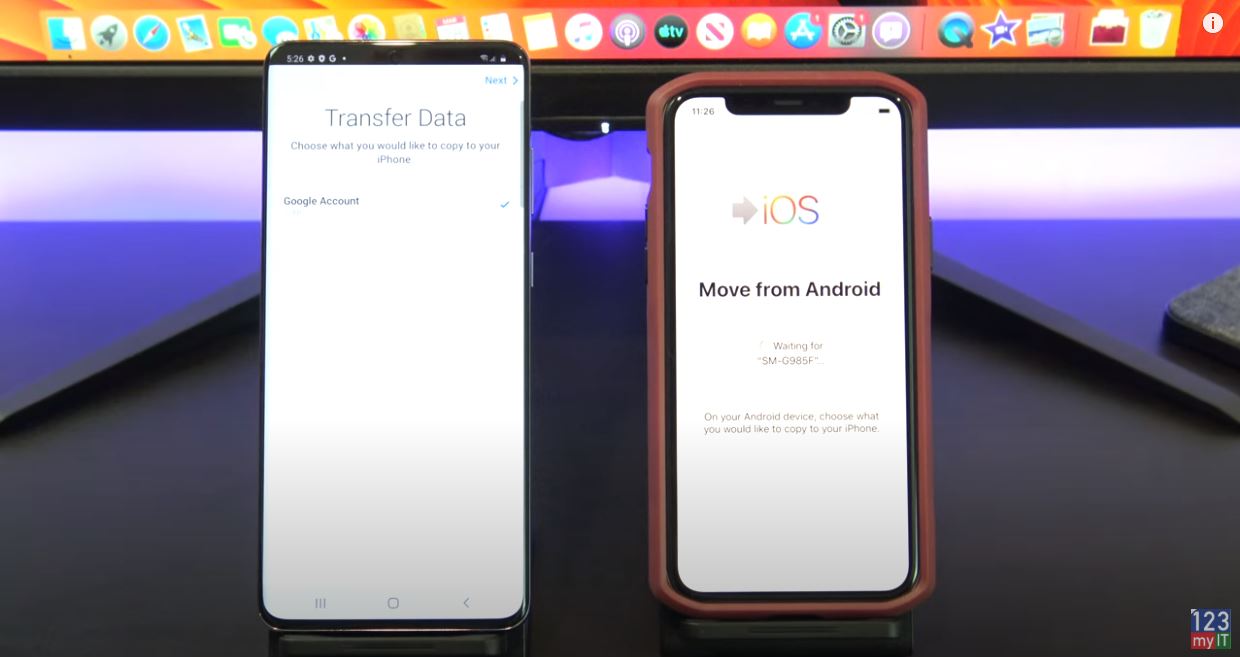
Android to iphone 2020 – Select what you want to transfer.
Ok great you are on the transfer data screen just deselect anything you don’t want to transfer and press next. Cool your data is transferred now. Tap done on your Android phone and you can close the app. On your iPhone tap, continue setting up iPhone. Go ahead and set up your iPhone.
Awesome the last step here is to install your free apps. To do this you will need your Apple iD. Just tap add apps and then tap use existing apple id. And your iPhone will download all your free apps for you.
If you swipe across you should see all your apps start to appear. You can also check if your if you photos messages and video copied across.
Hi Guys and welcome to 123myit, in this video I will show you how to Transfer your data from Android to Pixel 4.
Ok guys this video will show you the official way to
transfer all your data from Android to Pixel 4.
This is helpful if you just got your Pixel 4 phone and you want to move all your Texts ,Messages, contacts, calendars, photos, videos, free apps and music to your Pixel 4.
Ok guys lets get started. If you have a new pixel 4 then you will see this start screen. However if you have already setup your phone then you will need to reset the Pixel 4 back to factory defaults.
Reset your Pixel 4 phone.
We can do this under settings > System and Advanced then
reset options. Just remember if already have data on your Pixel phone this will
wipe that data. So make sure you backup that data before doing the factory
reset. Go ahead and Erase all data again and confirm it.
All right, that will set your Pixel 4 back to factory
defaults and you will be able to start the Transfer from Android.
Also guys I get asked
this question all the time will it transfer App Data. The answer is Yes. Will
it transfer Paid apps. Again the answer is Yes.
Alright so we are back at the Start screen so just hit
Start. Now if you have your sim you can put it In now. Otherwise you can hit
skip. You don’t need a sim to Transfer data. Next connect your WIFI. This is
important because the Pixel 4 will download the updated Transfer software.
Once connected the Pixel will check for that software I
mentioned. Ok just tap next. And tap next again and then it will ask you for
your old phone. Make sure you remove your passcode or any security features on
your Android Phone. You will also need your old phone cable.
Plug in your two phones
Using the USB C adapter to move the data
The Pixel 4 should have a USB to USB C adapter, plug the
other end into your old phone USB cable and then plug the adapter end into your
Pixel 4.
Now go ahead and plug both phones into each other to start
the transfer.
Tap Copy on your old
Android Phone. Ok cool, the Pixel 4 will give you a summary of what you can
transfer.
Just untick any data that you don’t want to transfer and tap
copy. Also if you copying fails, try this method again but maybe try a small
transfer first like contacts. Double check you don’t have any security options
like passcodes that could block the transfer. Congratulations you just copied
your data tap on next and unplug your phones. Follow the prompts of your phone.
Your Pixel 4 should show you a confirmation of the data you
have copied. Alright you all done. Check your data and you are good to go.
Also guys don’t forget to check out my other videos such as Transfer data from iPhone to Pixel 4. And do me a favour hit the subscribe button and smash the bell icon.
Hi Guys and welcome to 123myit, in this video I will show you how to Transfer your data from iPhone to Pixel 4. Ok guys in this video we will show you the official way to transfer all your data from iPhone to Pixel 4. This is helpful if you just got your Pixel 4 phone and you want to move all your Texts ,Messages, contacts, calendars, photos, videos, free apps and music to your Pixel 4.
Ok guys lets get started. If you have a new pixel 4 then you
will see this start screen. However if you have already setup your phone then
you will need to reset the Pixel 4 back to factory defaults.
System and Advanced
We can do this under settings > System and Advanced. Just
remember if already have data on your Pixel phone this will wipe that data. So
make sure you backup that data before doing the factory reset. Under reset
options now and we want to tap on Erase all data. Go ahead and Erase all data
again and confirm it.
Alright that will set your Pixel 4 back to factory defaults
and you will be able to start the Transfer from iPhone. Also guys I get asked
this question all the time will it transfer App Data. The answer is No unless
it’s a cloud based App that stores your data for you. Will it transfer Paid
apps. Again the answer is no. iPhone and Android are two different platforms.
Having said that I am sure there is 3rd party apps out there that
might do it, however that’s not part of this video.
Alright so we are back at the Start screen so just hit
Start. Now if you have your sim you can put it In now. Otherwise you can hit
skip. You don’t need a sim to Transfer data. Next connect your WIFI. This is
important because the Pixel 4 will download the updated Transfer software.
Once connected the Pixel will check for that software I
mentioned. Ok just tap next. And tap next again and then it will ask you for
your old phone. Make sure you remove your passcode or any security features on
your iPhone. You will also need your old phone cable.
Using the USB to USB C Adapter
Use the USB to USB C cable to connect the two phones.
The Pixel 4 should have a USB to USB C adapter plug the
other end into your old phone USB cable and then plug the adapter end into your
Pixel 4. Now go ahead and plug both phones into each other to start the
transfer. You can sign into google if you want or just skip it. And just tap
Trust of your iPhone if it prompts on your screen. Alright phones are connected
tap Next. You can enter your Google account or just hit skip. Ok right now the
Pixel 4 will check what data you have on your iPhone that it can transfer. Ok
cool, the Pixel 4 will give you a summary of what you can transfer. Just untick
any data that you don’t want to transfer and tap copy. Also if you copying
fails, try this method again but maybe try a small transfer first like
contacts. Double check you don’t have any security options like passcodes that
could block the transfer. Congratulations you just copied your data tap on next
and unplug your phones. Follow the prompts of your phone.
Your Pixel 4 should show you a confirmation of the data you have copied. Alright you all done. Check your data and you are good to go. Also guys don’t forget to check out my other videos such as Pixel 4 unboxing and first look. And do me a favour hit the subscribe button and smash the bell icon.
Hi guys and welcome to 123myIT. In this video we take a first look at the Google Pixel 4 Unboxing. Check out the Pixel 4 on Amazon here 👉 https://amzn.to/30Bb6QU
Prices for the Pixel 4 start at $799 us and it is $100
cheaper than the Pixel 4 XL. And the main new features for the Pixel 4 over the
Pixel 3 are a new bigger OLED display which has improved refresh rate up to
90hz. As well as 6 GB of Ram and a new Snapdragon 855 processor.
And of course it launches with Android 10 right of the bat.
Pixel 4 Unboxing – Right out of the Box!
All right guys let’s get to the unboxing and take a look what’s inside. So the first thing we see when doing the Google Pixel 4 Unboxing is the phone itself wrapped in plastic. And the colour I got is the clearly white, but it is also available in Just Black and Oh So Orange.
Under the phone we have the pretty standard documentation.
This includes a SIM eject tool and user guide on how to setup your Pixel.
Next up we have a set of Google Pixel USB-C earbuds and
there is an adjustable loop on the earbuds which allows you to set the size of
your ear so they grip to the inside of your ear better. Also included is a USB C cable and adapter
for charging the phone. This adapter has the Australia new Zealand plug.
However if you are in the US you will have the US adapter. You will also get a
USB C to USB adapter plug. This is helpful when transferring content with the a
USB cable.
Design
The pixel 4 is a decent looking phone. I actually like the
design of it. It has a low key clean look. It has matt black rails that go all
the way around the side of the phone. No markings along the back just the
Google G at the bottom and at the top a black square which contains the rear
facing camera. As well as the coloured power button on every version.
Google Pixel 4 Unboxing – Display
The screen on the Pixel 4 is bigger than the Pixel 3 going
from 5.5 inches to 5.7 inches. Its also got more rounded corners and it doesn’t
include the annoying notch that some other phones have.
The Screen
It’s a FHD+ flexible OLED display at 444 pixels per inch and
contains another big upgrade which is called Smooth Display. Smooth Display
refreshes the display at 90 Hz instead of the normal 60 Hz this means the
scrolling and movement of the screen will look somewhat smoother than normal.
The downside to high refresh rate is the battery life. More power is needed to
refresh the screen more often and thus this feature has been blamed for the
Pixel 4s poor battery life.
Playing Games!
You can turn this feature off at least under the Advanced Display
settings. I found it hard to tell the difference when looking at the phone in
person so maybe this isn’t such a big deal for normal use.
The phone doesn’t have a finger print sensor which I thought
would be quite annoying. But it does have the fastest face unlock of any smart
phone. It does this by detecting movement
earlier with a little sensor called Motion Sense. This sensor detects moment
early and prepares the phone to detect a face. Once it detects your face the
phone unlocks it works really well.
Motion Sense
You can turn Motion Sense off under Settings System and you
can also use this feature to skip songs, silence /snooze alarms and silence
phone calls.
On the right hand side you have a coloured sleep wake power
button. The colour will be different depending on which colour you buy. And
below that you have the volume up and down buttons. On the left side you have
the sim card slot. If you eject the slot you will see a little rubber seal
which keeps water out and makes the phone dust and water resistant. This gives
the pixel its IP68 water resistant rating.
On the bottom the speaker slots are lined up nicely with the
USB type C port. On the top of the pixel there is allot of action going on however its
mostly hidden so the best way to show you is with a picture. You have a Face
unlock IR Camera, 8 mega pixel Front facing camera, Ambient light Proximity
sensor, Audio port, Soli radar chip, Face unlock dot Projector, Face unlock IR
Camera and Face unlock Flood illuminator.
Audio
The speakers sound really good and here’s a quick sample.
Good for Movies!
The specs for the Pixel 4 are similar to the Pixel 4 XL they
both have the Snapdragon 855 cpu and 6 GB of Ram. Of course to view video on
the screen and play games you will need to help of a GPU and the Pixel 4 comes
with the Adreno 640 chip. This also gives us a pretty solid improvement over
the Pixel 3. Both the Pixel 4 and XL come with a storage options of 64 GB or
128 GB.
Battery
Battery size has been downgraded from a 2915 mAh battery on
the Pixel 3 to a 2800 mAh battery on the Pixel 4. Its disappointing to say the
least as the battery doesn’t seem to last as long as it should.
Camera
In terms of the two cameras on the back of the Pixel 4 you
have a 12.2 mega pixel, dual pixel rear camera with a 1.7 aperture. And you
also have a 16 mega pixel telephoto camera with a f 2.5 aperture. Testing out
the Super Res Zoom on the camera and it does a good job zooming down the street.
The Telephoto camera only has a 2x optical zoom this mean the rest of the zoom
is handled by the Super Res Zoom.
The camera also has some neat new sliders for exposure and shadows
adjustment. And as you can see here I change the exposure and shadows on the
fly. Even when objects are closer the camera does a really good job keeping all
the detail.
Lets take a quick look at the camera settings. At the bottom
we have different modes. Night sight for night photos. Portrait mode for
Portrait photos. The regular camera mode and a Video mode. We also have a more setting which opens up Panorama
mode. Photo sphere which is a 360 degree Panorama feature. Slow motion and time
lapse mode. Playground mode which allows
you to put object within other photos.
Google Lens
And the last one is Google Lens which allows you to take
photo and then it will return a Google search on the object that you photograph.
As for video it will do 720p 1080p and 4K, but you will need to turn on the 4K
feature in settings.
Don’t forget the Pixel 4 also support wireless charging.
When using the pad you might need to ajust the phone slightly until it makes a
connection.
Overall the Pixel 4 is a great phone, but I find it hard to recommend
because of the small battery. I also found the software at times buggy, like
when using the zoom on the camera and for no reason it would flick back to the
home screen. I can imagine this happening when you are about to capture that
special moment. Very frustrating.
Also guys don’t forget to check out my other videos such as Backup & restore WhatsApp messages on Android. And do me a favour hit the subscribe button and smash the bell icon.
Hi Guys and welcome to 123, in this video I will show you how to do a backup of WhatsApp on Android via Google drive.
Ok guys so this is the Official way that WhatsApp recommends for you to do a backup and restore WhatsApp on Android. You can also do a manually backup and restore from SD card and Computer. However, this video will be a backup via Google drive.
Let’s get started.
Backup your WhatsApp
You will need a Google account to Back up the WhatsApp to
Google drive. This should not be a problem because to download WhatsApp from
the Google play store, you would have had to use a Google account anyway. You can add your Google account under settings,
accounts and sync otherwise if that’s too confusing you can just go into the
play store and log in there.
Chat Backup on WhatsApp
Just tap sign in and the Google play store will add the
Google account for you whether you like it or not. If you want to back up your
whole phone to Google drive then leave the backup & storage on. However,
this setting does not affect the WhatsApp backup so I am going to turn it off
and tap accept.
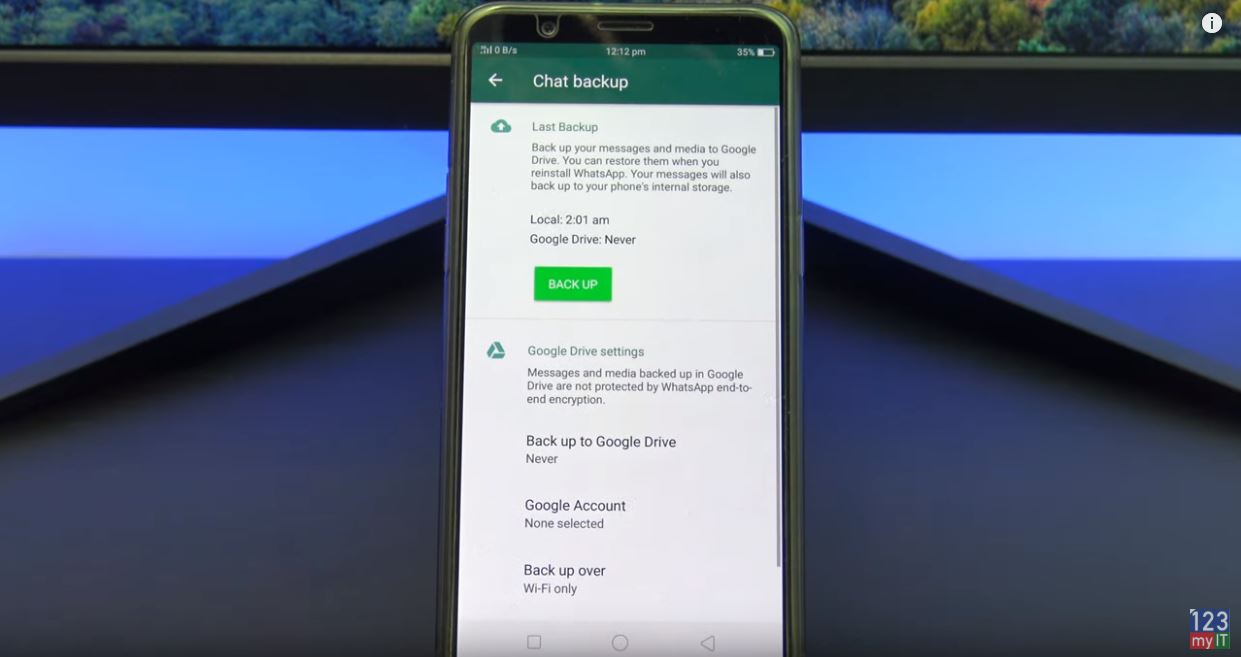
Alright we are logged in now, lets go into WhatsApp. In the top right hand corner you should see three little dots. Tap on that. And then press settings. Tap on Chats, backup, history, wallpaper. Tap on Chat backup.
Google Drive Backup
Now you will have a few options here. Go to where it says
Back up to Google Drive. And then we want to change that from never to only when
I tap backup. Choose the Gmail account you want to use for the backup. Next up
tap allow. Scroll down and tap on Back up over wifi only. Make sure you select
wifi only otherwise it could eat up your cellular data. And the last option is
include videos in your backup. Turn this on if you want to backup large video
files.
Press the Big green Back UP botton to start backing up all
your WhatsApp data. Here I get a message warning me that I am not on wifi so I
will turn my wifi on real quick.
Once this is done I hit back up again and wait for it to
complete. Depending on how much data you have it might take a while. Make sure
to confirm that the back up is there.
Now if you are moving to a new phone you will need to move
your sim first. This is because your sim stores your contacts and phone numbers
and WhatsApp needs these to attach the phone numbers with your messages.
On your new Android phone you need to install WhatsApp from
the Google play store.
Tap install. Once your WhatsApp is installed open it up. Tap
on Agree and Continue and then enter in your phone number. Go ahead and verify
your phone number.
Restore Whatsapp on Android
Hit continue and then allow WhatsApp access to your Contacts
and photos and media files. Awesome you have made it this far, now you should
see the message to restore from the backup you made earlier today. Alright you
can see that 11 000 messages have been restored. Tap next fill out your name
and you are done. All too easy!
Hi Guys and welcome to 123, in this video we will show you how to Transfer data from Android to iPhone in 2019.
Android to iPhone 2019 – What can you transfer?
This video will help you transfer Contacts, Message history, Camera photos and videos, Web Bookmarks, Mail Accounts, Calendars and Free apps. The first step is to reset your iPhone, if you don’t want to reset your iPhone then you will have to Transfer the data manually. I plan to do some videos on this method so hit subscribe.
Ok you can go into Settings > General and scroll down to reset. Once you are there tap on Erase content and settings. Next tap Erase iPhone. Once your iPhone has reset itself just follow the prompts and start setting it up.
Connect to your WIFI
Next up connect to your WIFI. Make sure that your Android device is connected to the same WIFI. Continue setting up your iPhone until you get to the apps and DATA screen.
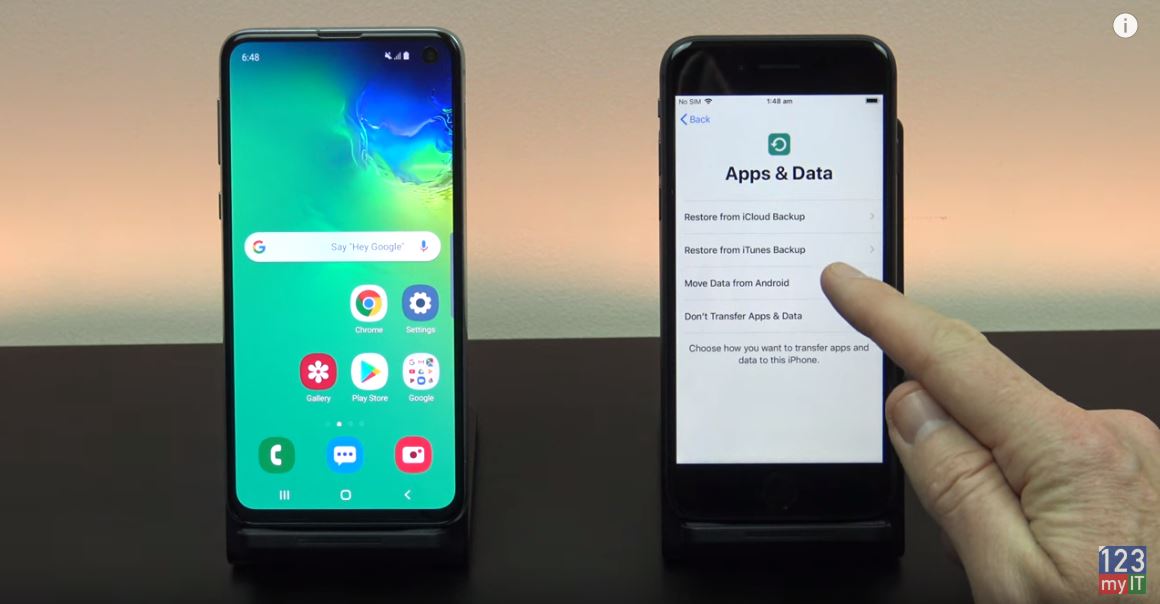
Apps & data screen.
Tap move data from Android. Before you hit continue, Go to your Android phone and download the Move to iOS app from the Google Play store.
Tap continue on your iPhone and Continue on your Android device. Agree and hit next. On your Android device type in the code that you see on your iPhone. Your devices should now connect and move to a Transfer data screen. If you get the error message Could not communicate with the device. I have already done a video on how to fix this and I will put a link in the top of the video now.
Select the data you want to Transfer
Alright good job you are on the Transfer data screen just deselect anything you don’t want to transfer and press next. Cool all your data is transferred now, tap continue setting up iPhone. Go ahead and setup your iPhone.
Awesome the last step here is to install your free apps. To do this you will need your Apple id. Just tap use exsiting Apple ID and your iPhone will download all the free apps for you.
If you swipe across you should see all your apps start to appear. Also guys don’t forget to check out my other videos like Fix could not communicate with the device error and do me a favour hit subscribe and smash the bell icon.
If you are getting the error Could not communicate with the device when using the Move to iOS app. This video can help. If you have a new iPhone like the iPhone 11 and you are transfering your data via the move to iOS app. You might get the Could not communicate the with device. here’s how you can fix it.
Could not communicate – Move to IOS
If you not familiar with the move to iOS app don’t worry I will have two new videos coming out shortly so keep checking this website, or subscribe on our YouTube page for updates. So here I will show you that I am trying to transfer data from Android to iPhone and I am getting the Could not communicate with the device error.
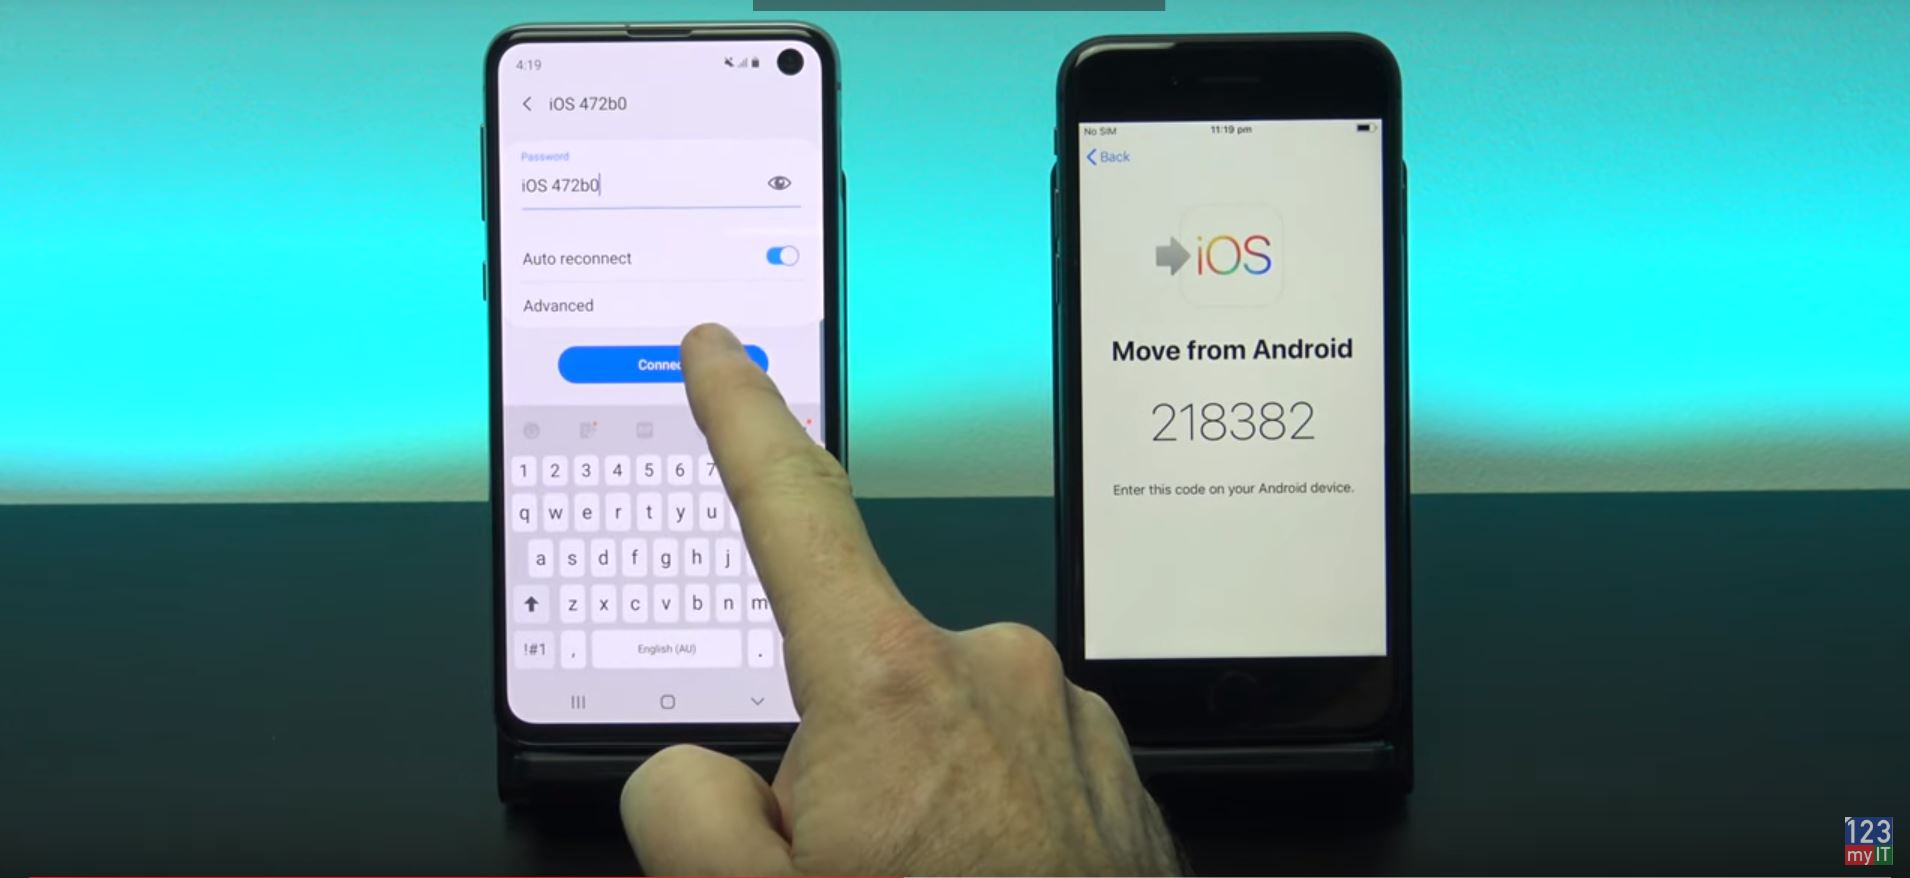
You will need to connect the Android phone to the iPhone manually. To do this go into the WIFI settings and find the iPhone WIFI. The iPhone WIFI will come up as iOS and then a random number, tap on that to connect to it.
Connecting the Android phone to the iPhone WIFI
Enter the iPhone WIFI password
Next enter the WIFI name as the WIFI password. Make sure you use upper and lower case. When you are done double check you have entered it right and hit connect. On the next screen make sure you are connected to the iPhone WIFI and restart the Move to iOS apps on both phones.
Next up on your Android phone enter the code that is displayed on your iPhone. There you go now the Could not communicate with the device error is gone and your phones have moved to the next step Data Transfer.
Simply untick and data you dont want to transfer and hit next. Hit Done on your Android phone. And now just continue along with the Move to iOS prompts to setup your new iPhone. Thats it you have now got past the Could not communicate with the device error.
Also Guys dont to check out my other videos like iPhone battery drain and do me a favor hit the Subscribe button and smash the bell icon.